
Page History
...
- In the Detection settings window, on the Select area tab, click the Stop video button to pause the video.

- To add a new detection zone, click on a free area of the video image (1) and use the mouse to determine its boundaries. The new zone will be added to the list to the right of the video image.
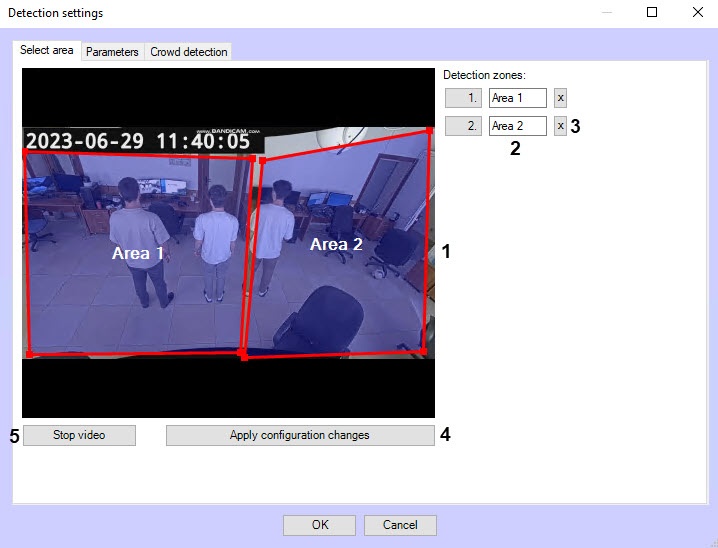
- To rename a detection zone, enter a new name in field 2. The new name will appear in the zone label on the video image.
- You can change the boundaries of the detection zone using the mouse by clicking on its number in the list on the right, and the number of the selected zone will be highlighted in blue.
- To delete a detection zone, click the
 button
  button to the right of the zone name (3).
 - To save all changes, click the Apply configuration changes button (4).
- To start video playback, click the Start video button (5).
...
- Go to the Parameters tab of the detection tool settings window. This tab displays the parameters of the used configuration. If you do not need to change the configuration, skip steps 2 and 3 and go to the next tab.

- To use custom configuration, click the Load configuration from file button.
- In the standard Windows search window that opens, specify the path to the configuration file in JSON format.
...
- Go to the Crowd detection tab.

- In the Head size [0.3, 1] field, indicate which portion of the video image height is the human head in the range 0.3—1 (1).
In the Occupancy field (2), specify in percent the share of the detection zone area, which should be filled in order for the detection tool to record the beginning of the Crowd event. If the occupancy remains longer than the time threshold specified in the Reaction time field (3), an alarm event Crowd is generated on the detection tool.
In the Reaction time field (3), specify in seconds the time interval after which an alarm event Crowd will be generated on the detection tool if the value of the Occupancy parameter (2) remains equal to or above the set threshold. If during the specified period of time the value of this parameter drops below the threshold value, then the time counting stops and the counter is reset to zero.
In the Time between alarms field (4), specify in seconds the frequency of the Crowd alarm event generation.
- Set the Background loading checkbox (5) if it is necessary to load the background of the video image; by default, the checkbox is clear.
- Set the Background saving checkbox (6) if it is necessary to save the background of the video image for the period of time specified in the Background saving period field. By default, the checkbox is clear.
- In the Background saving period (sec.) field (7), specify the period of time in seconds during which the background of the video image is saved. The default value is 0.
- In the Number of analytics streams field (8), specify the number of video streams that will be used for neural network analytics. The default value is 4.
- To save the detection tool settings, click OK.
- To save the changes, click the Apply button on the settings panel of the VideoIntellect detection of crowd object.
...
Overview
Content Tools