...
- Go to the settings panel of the Fight detector object that is created on the basis of the Camera object on the Hardware tab of the System settings window.
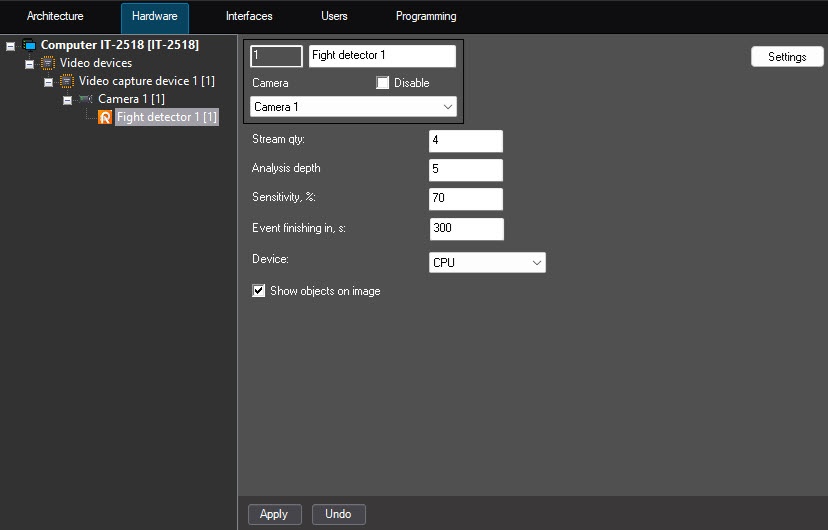
- In the Stream qty field, enter the maximum number of recognition streams. If the value is 0, the recognition process occurs in the same stream that starts it. The value must be in the range [0, 100]. The default value is 4.
- In the Analysis depth field, enter the number of recent events from the detector that will be taken into account when checking the recognition threshold. The value must be in the range [1, 20]. The default value is 5.
- In the Sensitivity, % field, enter the threshold value in the range [0, 100] at which behavior is recognized as a fight. The higher the value, the higher the chance of detecting mild signs of a fight. The default value is 70.
- In the Event finishing in, s field, enter the period in seconds during which the fights that are recognized once again are ignored. The value must be in the range [1, 3600]. The default value is 300.
- From the Device drop-down list, select the device on which the neural network will operate: CPU (default) or one of the GPUs: NVIDIA GPU0, NVIDIA GPU1, NVIDIA GPU2, NVIDIA GPU3.
| Note |
|---|
|
- If you select a processor other than the CPU, the major part of the computing load will be performed on that device. The CPU will also be used for detector operation.
- It can take several minutes to launch the algorithm on the NVIDIA GPU after you apply the settings. You can use caching to speed up future launches (see Configuring the speedup of neural analytics launch on GPU).
|
- Set
the - the Show objects on image checkbox to outline the detection area with a red frame on the video surveillance monitor when the camera status changes. The detection area is the entire video image.
- Click the Settings button. The Detection settings window opens.
- Click the Stop video button to pause playback and capture a frame of the video image.
- Click the Area of interest button to specify the detection area. The button is highlighted in blue.
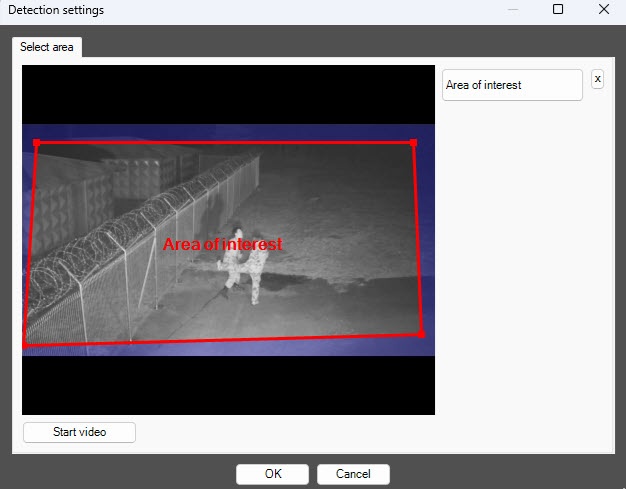 Image Modified
- On the captured video frame, use the mouse to sequentially set the anchor points of the area in which objects are detected. The rest of the frame is faded. If you don't specify the area of interest, the entire frame is analyzed.
| Info |
|---|
|
You can add only one area. If you try to add a second area, the first area is deleted. To delete an area, click the  Image Modified button to the right of the Area of interest button. Image Modified button to the right of the Area of interest button. |
- Click the OK button to close the Detection settings window and return to the settings panel of the detector.
Configuration of the Fight detector is complete.


