
Go to documentation repository


Page History
Configure the basic settings of the Face Detection module as module as follows:
- Go to the
- the Basic settings tab
- tab on the settings panel of the
- the Face Detection object
- object.
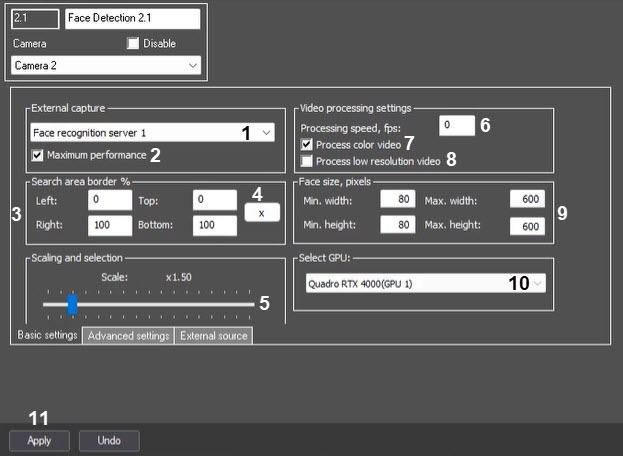
There are several variations of the face detection operation depending on the setting of the external capture and Face recognition server (1):
- External capture is NOT selected, and the detection is NOT added to any channel of the Face recognition server
channels- . In this case, faces are captured by Axxon PSIM face capturing, and vectors aren't generated. This option isn't used in Face PSIM.
- External capture is NOT selected, but the detection is added to
any - some channel of the Face recognition server
channels- . In this case, the photos of captured faces are captured and saved
by - by Axxon PSIM face capturing, the vectors are generated and saved to the database.
This option does not allow face recognition (the - Face recognition, search and visitor counting are available
)- with this option.
- External capture is selected, but the detection is NOT added to any channel of the Face recognition server
channels- . In this case, the photos of faces captured by the face recognition modules (see Structure of the Face PSIM software package) are captured and saved, and the vectors are generated, but the vectors
are not - aren't saved to the database. This option is only suitable for use in scripts.
External capture is selected, and the detection is added to any channel of the Face recognition server
channels. In this case, the photos of faces captured by the face recognition modules (
see see Structure of the Face PSIM software package) are captured and saved, and the vectors are generated and saved to the database.
The We recommend using the external capture
is recommended for use. From
the the External capture drop-down list, select the Face recognition server that will capture faces with the
help of which the face capturing with the subsequent generation of a vector (if
the the Create FIR in detection unit checkbox is set on the settings panel of the corresponding Face recognition server
object—see object—see Configuring the Face recognition server object) and saving of photos
will be performed..
- The Maximum performance mode is enabled by default (2). This mode allows improving the quality of face capture and recognition by using all available processor cores and increasing the RAM consumption. When
- If you disable this mode is disabled
- , the memory consumption will decrease
- decreases, but faces can be missed at capturing
- when capturing.
Info title Note When you use VL recognition module face recognizer, the Maximum performance checkbox is cleared automatically, and the setting becomes inactive when you select the Face recognition server in the previous step. This is due to the feature of this recognizer.
Set the border of the face search area
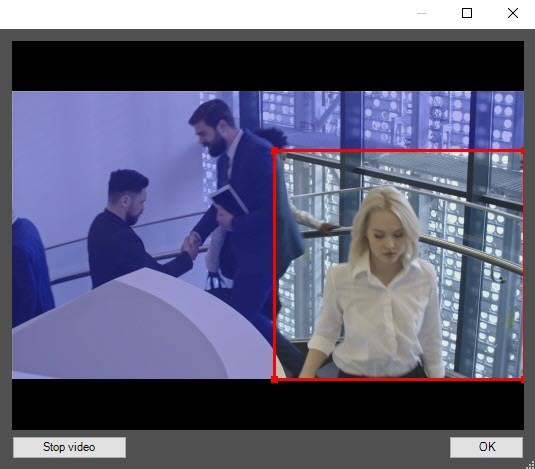
border on the video image by specifying the required values in percent in the corresponding fields (3), or by clicking the button (4) and using the interactive interface. After you click the button, the window with the corresponding video camera image
will openopens. To set the border of the face search area
border, click :
Click the Stop video button
at the required time, select .
Select the required area using the left mouse button
, and then click .
Click the OK button.
The specified face The values of the specified border of the face search area
border values will will be automatically entered in
the the Left, Right, Top and Bottom fields of the Search area border % group.
Note title Attention! Setting the border of the face search area
border is available only
if for the
VA or VideoIntellect 1.1 face recognition modules are usedRecognition module VA and Recognition module VI face recognition modules.
- Set the Scaling and selection slider (5) to the position corresponding to the required scale of the captured face in the frame for recording and highlighting the face with a dynamic frame. The current scale value is displayed in the field above the slider and ranges from 1 (only the captured face is recorded) to 5 (the whole frame is recorded).
- In the Processing speed, fps field (6), specify how many FPS from the video stream are processed by the Face detection program module. This parameter is necessary for reducing the load on the Server
- server.
If it is necessary to convert the color video image to a black-and-white image to generate the vectors by the black-and-white frames, then clear the Process color video checkbox (7).
Note title Attention! Generation of vectors by black-and-white frames is supported by
VA and VideoIntellect 1.1 face recognition modules onlythe Recognition module VA and Recognition module VI only. It reduces the CPU load, insignificantly affecting the face capture and recognition quality.
By default, the Face
detection tool detector processes a video with the resolution set for the Camera
parent parent object. To process a video with 320x240
pixels pixel resolution, set the Process low resolution video checkbox (8).
Info title Note - Enabling this option reduces the load
of - on the
Server’s - server processor, but the probability of face capture also reduces.
- The Process low resolution video setting
is not relevant in case, - isn't relevant when a high resolution is set for the Camera parent object. Also, this
settings - setting isn't used if the Recognition module VA or
VideoIntellect 1.1 module is applied for face capture- Recognition module VI module is used to capture a face.
Set the minimum and maximum width and height of the face on the video image in pixels in the corresponding fields of the Face size, pixels group (9).
Info title Note - If the specified minimum dimensions differ significantly from the actual ones, then the faces
will not be captured.- won't be recognized by the detector. For example, if the video contains large faces (15-30%), then if you set the minimum size to 5%
, - and the maximum size to 80%,
then - then the faces
will not - won't be detected. However, if you specify a minimum size of 12% and a maximum size of 80%,
the - faces will be
captured- detected.
- Thus, if the
detection tool - detector is configured to capture small faces, then it cannot detect large ones, and vice versa.
- If all parameters of face
sizes - size are set to 0, the Face Detection
tool - module uses similar parameters
set on the - specified on the settings panel of the Face recognition server
object settings panel - object (see Configuring the
captured - If you use the VL recognition module, the minimum and maximum values for all face
detection tools should - detectors must be the same, as the values are set for the entire software module.
- From the Select GPU drop-down list (10), select a video card for recognition for the Recognition module VA and VL recognition module. The Use GPU checkbox must be set on the settings panel of the Face recognition server object (see Configuring the recognition parameters of captured faces).
Note title Attention! All GPUs with Pascal architecture are not supported by the Recognition module VA; if you select such a graphics card, faces will not be recognized.
- To save the changes, click the Apply button ( 10)
- 11).
| title | Note |
|---|
| title | Note |
|---|
Configuration of the basic settings of the Face Detection module is complete.
Overview
Content Tools