Versions Compared

Key

  • This line was added.
  • This line was removed.
  • Formatting was changed.
Info
titleNote

You can use templates when you create a report.

To add a new template, click Report templatesNew template and fill in the Name and Description fields. The template will use the selected parameters of the current report.

Templates work the same way as templates in the scheduler and can be used interchangeably.

When you create a response using a template, click Report templates at the top of the page and select the required template from the list of saved templates (the required template is highlighted). As a result, the parameters of the current report are updated according to the selected template.

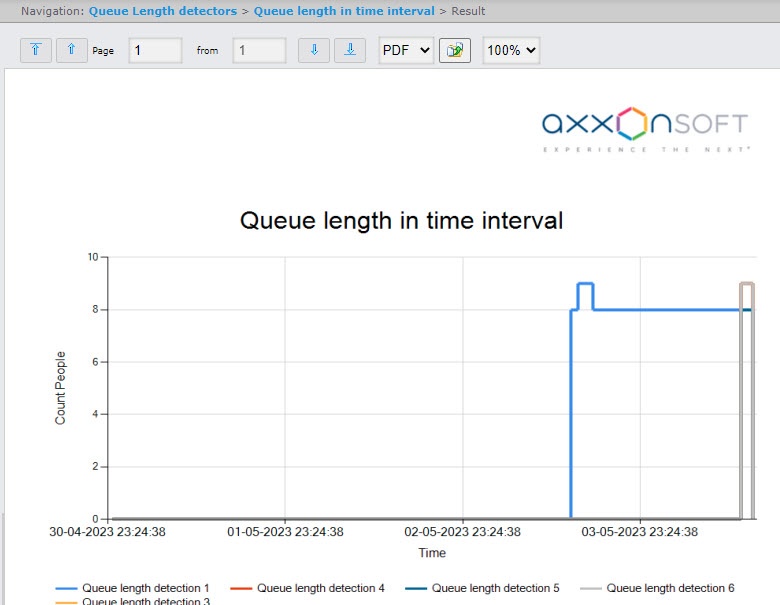
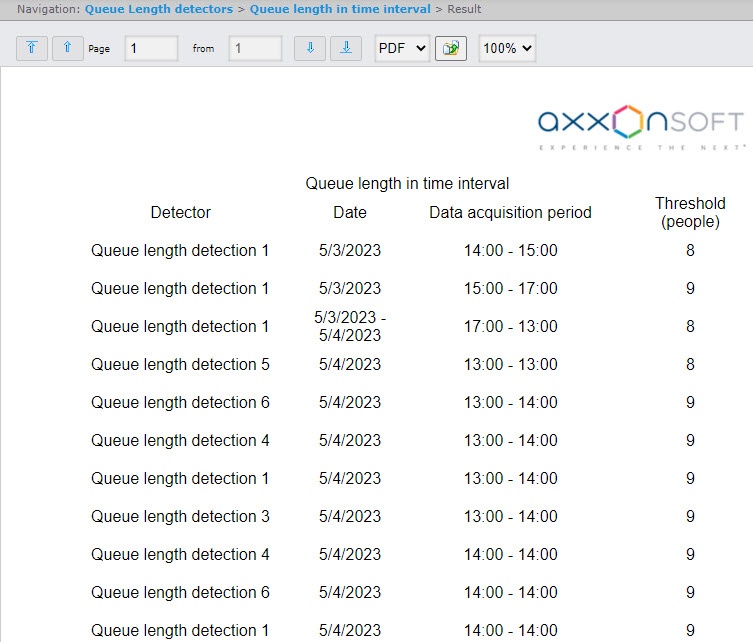
The Queue length in time interval report provides the information on the queue length in time interval. The data can be presented in the form of a chart or a table.

Info
titleNote

The Queue length in time interval report is a part of the Queue Length Detector module (length detection module, it is necessary to create and configure the corresponding object in Axxon PSIMDetectorPack PSIM (see Configuring the Queue length detection module).

To create the Queue length in time interval report, do the following:
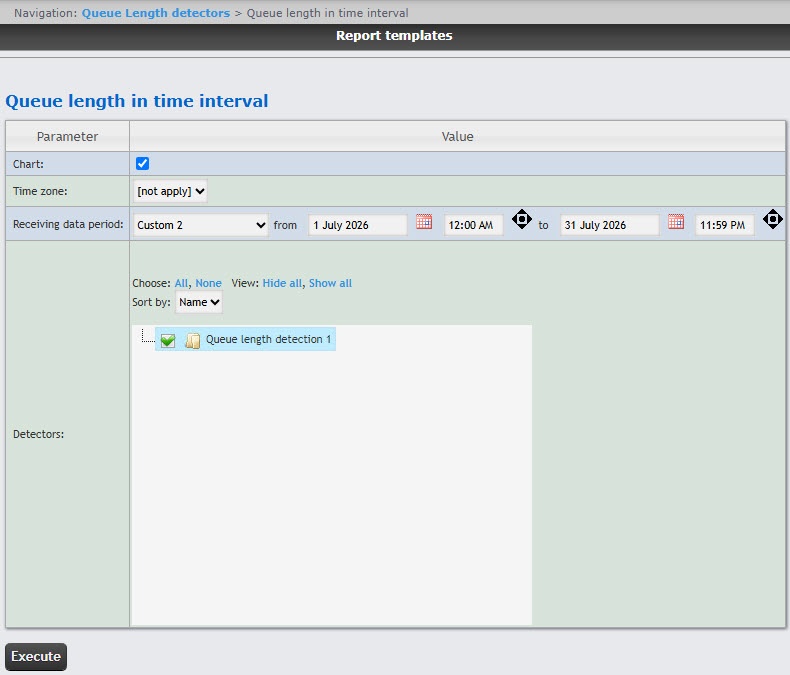
  1. Select the Queue length in time interval report type (see Selecting a Select the type of reports by Queue Length detectors ). As a result, the dialog box for specifying the report parameters will be displayedreports).
  2. Set the Chart
  3.  
  4. checkbox
  5. (1), if it is necessary to display the report
  6. if you want to create the report in the form of a chart.
  7. 2)
  8. From the Time zone drop-down list

  9. (
  10. , select the time zone for which the report

  11. should
  12. must be created.

    Info
    titleNote

    You can select time zones created in Axxon PSIM that have only one time period and don't have any nested time periods. You cannot select days of the week. For detailed information about creation and using time zones, see Creating and using time schedules.

  13. From the Receiving data period drop-down list
  14. (3)
  15. , select the time period for which the report
  16. should
  17. must be created.
    1. If you select the Custom or Custom 2 time period
  18. is selected
    1. ,
  19. enter the
    1. enter the start and end dates of
  20. the time
    1. the time period for which the report
  21. should
    1. must be created in the from and to fields using the Calendar tool.
  22. Click
    1. If you select the
  23. Image Removed button near the corresponding field to use the Calendar tool. It is also necessary to enter the time of start and end periods using the Image Removed button
    1.  Custom 2 period, additionally enter the start and end time of the period.
  24. In the Detectors field
  25. (4)
  26. , set the checkboxes next to those Queue length detection objects
  27. which information should be displayed
  28. whose information you want to include in the report. Click All to select all
  29. found/
  30. available detectors
  31. . Click
  32. , click None to deselect. Click Show all to expand the
  33. detectors
  34. detector structure. Click Hide all to hide the
  35. detectors structure
  36. structure.
  37. By default, the list of detectors is sorted by name. To sort by number, select this option from the Sort by drop-down list.
  38. To create
  39. a
  40. the report, click the Execute button
  41. (5)
  42. .
    As a result, the report by the queue length in time interval with the specified parameters
  43. will be
  44. is displayed. The data is displayed with averaging depending on the selected time interval. If you select more than 14 days, the data averaging is one day. If you select from one day to 14 days, the data averaging is one hour. If you select less than one day, the data averaging is one minute.

Example of the report in the form of a table:.
Example of the report in the form of a chart:.