
Go to documentation repository
Previous page Next page
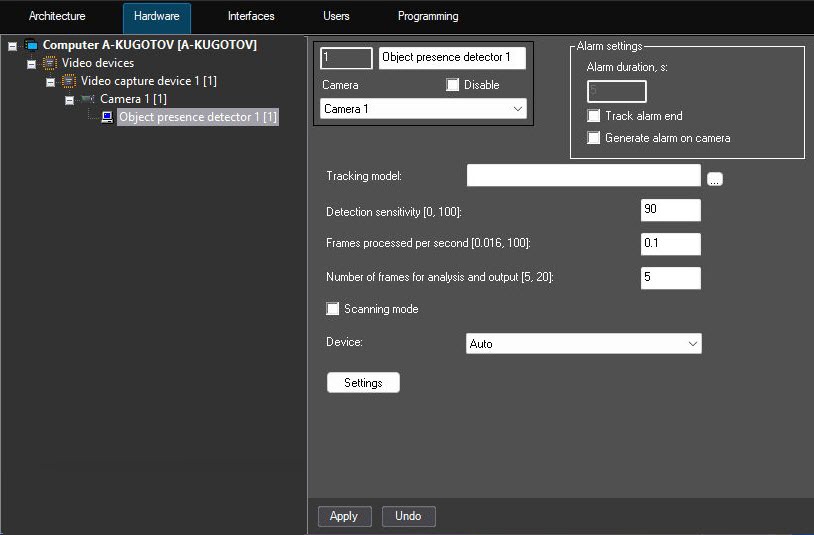
To configure the Object presence detector module:
Note
If you set the Track alarm end checkbox, the events about the end of object presence are received after the time specified in the Alarm duration, s setting. If, until the end of this period, the current object presence is completed and the new one is detected, the detector doesn't generate events about completing the current and starting the new alarm. The new object presence event is received after the current alarm is completed.
 button to the right of the Tracking model field, and in the standard Windows Explorer window that opens, select the file of the trained neural network (for information on how to train neural networks, see Starting training and retrieving results).
Attention!
The service trains neural networks to work with specific camera angles and objects. It's important to note that a neural network trained on one scene is not intended for use in another, even if they appear visually similar. In such cases, the accuracy and performance of the neural network are not guaranteed.
In the Detection sensitivity [0, 100] field, enter the detector sensitivity—an integer value in the range from 0 to 100. This parameter determines the level of reliability at which an alarm is generated when object presence is detected: the higher the sensitivity, the higher the recognition threshold. For example, at sensitivity 100, the neural network of the detector must get 100% certainty for some period of time during the frame processing. The value of the Detection sensitivity field is determined experimentally.
In the Number of frames for analysis and output [5, 20] field, enter the minimum number of frames in the range from 5 to 20 for the detector to analyze before generating an alarm. The higher the value, the more reliable the result of the detector operation. At the same time, if the value is too high, the short-term presence of an object can be missed. If you enter a value less than the minimum, the value is set to 5.
Note
You cannot configure the scanning windows for the Object presence detector module. The default parameters are used.
When you use the scanning mode, we recommend using a full frame without specifying the area of interest in step 11.
Attention!
In the Detector Pack subsystem of version 2.0, the support of Intel HDDL is removed, therefore, when you update from version 1.0, the Not supported option is selected automatically instead of this device variant, and detectors don't operate. To resume the detector operation, select the required device from the list.
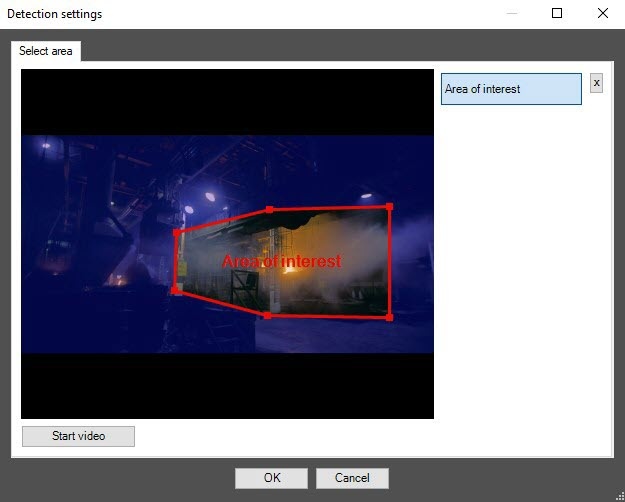
On the captured video frame, sequentially set the anchor points of the area the situation in which you want to analyze using the left mouse button. After you add the area, the remaining part of the video image is darkened. If you don't specify the area of interest, the entire frame is analyzed.
Note
To remove the area, click the  button next to the Area of interest button.
You can add only one area. If you try to add the second area, the first area is deleted.
Note
To use the asynchronous hardware decoder and reduce CPU load, set the Use decoder NGP (GPU+CPU) checkbox on the settings panel of the camera (see Enable asynchronous hardware decoder NGP (GPU+CPU)). Then click the Apply button on the settings panel of the detector. Video decoding is now performed using the GPU (for more information, see Asynchronous hardware decoder NGP).
Configuration of the Object presence detector module is complete.

