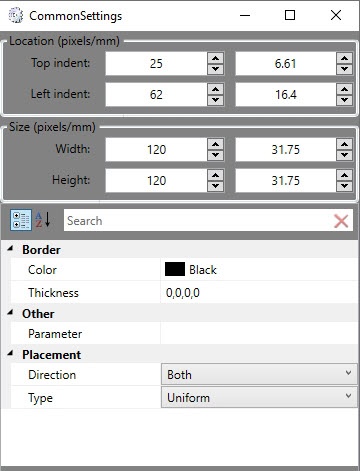
To open the properties window for a Photo object, see the Editing objects properties in the Template Editor section.
As a result the following window opens.

To edit the Photo object properties, do the following:
- In the Thickness field, enter a value for the thickness of the line bounding the Photo object.
- In the Color field, select the color of the line bounding the Photo object.
- In the Parameter field, specify the parameter containing the Base64 image from the event that the Event Manager is configured for. For example, to display a face captured but not recognized by the camera of the Face Recognition Server, it is necessary to specify the imageBase64 value (also see Configuring the face temperature monitoring and control).
- From the Direction drop-down list select direction of image location in the Photo box:
- UpOnly – image scales upward only it's smaller than window of the Photo object.
- DownOnly – image scales downward only it's larger than window of the Photo object.
- Both – image stretches to fit a window of the Photo object according to the Type mode.
- From the Type drop-down list select the way of image location in the Photo box:
- None – image preserves its original size;
- Fill – image is resized to fill the whole window of the Photo object. The aspect ratio is not preserved.
- Uniform – image is resized to fit the window of the Photo object while it preserves its native aspect ratio.
- UniForm ToFill – image is resized to fill the object window while it preserves its native aspect ratio. If the image size larger than the object window, the image is clipped to fit in the object window.
Editing of Photo object properties is completed.