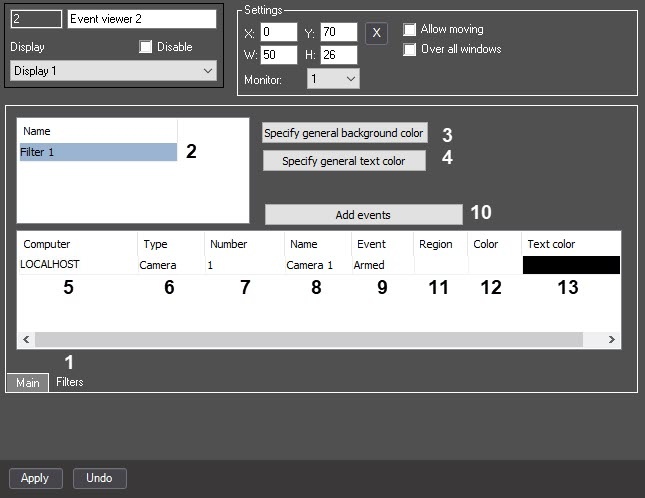
To select the events to be logged in the Events viewer object, do the following:

  1. Go to the Filters tab (1) on the settings panel of the Event viewer object.
  2. In the Name field (2), enter the name of the filter.
    By default, the filters are created with the name
    Filter1Filter2, and so on. To add a new filter, select the last line in the list of filters and click the down arrow key on the keyboard.

    You can copy the created filters by selecting the filter name using the Ctrl+C and Ctrl+V key combination.

    To display all events for all system objects in the Event viewer window, you can use one of two methods:

    1. Create an empty filter, leaving all filter fields blank.
    2. Do not create a filter.

    Both options provide a full output of data. If you delete all previously created filters, the interface still has an empty filter, which, when selected, displays all events.

  3. To set the background color that is used by default for all filter events, click the Specify general background color (3) button and select the required color in the standard Color window.
    The default background color is white.
  4. To set the text color that is used by default for all filter events, click the Specify general text color (4) button and select the required color in the standard Color window.
    The default text color is black.
  5. From the drop-down list in the Computer column (5), select the Computer object on the basis of which the objects included in the filter must be created. If filtering by computer is not required or the required object isn't created on the basis of the Computer object, select a blank value in this drop-down list.
  6. From the drop-down list in the Type column (6), select the type of an object for which the required event can be logged. If you don't specify the type of an object, when you select this filter, all events of all objects are logged in the event viewer.

    You can open the drop-down list in the table by double-clicking the left mouse button on the corresponding cell. For the detailed description of actions with tables and lists, see Object settings panel.

  7. From the drop-down list in the Number column (7), select the ID of the object, the type of which was selected in step 1. If the field is blank, the Events viewer object logs all events of the object of the specified type.
  8. The name of the object is set automatically on the basis of the values selected in step 1-2 and displayed in the Name column (8). You cannot edit the Name column.
  9. From the drop-down list in the Event column (9), select the required event for the selected object in step 1-2. If the field is blank, the Events viewer object logs all events registered for the specified object.
  10. To add one or more events from the same object, do the following:
    1. Select a line in which at least the type of object has already been selected.
    2. Click the Add events button (10).
    3. In the window that opens, set the checkboxes next to the required events.
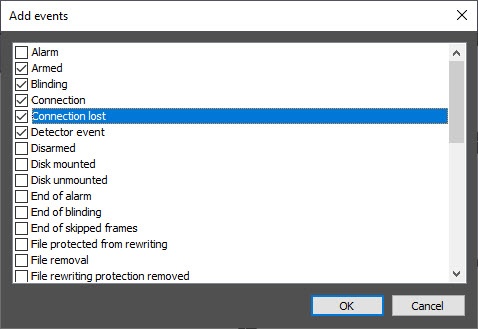
    4. Click the OK button.
      As a result, rows corresponding to the selected events are added to the table. All event settings, including colors, IDs, object type, and so on, are copied from the original selected event.

  11. From the drop-down list in the Region column (11), select the Region to log events of objects included in this region. If the objects are identified (see step 7) or no Region is set, events are recorded in the Event viewer object without taking into account the objects' belonging to the Region.
  12. From the drop-down list in the Color column (12), select the background color for the message about an event in the Event viewer window.

  13. From the drop-down list in the Text color column (13), select the text color of the event message in the Event viewer window.
  14. Repeat steps 2-13 for all required filters.

  15. Click the Apply button to save the changes.

Selecting events for logging to the Events viewer object is complete.

Event control via Event Viewer