General information
The Event Manager is used to work with the events of photo identification and visually monitor the state of objects in Axxon One.
The module provides a set of tools for monitoring events, displaying information using preset templates, event processing by the operator, and monitoring the current state of objects. The module includes widgets for photo identification, monitoring the states of objects, event viewer, and a widget for counting users in an area.
The event manager provides tools for viewing, processing, and visually monitoring events, as well as for configuring the contents and position of the widgets on the workspace.
You can use the module in two modes:
- View mode is used to monitor events and object states.
- Edit mode is used to configure the contents and position of the widgets and their display parameters.
View mode
In the view mode, the configured widgets are displayed on the workspace. Events are displayed in a table format. Events can display time, object, and additional information. If no events are available, a waiting for data message is displayed in the widget area.
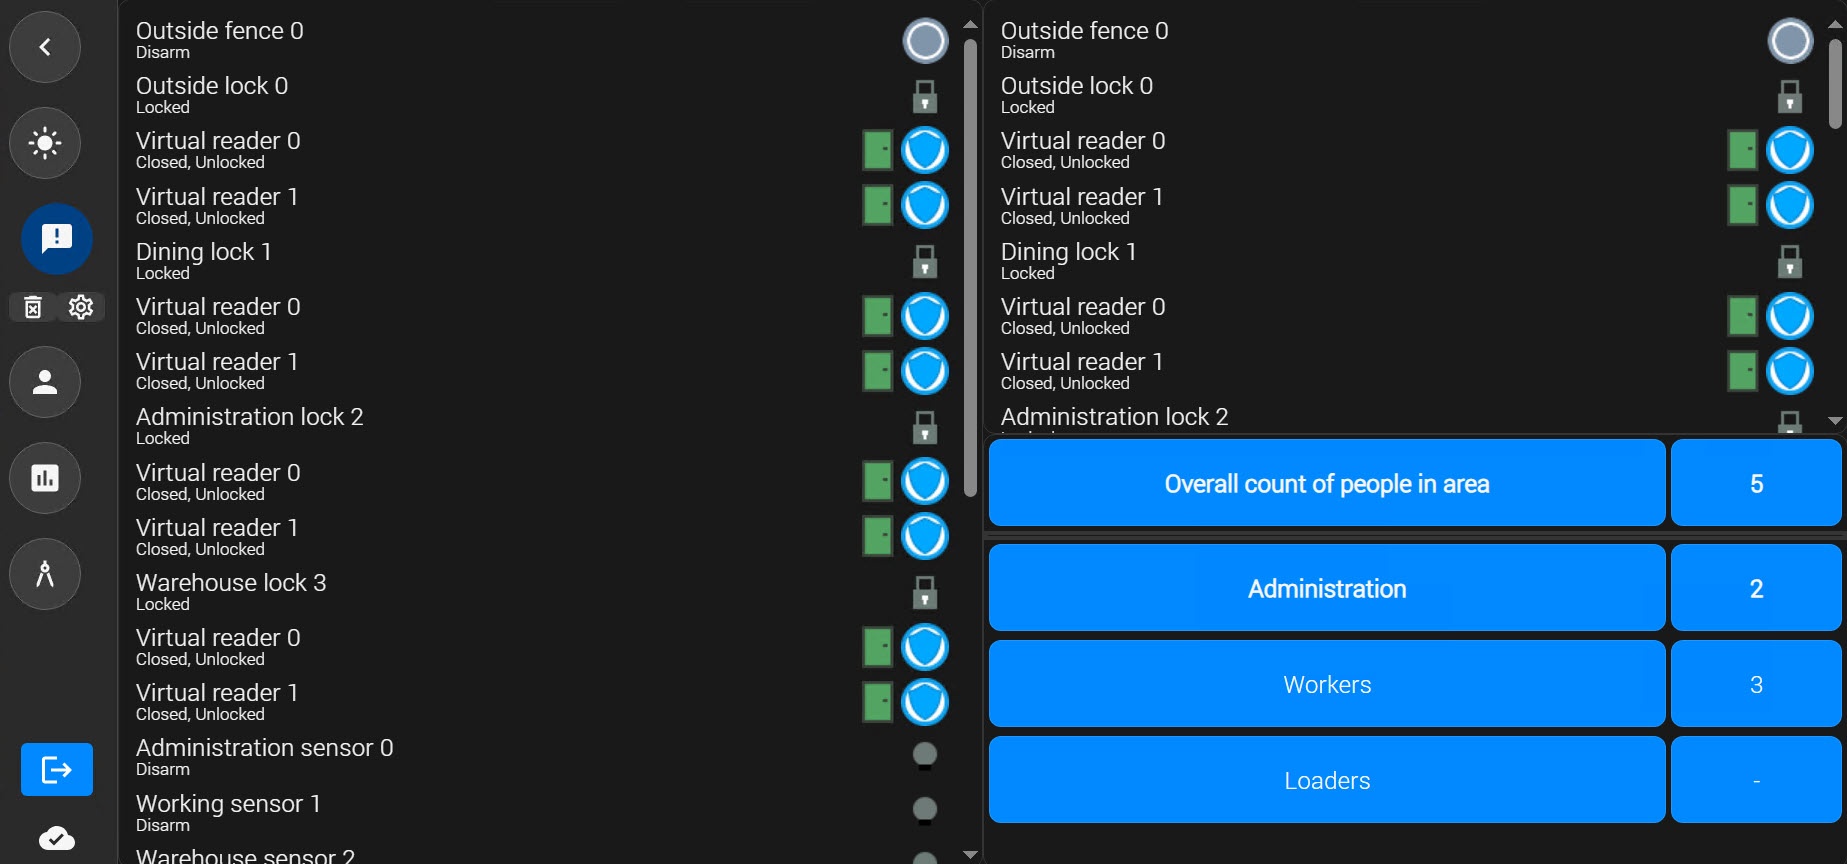
In the view mode, you can:
- View incoming events.
- Control information about an event, object, and time.
- Clear the event list.
- Switch to the workspace edit mode.
To delete all events, use the Clear all events  button in the side menu of the Access Manager module.
Edit mode
You can use the edit mode to configure the workspace of the event manager. You can change the contents of widgets, their location, and parameters in this mode.
To switch to the edit mode:
- Click the
 button in the side menu of the Access Manager module.
 - Click the Edit mode
 button. The window for creating a template opens.
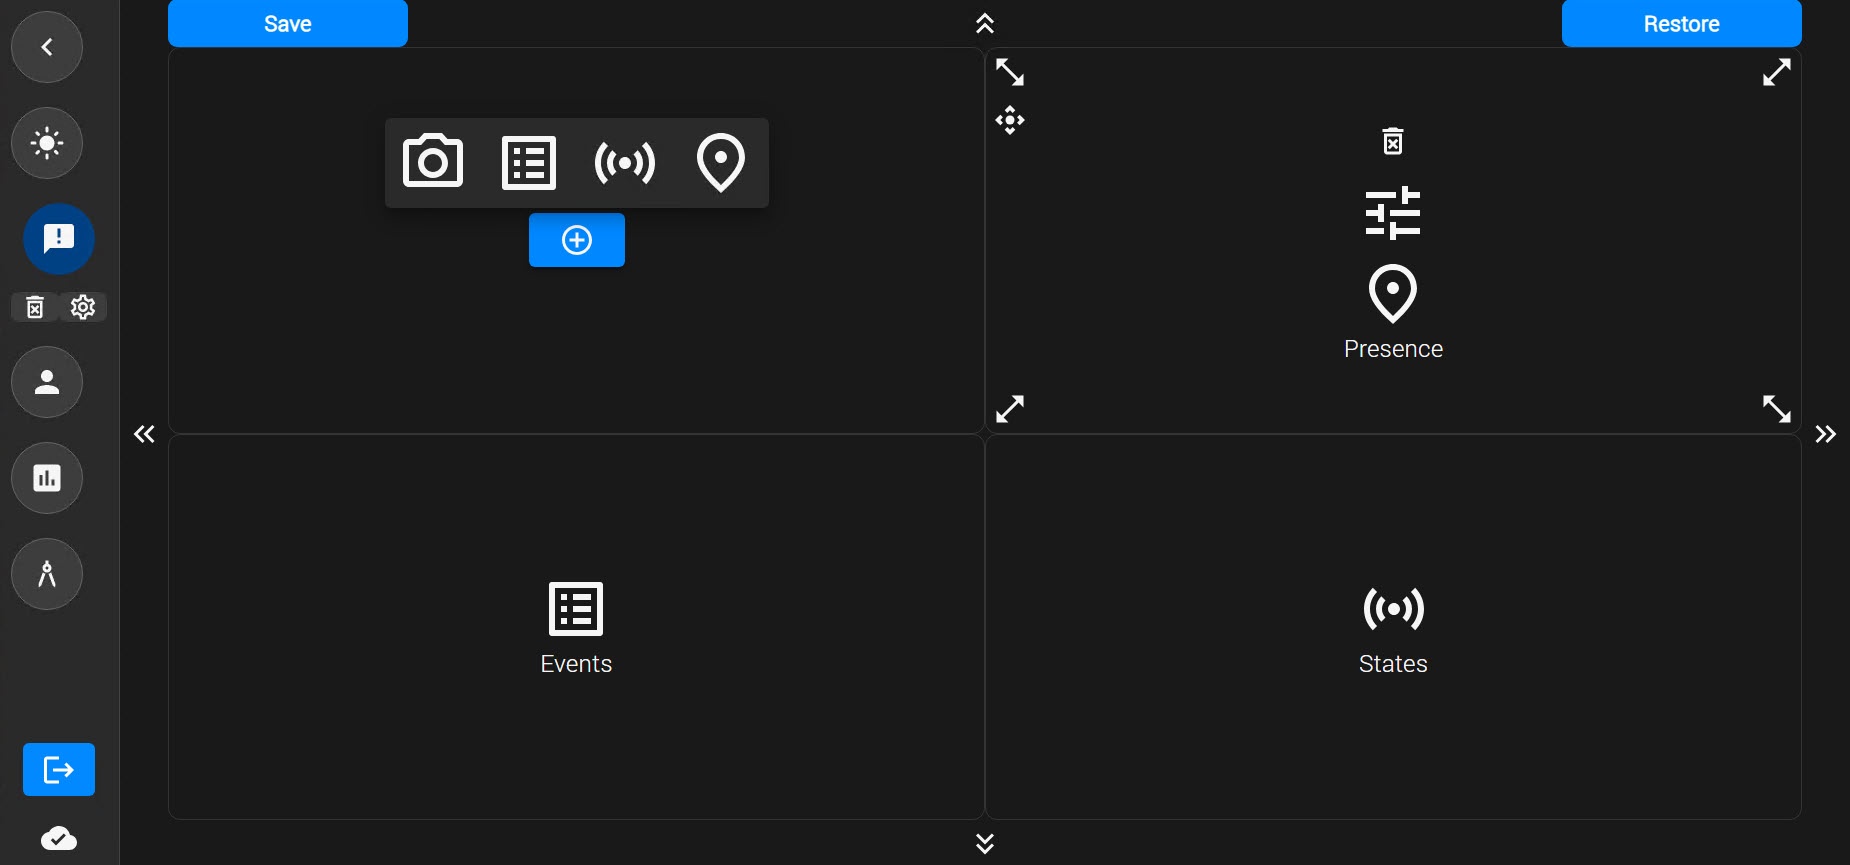
In the edit mode, you can:
- Add a new widget to the workspace.
- Delete a widget.
- Open widget settings.
- Resize the widget.
- Save changes.
- Cancel changes.
To add a widget, click the  button in the selected cell of the workspace. A list of available widgets is displayed:
- Photoident displays photo identification events.
- Events displays system events in a table format.
- States displays the states of selected objects.
- Presence displays the number of users in a selected area or by selected departments.
After you configure the workspace, save the changes by clicking the Save button in the upper left corner of the window. To discard changes and return to the previous configuration, use the Restore button.
Configuration of the Photoident widget
The Photoident widget is used to display information on employee identification by photo.
To add the widget:
- Click the button in the side menu of the Access Manager module.
- Click the Edit mode button. The window for creating a template opens.
- In the free area, click the button.
- Select the Photoident
 widget.
 - In the window that opens, set up the widget parameters:
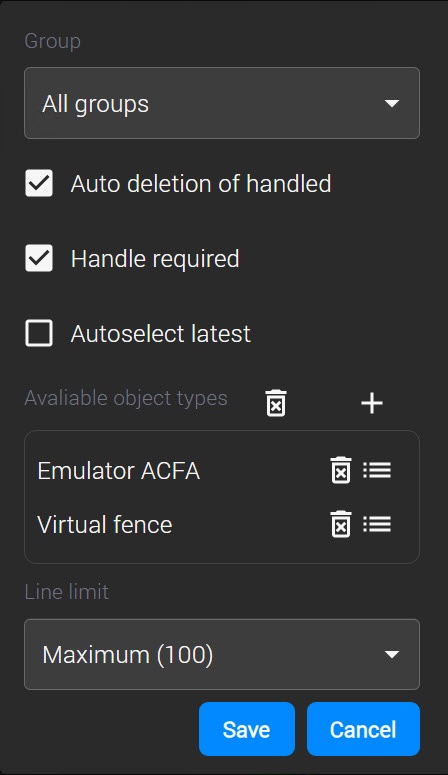
- In the Group list, select groups of objects whose events must be displayed in the widget.
- If necessary, set the checkboxes:
- Auto deletion of handled to automatically delete processed events from the widget.
- Handle required to prevent deletion of events for which processing has not been completed.
- Autoselect latest to automatically select new incoming events.
- In the Available object types parameter, select the object types whose events must be displayed in the widget. To select object types, click the
 button and set the checkboxes next to the required object types in the window that opens. You can select one or more object types from the list. If you select All types, the widget displays events from all available object types.
 - In the Line limit parameter, select the limit on the number of rows displayed in the widget.
- Click the Save
 button.
- Save the configuration of the workspace by clicking the Save
 button in the upper left corner.
After you save the widget, it appears in the event manager.
Configuration of the Events widget
The Events widget is used to display events according to specified filters.
To add the widget:
- Click the button in the side menu of the Access Manager module.
- Click the Edit mode button. The window for creating a template opens.
- In the free area, click the button.
- Select the Events
 widget.
 - In the window that opens, set up the widget parameters:
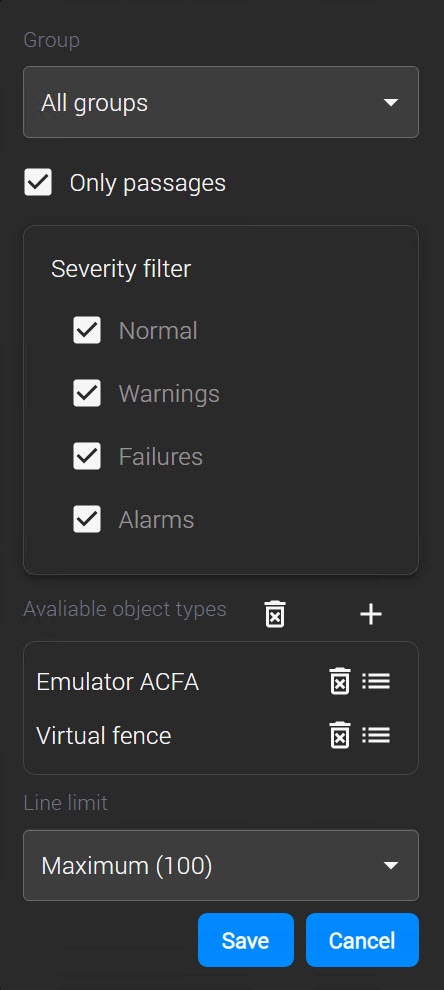
- In the Group list, select groups of objects whose events must be displayed in the widget.
- If necessary, set the checkboxes:
- Only passages to display only passage events.
- Severity filter to select the alarm levels of the displayed events:
- Normal: informational events.
- Warnings: events that require attention.
- Failures: events related to hardware errors or malfunctions.
- Alarms: alarm events.
- In the Available object types parameter, select the object types whose events must be displayed in the widget. To select object types, click the button and set the checkboxes next to the required object types in the window that opens. You can select one or more object types from the list. If you select All types, the widget displays events from all available object types.
- In the Line limit parameter, select the limit on the number of rows displayed in the widget.
- Click the Save button.
- Save the configuration of the workspace by clicking the Save button in the upper left corner.
After you save the widget, it appears in the event manager.
Configuration of the Presence widget
The Presence widget is used to display the number of employees in a selected area or department.
To add the widget:
- Click the button in the side menu of the Access Manager module.
- Click the Edit mode button. The window for creating a template opens.
- In the free area, click the button.
- Select the Presence
 widget.
 - In the window that opens, set up the widget parameters:
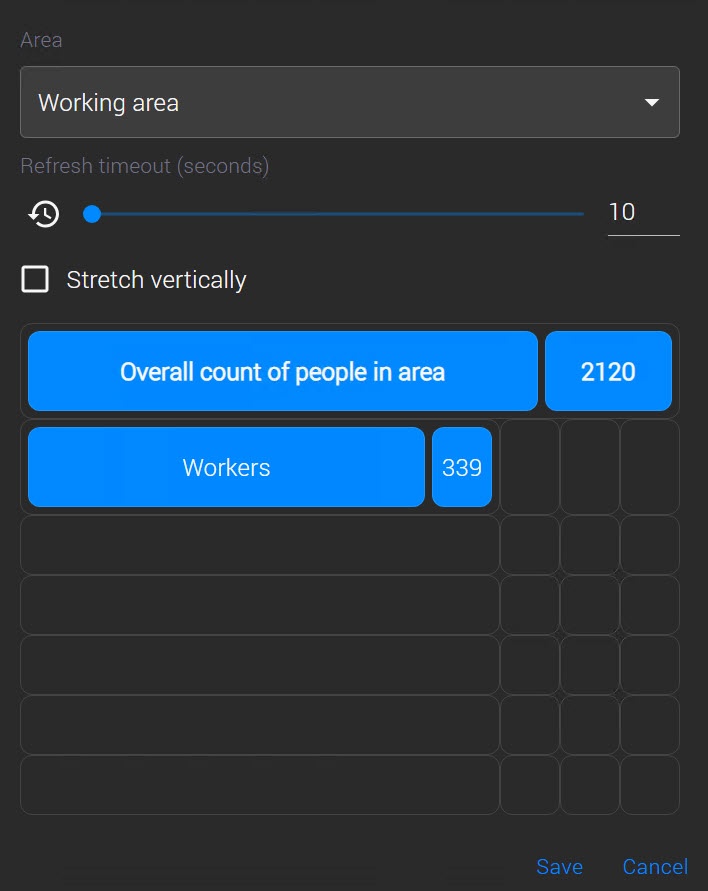
- In the Area list, select the area whose employee presence is displayed.
- In the Refresh timeout (seconds) parameter, enter the interval of data update.
- If necessary, set the Stretch vertically checkbox if you want the widget to stretch vertically.
- The panel can display the total number of users in the area and individual rows for selected departments. You can configure the display name and visual design for each row. To do this, hover the mouse cursor over an empty cell and click the button.
- In the window that opens, set up the parameters:
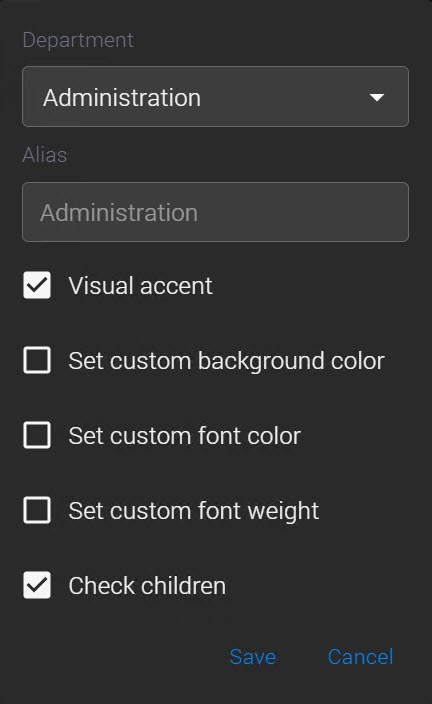
- In the Department list, select the department whose presence is displayed.
- In the Alias parameter, enter the name that will be displayed in the panel instead of the system name of the area or department.
- If necessary, set the checkboxes:
- Visual accent to highlight the element in the panel.
- Set custom background color to set the background color of the element.
- Set custom font color to set the text color.
- Set custom font weight to set the text size.
- Check children to display department data. If you set the checkbox, users from the selected department and its child departments are counted.
- Click the Save button.
- Save the configuration of the workspace by clicking the Save button in the upper left corner.
After you save the widget, it appears in the event manager.
Configuration of the States widget
The States widget is used to display the current state of objects and quickly access information about selected system elements.
To add the widget:
- Click the button in the side menu of the Access Manager module.
- Click the Edit mode button. The window for creating a template opens.
- In the free area, click the button.
- Select the States
 widget.
 - In the window that opens, set up the widget parameters:
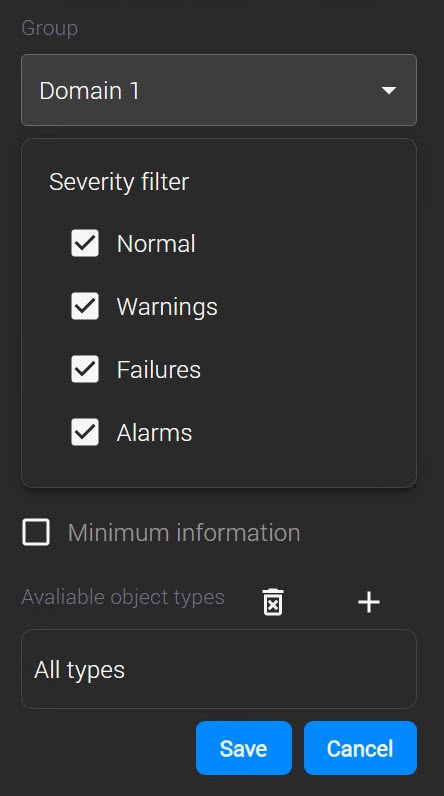
- In the Group list, select groups of objects whose events must be displayed in the widget.
- If necessary, set the checkboxes:
- Severity filter to select the alarm levels of the displayed events:
- Normal: informational events.
- Warnings: events that require attention.
- Failures: events related to hardware errors or malfunctions.
- Alarms: alarm events.
- Minimum information to display states in short form.
- In the Available object types parameter, select the object types whose events must be displayed in the widget. To select object types, click the button and set the checkboxes next to the required object types in the window that opens. You can select one or more object types from the list. If you select All types, the widget displays events from all available object types.
- Click the Save button.
- Save the configuration of the workspace by clicking the Save button in the upper left corner.
After you save the widget, it appears in the event manager.
Edit a widget
To edit a widget:
- Click the button in the side menu of the Access Manager module.
- Click the Edit mode button. The window for creating a template opens.
- Hover the mouse cursor over the required widget.
- Click the
 button.
 - Make the necessary changes.
- Click the Save button in the upper left corner of the workspace.
Widget is edited.
Delete a widget
To delete a widget:
- Click the button in the side menu of the Access Manager module.
- Click the Edit mode button. The window for creating a template opens.
- Hover the mouse cursor over the widget that you want to delete.
- Click the
 button.
 - Click the Save button in the upper left corner of the workspace.
Widget is deleted.