
Go to documentation repository
Previous page Next page
Note
You can use templates when you create a report.
To add a new template, click Report templates → New template and fill in the Name and Description fields. The template will use the selected parameters of the current report.
Templates work the same way as templates in the scheduler and can be used interchangeably.
When you create a response using a template, click Report templates at the top of the page and select the required template from the list of saved templates (the required template is highlighted). As a result, the parameters of the current report are updated according to the selected template.
The Report by employee passes displays all interactions between the selected employee and the selected readers. The report allows you to track the movement of the selected employee within a specified area.
To create the report, select the Report by employee passes from the list of Access Manager reports (see Select the type of Access Manager report) and specify the report parameters in the opened form.
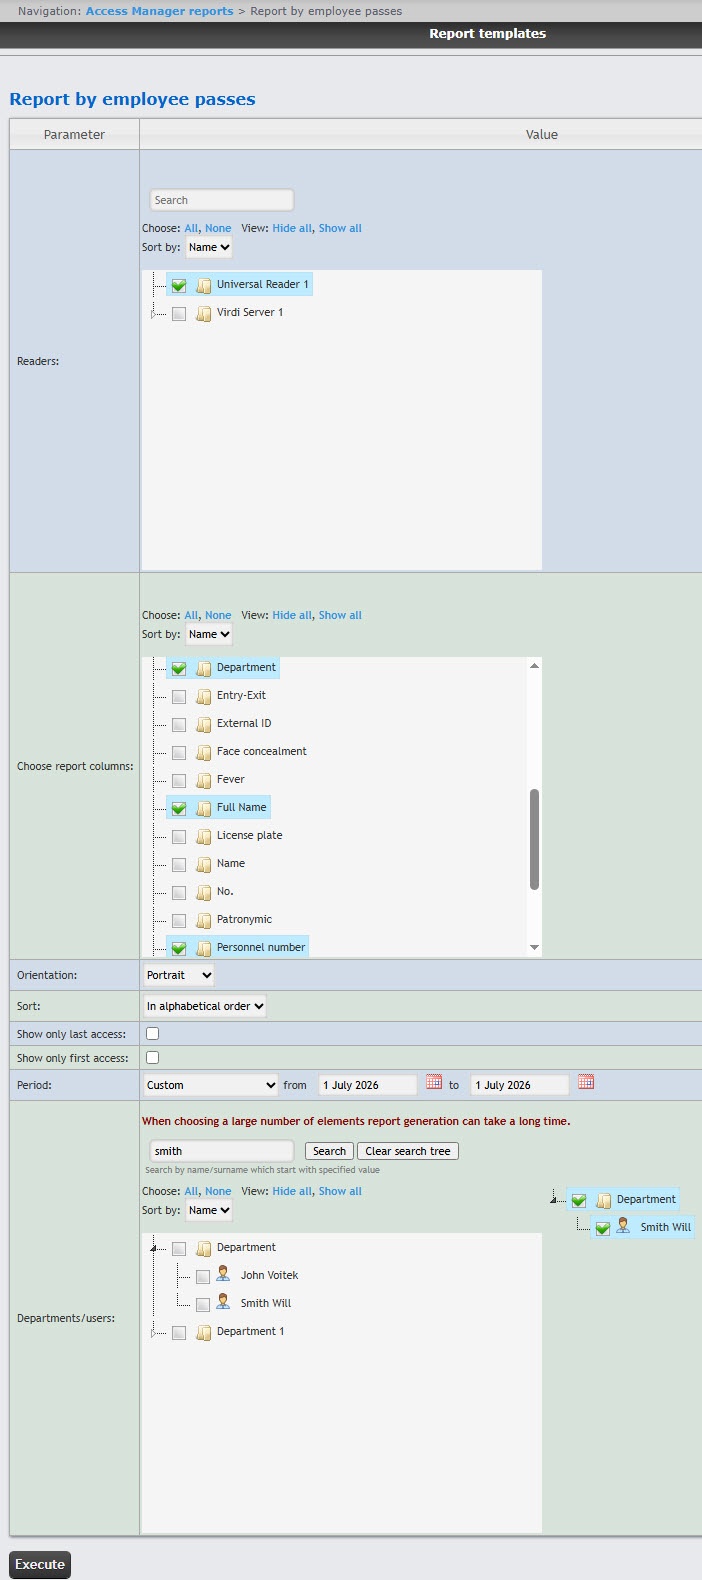
In the Readers area, set the checkboxes next to those access points, the information on which must be displayed in the report. Click All to select all found access points. Click None to deselect. Click Show all to expand the access point structure. Click Hide all to hide the structure.
You can search for an access point using the search field. For this, in the search field, enter the name of the access points. The search works from the first character. The results are highlighted in a different color.
By default, the list of readers is sorted by name. To sort by number, select this option from the Sort by drop-down list.
Attention!
This field displays only the access points that are added to any access level in the Access Manager module (see Creating access levels).
For the rs user, it is enough to create an access level with all access points. For other users, you must assign access levels in the Access Manager module (see Assigning access levels to a user).
In the Choose report columns area, set the checkboxes next to those columns that must be displayed in the report. You can also change the order of the columns: left-click and hold the column name and drag it higher or lower relative to other columns. Click All to select all columns, click None to deselect. Click Show all to expand the column structure, click Hide all to hide the structure.
From the Orientation drop-down list, select the report display orientation: Portrait (vertical) or Landscape (horizontal).
Attention!
From the Period drop-down list select the time period for which the report must be created.
If you select the Custom or Custom 2 time period, enter the dates of the start and end periods for which the report must be created in the from and to fields using the Calendar tool.
For the Custom 2 time period, it is also necessary to enter the start and end of the period.
To create a report, click the Execute button.
Example of a report in the Portrait orientation:
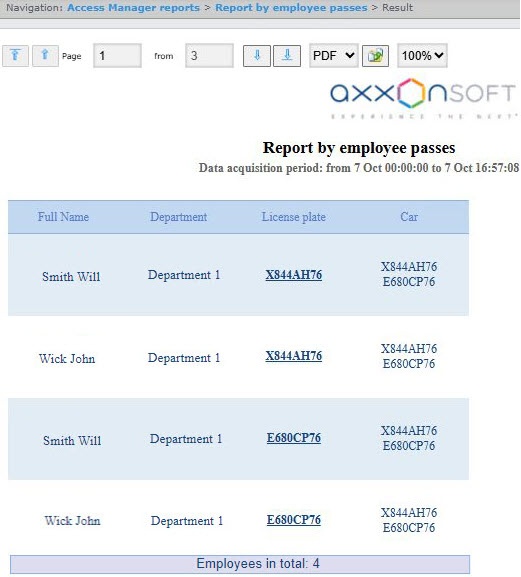
All possible report fields are described in the table.
| Field name | Description |
|---|---|
| No. | Line number |
| Full name | Employee's full name |
| Name | Employee's first name |
| Surname | Employee's last name |
| Patronymic | Employee's patronymic |
| Position | Employee's position |
| Company/Department | Company/Department where employee works |
| Department | Department where employee works |
| Face concealment | Glasses, masks and other options of face concealment |
| Temperature | Face temperature in degrees Celsius from thermal camera or external system |
| Access levels | Employee's access levels |
| License plate | License plate of an employee's vehicle. If several license plates are assigned to an employee, the report displays the license plate of a vehicle that was actually used to pass |
| Car | Brand of an employee's car |
| Card number | Number of an employee's access card. If several cards are assigned to an employee, the report displays the card specified in the event viewer |
| Card code | Code of an employee's access card |
| Date of card issue | Date when the card was issued to the employee |
| Access point | Access point through which the employee passed |
| Date | Date of passage |
| Date and time | Date and time of passage |
| Time | Time of passage |
| Phone | Employee's phone number |
| Comment | Comment |
| Card start date | Start date of an employee's card |
| Card expiration date | Expiration date of an employee's card |
| Pin code | PIN code of an employee's card |
| External ID | Employee's external ID |
| Personnel number | Employee's personnel number |
| Entry-Exit | Date and time of employee's entry and exit |
| The Employees in total line displays the number of captured employee faces, not the number of unique faces | |
You can save this report in the following formats:
The report by employee passes is created.

