
Go to documentation repository
General settings of export consist of:
Export period (1). It is specified in the Export period from and to fields. When the utility is launched, the period is set depending on the initial conditions described in the table:
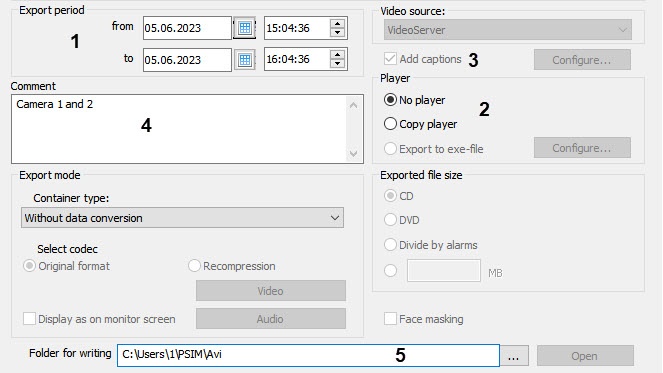
Copying of the Axxon Player Portable to the export folder is set in the Player (2) radio button group:
Note
This setting is only available in the extended mode of the Export dialog box. Click → in the bottom right corner to display it. If it is not displayed in the extended mode, then it is hidden using the AviShowPlayerSection registry key (see Registry keys reference guide).
- If the switch is set to the No player position, then only archive files in the specified format will be exported.
- If the switch is set to the Copy player position, then AxxonPsim_player_portable.exe file along with archive files will be stored to the folder. The file includes a portable version of Axxon Player. Information on how to work with this utility is given in Axxon Player documentation.
- If the switch is set to the Export to exe-file position, then the archive will be exported to exe file that can be played back without Axxon PSIM or Axxon Player installed. If required, it is possible to set a password to open the exported exe-file, which you will need to enter every time you start it. To set a password, do the following:
- Click the Configure button. The Export to exe setup dialog box appears.
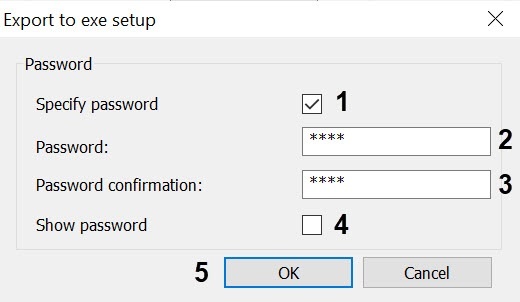
- Set the Specify password (1) checkbox.
- Enter the password (2) and confirm it (3).
- By default, all specified password characters are masked. If you want these characters to be displayed, then set the Show password (4) checkbox.
- Click the OK button (5).
- Click the Configure button. The Export to exe setup dialog box appears.
Adding captions to video image. If the Add captions checkbox (3) is set, then video is exported with captions saved in the captions database. Features of adding captions:
- if there are captions from POS terminals or ATMs, then these captions are also exported;
- if you selected the export mode without data conversion, you cannot disable captions overlay—see Selecting the format and recompression for the exported file;
- you can configure the parameters of the exported captions—see Setting captions export parameters;
- it is recommended to view video with captions in the Axxon Player utility (see Axxon Player documentation). The video with captions can also be viewed in other players, for example, in Windows Media player with enabled captions display function, though proper display of captions is not guaranteed.
- A comment is entered in the Comment field (4). When exporting, it is saved in the “Camera_<camera id>.txt” text file in the folder specified for writing.
Select a folder for export using the
 button next to the Folder for writing field (5). The Open button is used for going to the specified folder in the Windows Explorer.
Specifics of a folder selection:The specified path to the export folder will be applied to the ExportDir registry key located in HKLM\SOFTWARE\WOW6432Node\AxxonSoft\Axxon PSIM\Video\AviExport (see Registry keys reference guide). Please note that the same path will be used to save video recordings exported from the Monitor or an archive period (see Export and print out).
If a CD or a DVD is selected as export destination (see The size of the exported file), the Burn a Disc dialog box will appear. Enter the disc title and set the switch to Like a USB flash drive.

- You can add a file to the export result using the AviRequiredAdditionalFilePath registry key (see Registry keys reference guide).
Below is an example of the selected folder contents after export (see Starting export) with the Add captions checkbox is set (with captions saved in a separate file) and the Comment field is filled in:

Overview
Content Tools