Unable to render embedded object: File (books.jpg) not found.
Go to documentation repository
Documentation for Auto Intellect 5.1. Documentation for other versions of Intellect is [available too].
By default, the LPR channel scans the whole video image received from the camera for the LP number. To decrease the CPU load, a smaller area where the LP should be searched for, can be specified.
Note.
This setting is given only when Auto-Uragan, CARMEN-Parking, CARMEN-Auto, ACCR or AxxonSoft program module is used.
Note.
If the LP search area boarder is specified, only the license plates that completely fit into the area will be recognized.
The search area borders can be specified using one of two methods:
- Manual entry of the area coordinates;
- Pointing at the borders on the video image using the mouse.
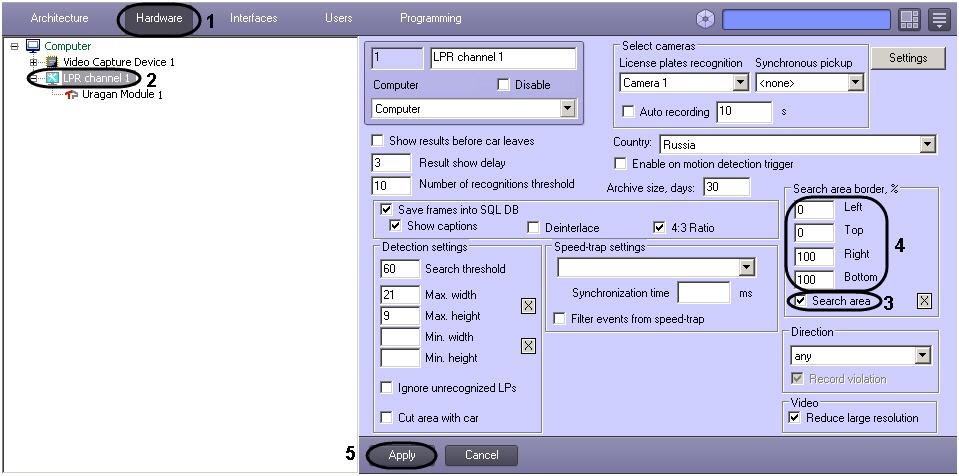
To manually enter the exact coordinates of the search area boarders, do the following:
- In the System Settings dialog window, open the Hardware tab (1).
- In the object tree of the Hardware tab, select the LPR channel, corresponding to the activated Auto-Uragan, CARMEN-parking, CARMEN-Auto, ACCR, VIT or AxxonSoft program module (see Activating the program module, used for identifying the plates section, 2).The settings panel of the selected object will open on the right side of the window.
- Check the Search area checkbox (3).
- In the Left, Top, Right, and Bottom fields, enter the coordinates of the corresponding search area boundaries, as a percentage of the full frame size (4).
- Click Apply (5).
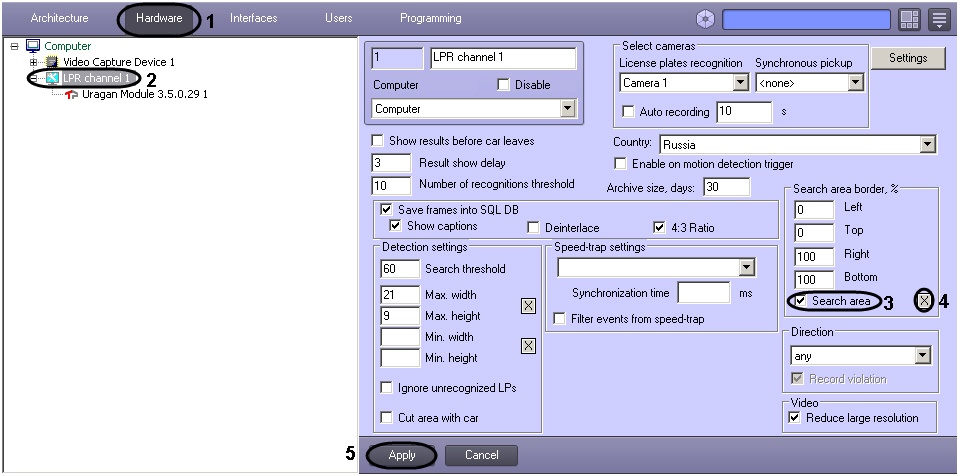
To specify the search area borders using the mouse, do the following:
- In the System Settings dialog window, open the Hardware tab (1).
- In the object tree of the Hardware tab, select the LPR channel, corresponding to the activated Auto-Uragan, CARMEN-Parking, CARMEN-Auto, ACCR, VIT or AxxonSoft program module (see Activating the program module, used for identifying the plates section, 2).The settings panel of the selected object will open on the right side of the window.
- Check the Search area checkbox (3).
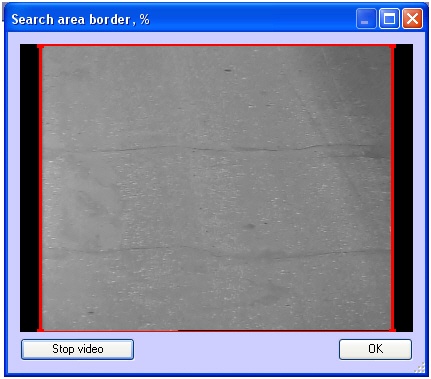
- Click the button to open the Search area borders window. The window Search area borders displays the video image from the camera set in the LPR channel settings.
To define the search area, do the following:
4.1 Click and hold the mouse button in the video image at one of the corners of the supposed search area;
4.2 Keep the mouse button pressed and drag the mouse across the supposed search area to the opposite corner;
4.3 Release the mouse button.
4.4 Click the OK button to save the selected area, or the Cancel button to clear the selection. The Search area border window will be closed. - Click Apply (5).
Note.
The search area should not contain the titles in the image for correct recognition of the LP numbers.
The LP search area boarder is now set up.


