Documentation for DetectorPack PSIM 1.0.1.

Previous page Configuring the Handrail grip detection  Configuring the Shooter detection Next page

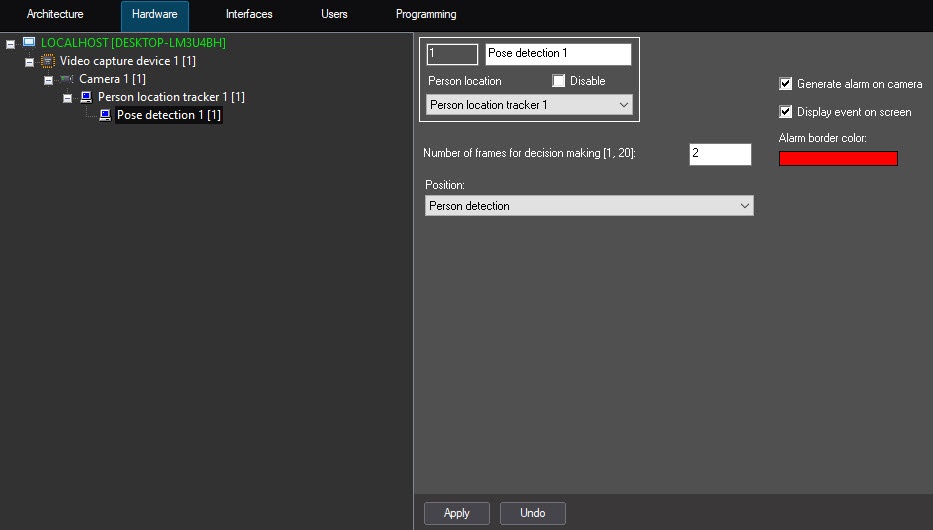
To configure the Pose detection, do the following:

  1. Go to the settings panel of the Pose detection object that is created on the basis of the Person location tracker object.
  2. In the Number of frames for decision making [1, 20] field, enter the required amount of frames from 1 to 20 on which a person must be found in the specified pose to trigger the corresponding event. The default value is 2.
  3. Set the Generate alarm on camera checkbox to gererate an alarm on camera when the detection tool detects the specified pose. The checkbox is clear by default.
  4. Set the Display event on screen checkbox to display an alarm border on the screen when the detection tool triggers. You can specify the color of the alarm border in the next step. The checkbox is clear by default.
  5. In the Alarm border color field, specify the color of the alarm border using the color palette. The default color is red. Double click the color field to open the Color palette. After selecting the border color, click the OK button to save the settings.

  6. From the Position drop-down list, select the person position that you want to detect. Further settings depend on the selected option.

    1. Person detection—the detection tool triggers when there is a person in any pose in the frame.
    2. Hands up detection—the detection tool triggers when there is a person with hands raised in the frame. A hand is considered raised if the forearm is parallel to the backbone and the wrists are above the shoulders. If this detection is selected, the additional settings will become available. Working mode—sets the hands position at which the alarm event will be generated.
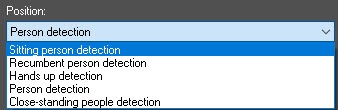
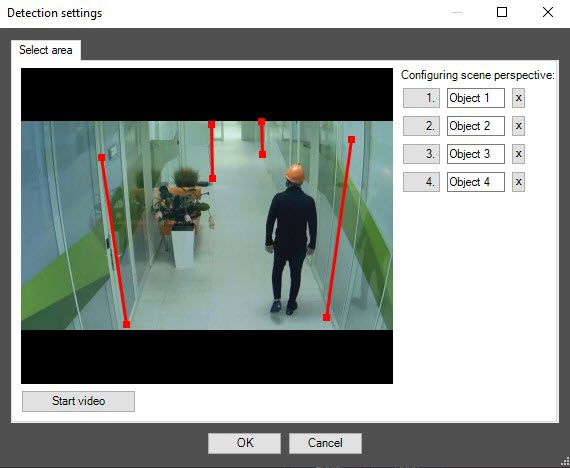
    3. Sitting person detection—the detection tool triggers when there is a sitting person in the frame. For this and further options of the person position, perspective adjustment is available. To adjust the perspective of the video image, click the Settings button.

      1. In the Detection settings window, click the Stop video button to capture a frame.
      2. Specify at least three calibration segments in different parts of the frame. To create a calibration segment, click and hold the left mouse button on the video image so that you can specify the necessary length size. You can change the size of the already created segments using the anchor points. The calibration segments must be located at different angles to each other depending on the scene and the distortion of the video image.

        To delete the created segment, click the  button.
      3. Click the OK button to save the settings of the perspective of the video image.
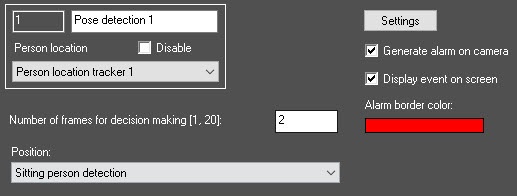
    4. Recumbent person detection—the detection tool triggers when there is a recumbent person in the frame. You can exclude repeated triggering of the Pose detection tool when there is a recumbent person in the frame by using the Recumbent.SkipSitPeople registry key with the value 1, and the Recumbent.SkipSitPeopleTimeOffset, and Recumbent.SkipSitPeopleAreaOffset registry keys. For more information on registry keys, see Registry keys reference guide. For the information on working with the registry, see Working with Windows OS registry.

    5. Close-standing people detection—the detection tool triggers when there are close-standing people in the frame. If you select this detection, the following additional settings will become available:
      1. Calibration column length [0, 3]—sets the length of the calibration segments from 0 to 3 meters that were set when adjusting the perspective of the video image. The default value is 1.7;
      2. Distance sensitivity [0, 20]—sets the minimum distance between people from 0 to 20 meters. If the distance between people in the frame is equal to or less than the specified value, then the detection will trigger. The default value is 2;
      3. Number of people to alert [2, 20]—sets the number of people who must break the distance for the detection to trigger. Possible values are from 2 to 20. The default value is 2.

  7. Click the Apply button to save the settings.

The Pose detection is now configured.

  • No labels