
Go to documentation repository
Documentation for Axxon One 2.0. Documentation for other versions of Axxon One is available too.
Previous page
![]()
![]() Next page
Next page
On the page:
General information about configuring Automatic connection
This setting is used to automatically connect:
- the Client to the Server without having to re-enter the Server name, username and password when starting the app;
- the Client to Servers belonging to different domains (see Cross-System client);
- the Client to the nodes of the FailOver system (see Configuring Failover VMS).
If you connect automatically, the Servers specified in the Automatic connection parameters group will be used first. If these Servers are unavailable, the system will try to connect to the Servers from the Preferred servers parameters group following the set order (see Selecting Preferred Servers).
Configuring Automatic connection
To configure automatic connection, do the following:
- Select the Options tab (1) → Automatic connection (2).
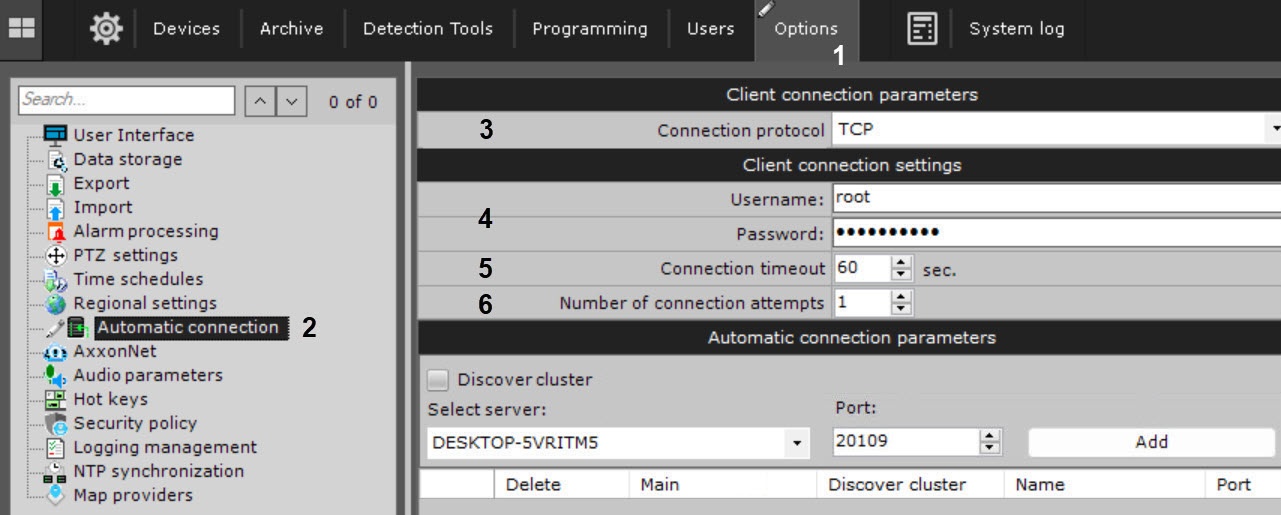
- From the drop-down list (3), select the connection protocol.
Description of the protocol and recommendations for selection are given in the table.The connection protocol of the Clients to the Server determines the choice either in favor of connection reliability or in favor of data transmission speed. You must select the connection protocol for each Sever of the domain. All Clients connected to the Server will receive video streams via this protocol.Protocol Description TCP This protocol is more reliable, but has a busy connection. We recommend selecting it for Servers with a small number of cameras UDP unicast UDP protocol has a higher data transmission speed, but it is less reliable. The unicast scheme is used to transmit data to a single recipient.
You must select this protocol for a Server with a large number of cameras and which has several Clients working with itUDP multicast The multicast scheme is used to transmit data to a group of recipients. This protocol is best suited for a Server with a large number of cameras and which has many Clients working with it.
Attention! This protocol must be supported by all network elements, including switches - For automatic authorization when connecting to Servers, enter the username and password (4). If you leave these fields blank, authorization will be performed manually when you start the Client.
Attention!
Cross-System Client connects to all Servers using a single username-password pair that must be created in each domain (see Cross-System client).
- In the Connection timeout field (5), specify the wait period for a successful connection before considering the attempt unsuccessful. The default value is 60 seconds, the maximum value is 300 seconds (5 minutes). If you use this setting, an automatic connection attempt will occur immediately. If connection fails, the Server will wait for the period of time specified by the user (timeout) and repeat the connection attempt.
- Specify the maximum number of automatic connection attempts after the specified timeout (6).
- Specify the Servers to which you want to connect. For each Server, do the following:
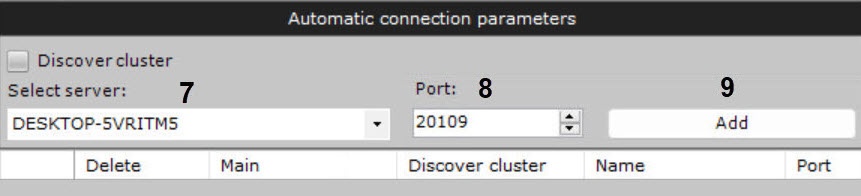
- Select a Server from the list or enter the Server IP address (7).
- Specify the port for connecting to the Server (8).
Note
If you leave the Port field blank, the standard port 20109 will be used for connection.
- Click the Add button (9).
Note
- If you use Cross-System Client, you can connect to only one Server of each domain (see Cross-System client). That is why when you add a Server to the list, all other Servers in that domain become unavailable for selection.
- To remove a Server from the list, click the
 button.
Configuration of automatic connection of the Client to Servers is complete. The next time you start Axxon One, it will connect to the selected Servers.
Configuration of automatic connection of the Client to Servers located in different domains
When you use Cross-System Client, select the main domain after adding all Servers to the list. To select the main domain, set the Main checkbox in the corresponding column of the Server that is on the domain.
When connecting, the Client will use the parameters (maps, layouts, user permissions) of the main domain.
Configuration of automatic connection of the Client to the nodes of the FailOver system
If you want to configure automatic connection to a node of the FailOver system, do the following:
- Set the Discover cluster checkbox (1).
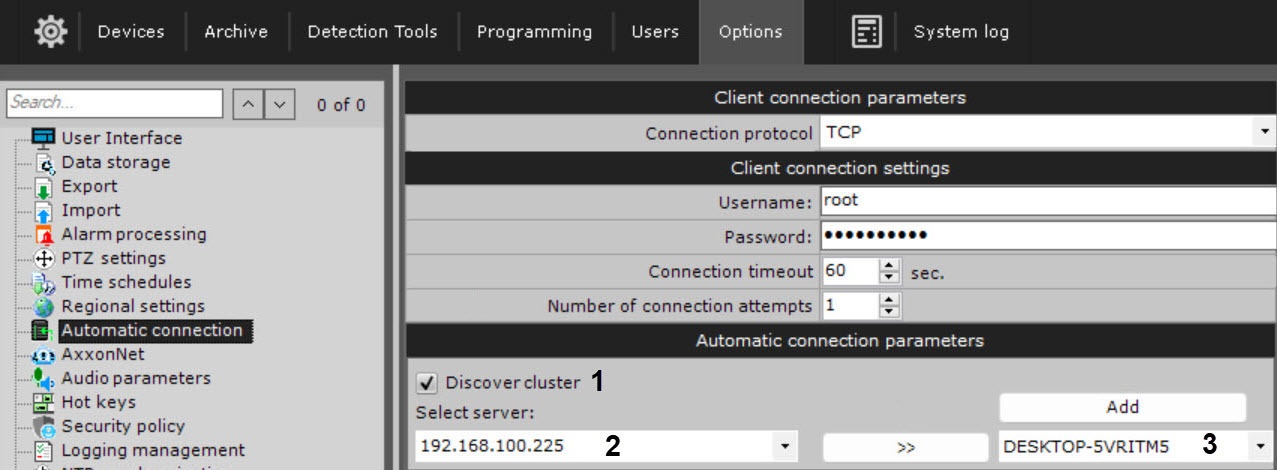
- Enter the IP address of any Server of the cluster (2) and click the
 button.
 - From the drop-down list (3), select a node that you want to add to autoloading.
- Click the Add button.
- Click the Apply
 button.
Configuration of automatic connection of the Client to the node of the FailOver system is complete.
Changing the Server port
To change the port of an already added Server, do the following:
- Select the Server from the list again (1).
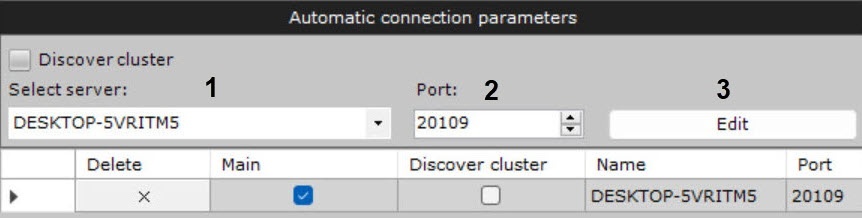
- In the Port field (2), specify a new number.
- Click the Edit button (3).
Changing the port of the added Server is complete.
Exporting and importing the configuration of automatic connection
To save the configuration of automatic connection to Servers and preferred Servers (see Selecting Preferred Servers) to a JSON file, click the Export button.

To load the configuration on the Clients, do the following:
- Click the Import button.
- Click the Apply button.
Overview
Content Tools