
Go to documentation repository
Documentation for Axxon One 2.0. Documentation for other versions of Axxon One is available too.
Previous page
![]()
![]() Next page
Next page
On the page:
Configuring the parameters
Attention!
When a recumbent person is facing a camera or away from a camera, the correct operation of the detector isn't guaranteed.
To create the Person down detector, do the following:
- Create the Human pose detector (see Configuring the Human pose detector).
- Below the Human pose detector, click Create… → Person down detector.
By default, the Person down detector generates an event if a recumbent person is detected in the specified area.
If necessary, you can change the detector parameters. The list of parameters is given in the table:
| Parameter | Value | Description |
|---|---|---|
| Other | ||
| Enable | Yes | The detector is enabled by default. To disable the detector, select the No value |
| No | ||
| Name | Person down detector | Enter the detector name or leave the default name |
| Type | Person down detector | Name of the detector type (non-editable field) |
| Basic settings | ||
| Number of measurements in a row to trigger detection | 2 | Specify the minimum number of frames with the corresponding pose or behavior for the detector to generate an event. The value must be in the range [1, 20]. The recommended (default) value is 2. Increasing the value can help eliminate false events, but increases the risk of skips. Decreasing the value can help reduce skips, but increases the probability of false events |
To save the parameters of the detector, click the Apply ![]() button. To cancel the changes, click the Cancel
button. To cancel the changes, click the Cancel ![]() button.
button.
Configuring the frame perspective
For the Person down detector operation, you must configure the frame perspective first.
For this, do the following:
- In the preview window, click the
 button.
 - Specify the size of the same person in different parts of the frame by eye:
- To create a leveling rod, left-click the video image to add two anchor points.
Set at least three calibration rods. The lower anchor points of any three rods must not be located on the same line (horizontal, vertical, slanting, and so on).
- The size of the leveling rod must be about the average height of a person at this part of the frame.
- You can resize the rod by stretching its anchor points
 . You can move it on screen by dragging and dropping.
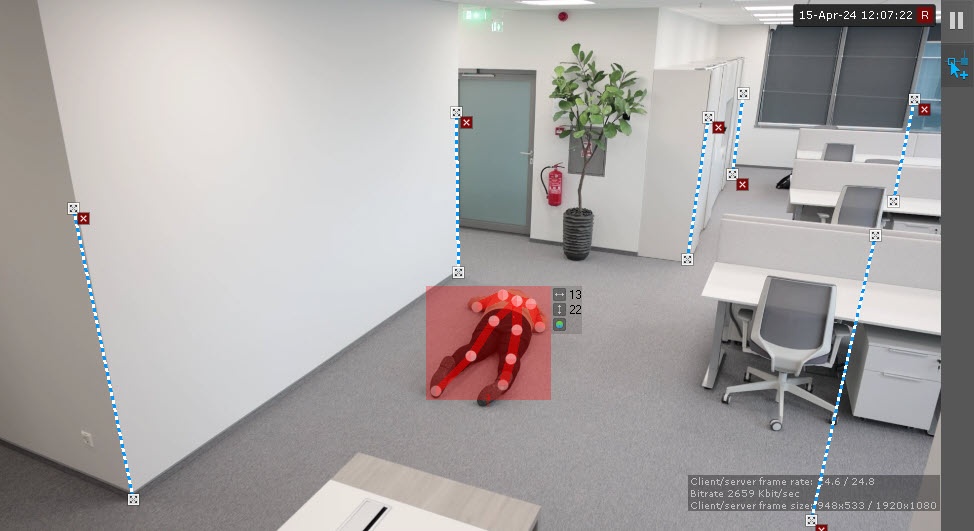
Attention!
When you set up leveling rods, the following conditions must be met:
- the rods that are located at the same distance from the camera lens must be of the same size;
- the feet of the rods must be located on the same surface (for example, floor);
in complex scenes, we recommend adding more than three rods to increase the accuracy of the detection;
in the parts of the frame where the lens vertical distortion is observed, the rods must be parallel to the nearest vertical objects (for example, door or wardrobe);
- if you add only three leveling rods to a scene, you cannot remove them from the scene, you can resize them and change their location;
- if you add more than three leveling rods to a scene, you can resize them and change their location, and remove them from the scene;
- for portrait-oriented scenes (such as corridor, shopping aisle, warehouse aisle, and so on), the arrangement of the rods must form triangles.
Note
- For convenience of configuration, you can "freeze" the frame. Click the
 button. To cancel the action, click this button again.
 - The area for detection is displayed by default. To hide it, click the
 button. To cancel the action, click this button again.
 - To delete a rod, click the
 button.
- Click the Apply button.
Configuration of the Person down detector is complete.
Overview
Content Tools