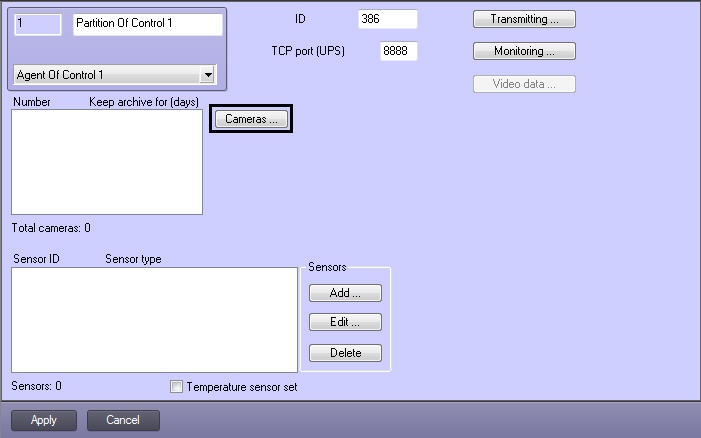
The list of cameras specified in the configuration panel for the Partition Of Control object defines the cameras whose archives can be accessed through the Search in Archive interface object (see the document Monitoring Software Package: Operator's Guide). In addition, this list defines the cameras whose state and archives are monitored by Agent of Control.
Depending on whether the list of cameras has been specified or not, the following situations are possible:
- If cameras are specified in the list, Agent of Control works in normal mode: it monitors the state of cameras and their archives. Server of Control receives information about the number of cameras, disks, disk volume, etc.
- If no cameras are specified in the list, Agent of Control checks for the presence of a Long-term Archive object in the system and gets information about disks from this object. In this case, Server of Control will receive information only for the disks marked in the Long-term Archive object. Access to the archive is not performed from the Search in Archive interface object during this process.
- If no cameras are indicated in Agent of Control settings and there is no Long-term Archive object in the configuration, information about disks is taken from the Computer object; the disks indicated for storage of the main archive are taken into account. Access to the archive is not performed from the Search in Archive interface object during this process.
In the second and third cases, monitoring is performed of the state of the system (network functioning, restarts, etc.) and disks (their number and free space). The state of cameras and their archives is not available for monitoring.
Note.
Creation and configuration of the Long-term Archive object is described in the document Intellect Software Package: Administrator's Guide.
To configure the list of cameras in use:
- Go to the configuration panel for the Partition Of Control object.
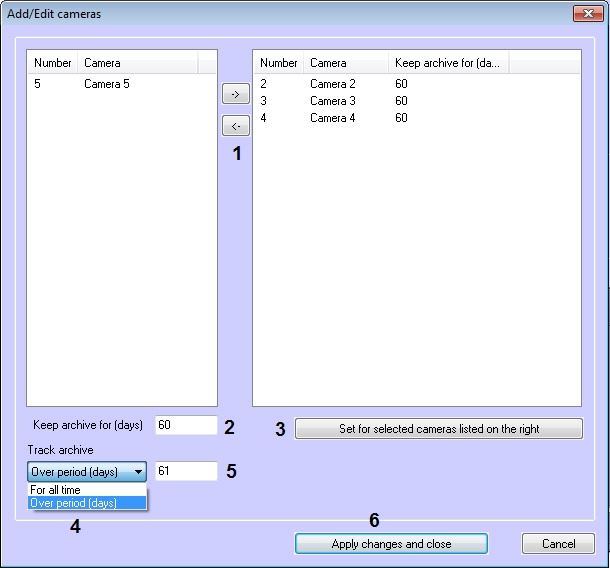
- Click the Cameras... button. The Add/edit cameras window opens.
- Configure the necessary cameras by clicking the and buttons to move cameras from the left list to the one on the right (1).
- Select cameras in the list on the right.
- Specify the time for video archive storage, in days (2).
- Click the Set for cameras selected in the right list button (3).
- Repeat steps 4 to 6 for all necessary cameras.
Set the archive tracking time period (4): For all time or Over period (days). When Over period (days) is selected, the (5) field is enabled to specify the number of days.
Note.
If For all time is selected, the algorithm of decision-making on an alarm for all time is used, even when the video archive is empty.
If Over period (days) is selected, the value entered in field (5) must be greater than or equal to the archive storage time + 1 day.
To take into account the regular voids in the archive, the number of days in the tracking period should be increased by the maximum number of days of regular voids during the archive storage.- Click the Apply changes and close button (6). The selected cameras will be added to the list on the configuration panel of the Partition of Control object.
- Click the Apply button.
Note.
The ID numbers of cameras and captioners must be whole numbers.
Configuration of the camera list is now complete.


