| Info |
|---|
|
You can use templates when you create a report. To add a new template, click Report templates→New template and fill in the Name and Description fields. The template will use the selected parameters of the current report. Templates work the same way as templates in the scheduler and can be used interchangeably. When you create a response using a template, click Report templates at the top of the page and select the required template from the list of saved templates (the required template is highlighted). As a result, the parameters of the current report are updated according to the selected template. |
The Report by employee passes with photo displays all interactions of the selected employee with the selected readers , displaying and displays a photo from the video archive at the time they have an employee passed the reader. The report allows you to track the movement of the selected employee within the specified zonearea.To build
| Info |
|---|
|
To create the Report by employee passes with photo, first you need to create and configure the following objects in Axxon PSIM: - Create and configure the Web-Server object (see Configuring the videoserver to connect Clients via the Web-server module).
- On the List of cameras tab of the Web-Server object, add the cameras, from the archive of which photos will be added to the report (see Selecting and configuring cameras for the Web-server module).
- Create and configure the Web-Server 2.0 object (see Configuring the Server to connect the Clients via the Web-server 2.0 module).
- In the settings of the video player of the Web Report System (see Video player settings), specify the Web server address and port.
- Link the camera to the reader by configuring the connection between them on the settings panel of the Objects link object on the Programming tab (see Connection of objects with cameras). Each reader must be linked to its own camera.
- When you create the Report by employee passes with photo, Axxon PSIM must be running, and the camera linked to the reader must have an archive record of the user's pass.
|
To create the Report by employee passes with photo do the following:
- Select the Report by employee passes with photo (see Selecting a Select the type of reports by Visitors counting detectors reports). As a result the dialog box for specifying the report parameters will be displayed.
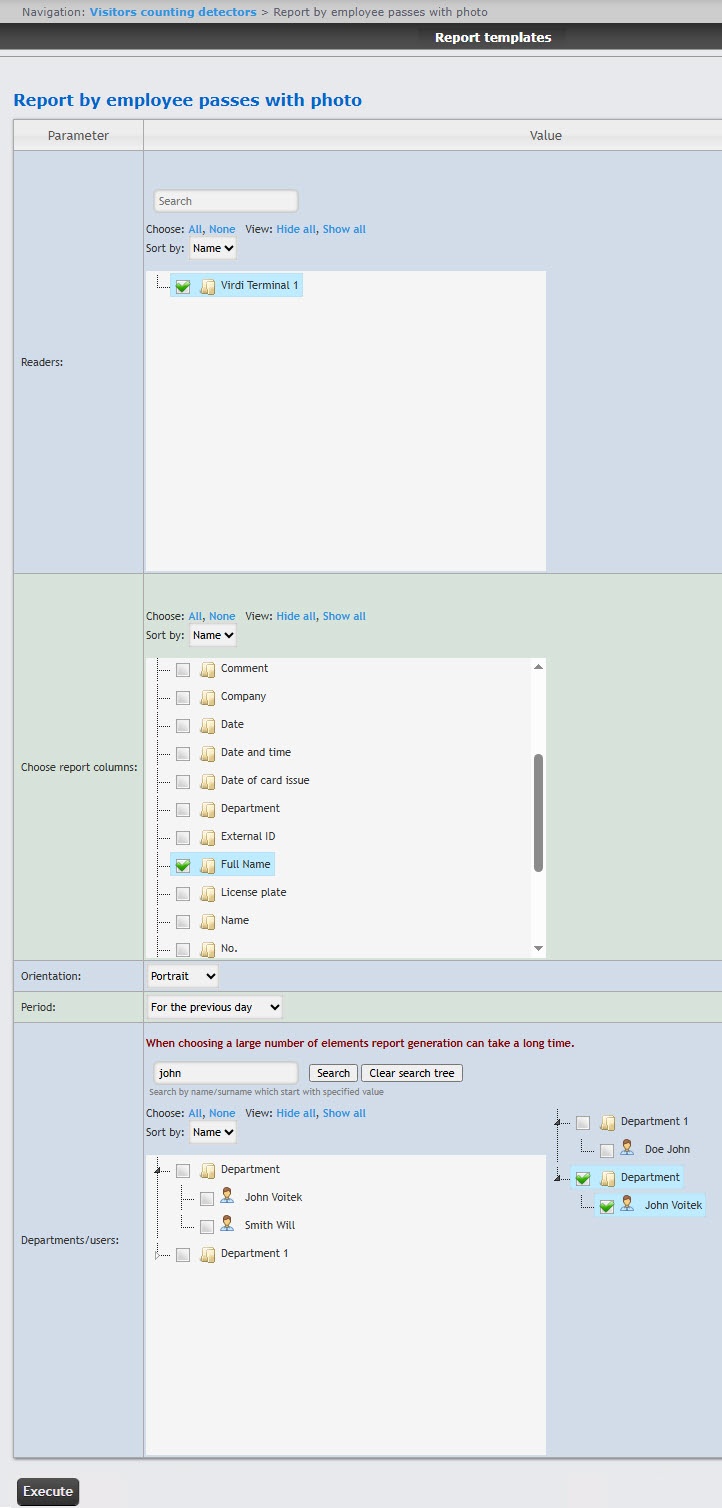
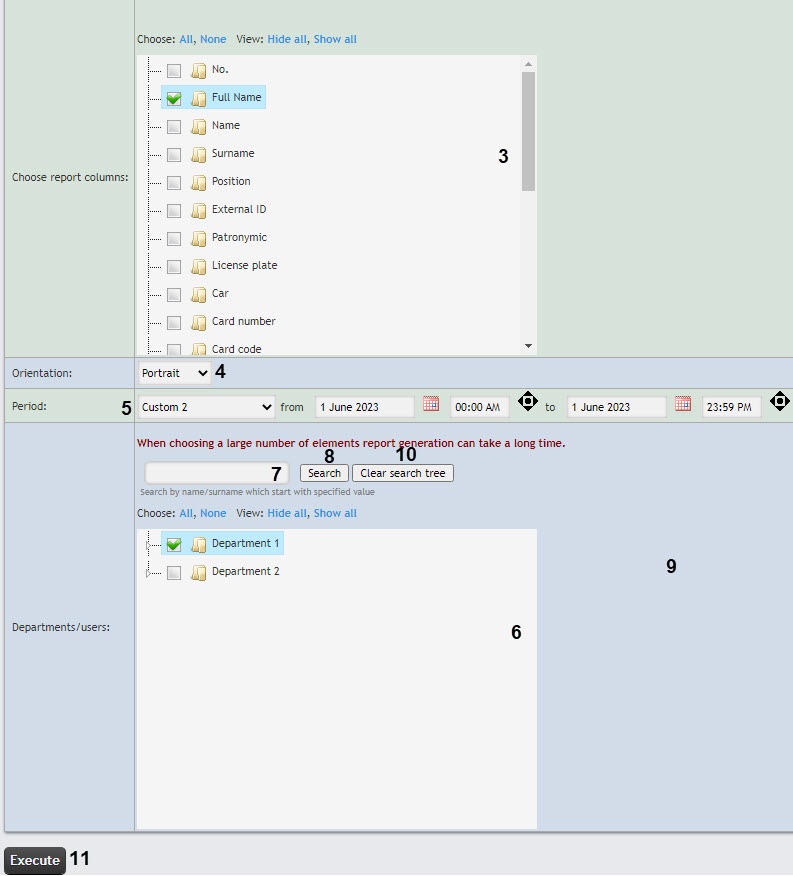 Image Removed
 - In
the - the Readers field
(1)- ,
check - set the
boxes - checkboxes next to the access points, information on which
should - must be displayed in the report. Click All to select all found or available objects. Click None to deselect. Click Show all to expand the object structure. Click Hide all to hide the object structure.
| Note |
|---|
|
This field displays only those access points that have been added to any access level in the Access Manager module (see Creating access levels). |
To use the search when selecting readers, in the search field
, start entering the reader name. The search works starting from the first character. The results
are highlighted in a different color
.
- By default, the reader list is sorted by name. To sort by number, select this option from the Sort by drop-down list.
- In the Choose report columns field, set the checkboxes next to the columns that must be displayed in the report. Click All to select all found or available objects.
Click None - Click None to deselect.
Click - Click Show all
to - to expand the object structure.
Click - Click Hide
all - all to hide the object structure
.In the Choose report columns field (3), check the boxes next to the columns that should be displayed in the report- . You can also change the order of the columns: to do this, use the left mouse button to move the column name up or down.
Click All to select all available objects. Click None to deselect. Click Show all to expand the object structure. Click Hide all to hide the object structure.- By default, the report columns list is sorted by name. To sort by number, select this option from the Sort by drop-down list.
From the From the
Orientation drop-down list
, select the report orientation: Portrait (vertical) or Landscape (horizontal).
- five columns.
- In Landscape orientation, you can select up to
|
In the Period
field, select the time period for which you want to
create the report.
| Info |
|---|
title | NoteIf you select the Custom period
, enter the
dates of the start and end periods for which the report
must be created in
the from and to fields using the Calendar
 Image Removed button near the corresponding field to use the Calendar tool
 tool.
- If you select the Custom 2
- period, additionally enter the start and end time of the period for which the report
- must be created
 Image Removed button
- .
- The Custom 3 period allows you to set the time interval from Yesterday (time) to Today (time) relative to the report date.
- In the Departments/users field
(6)- , select the departments or users, information on which
should - must be displayed in the report.
Click - Click All to select all available objects. Click None to deselect. Click Show all to expand the object structure. Click Hide all to hide the object structure.
- You can find an employee by their first name or surname using the search. For this,
enter in the search field (7) - enter at least
4 - four first characters of the employee's first name or surname in the search field and click the Search button
(8)- . The department to which the found employee belongs
will be - is displayed in the search tree in the area
9- to the right of the list of departments and users. To clear the search field and the search tree, click the Clear search tree button
(10)- .
- By default, the list of departments and employees is sorted by name. To sort by number, select this option from the Sort by drop-down list.
- To create
a - the report,
click Execute (11)- click the Execute button. As a result, the report with specified parameters is displayed.
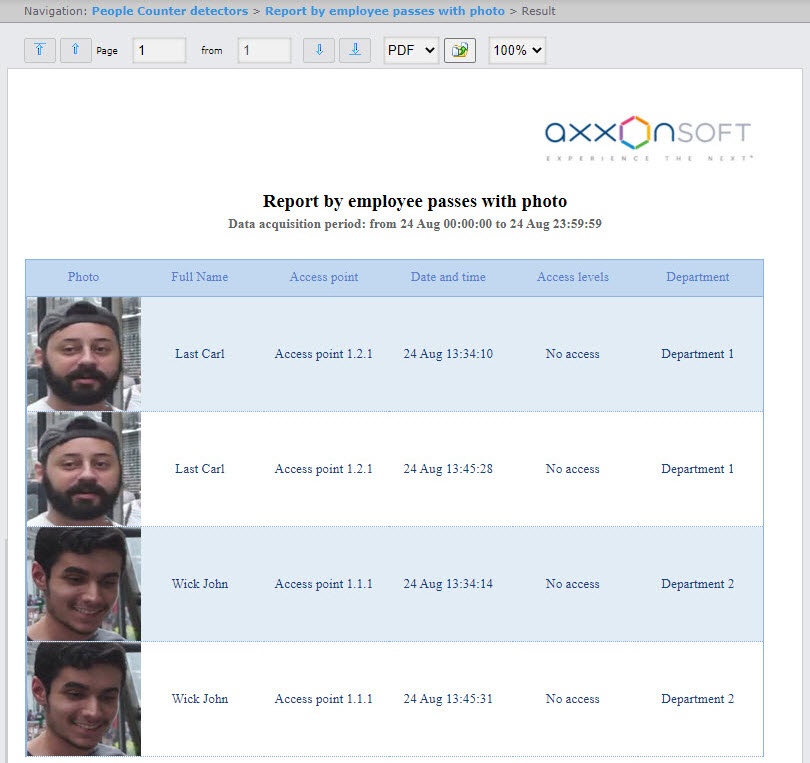
All possible fields of the report are described in the table.
| Field name | Description |
|---|
| No. | Line number |
| Photo | Photo from the camera |
| Full Name | Employee's full name |
| Name | Employee's first name |
| Surname | Employee's last name |
| Position | Employee's position |
| External ID | Employee's external | identity numberID |
| Patronymic | Employee's patronymic | name |
| License plate | EmployeeLicense plate of employee's car | license plate number |
| Car | EmployeeBrand of employee's car | brand |
| Card number | EmployeeNumber of employee's access card | number |
| Card code | Employee's access card codeCode of employee's access card |
| Date of card issue | Employee's access card issue dateIssue date of employee's access card |
| Access point | Access point through which the employee has passed |
| Date | Date of the passage |
| Date and time | Date and time of the passage |
| Time | Time of the passage |
| Access levels | Employee's access levels |
| Phone | Employee's phone number |
| Company | The name of the parent department, if the employee's department is a subsidiary |
| Department | Department where employee works |
| Comment | Commentary |
| Card expiration date | Employee's access card expiration dateExpiration date of employee's access card |
| Pin code | Employee's access card pin codePIN code of employee's access card |


