| Info |
|---|
|
You can use templates when you create a report. To add a new template, click Report templates → New template and fill in the Name and Description fields. The template will use the selected parameters of the current report. Templates work the same way as templates in the scheduler and can be used interchangeably. When you create a response using a template, click Report templates at the top of the page and select the required template from the list of saved templates (the required template is highlighted). As a result, the parameters of the current report are updated according to the selected template. |
The Report by actions of Event Manager operator is a table which displays the that displays the requests received by the Event Manager operator and his operator and their reactions to themthe requests.
To create the Report by actions of Event Manager operator, do the following:
- Select the Report by actions of Event Manager operator (see Selecting Select the type of Access Manager report). As a result the dialog box for specifying the report parameters will be displayed.
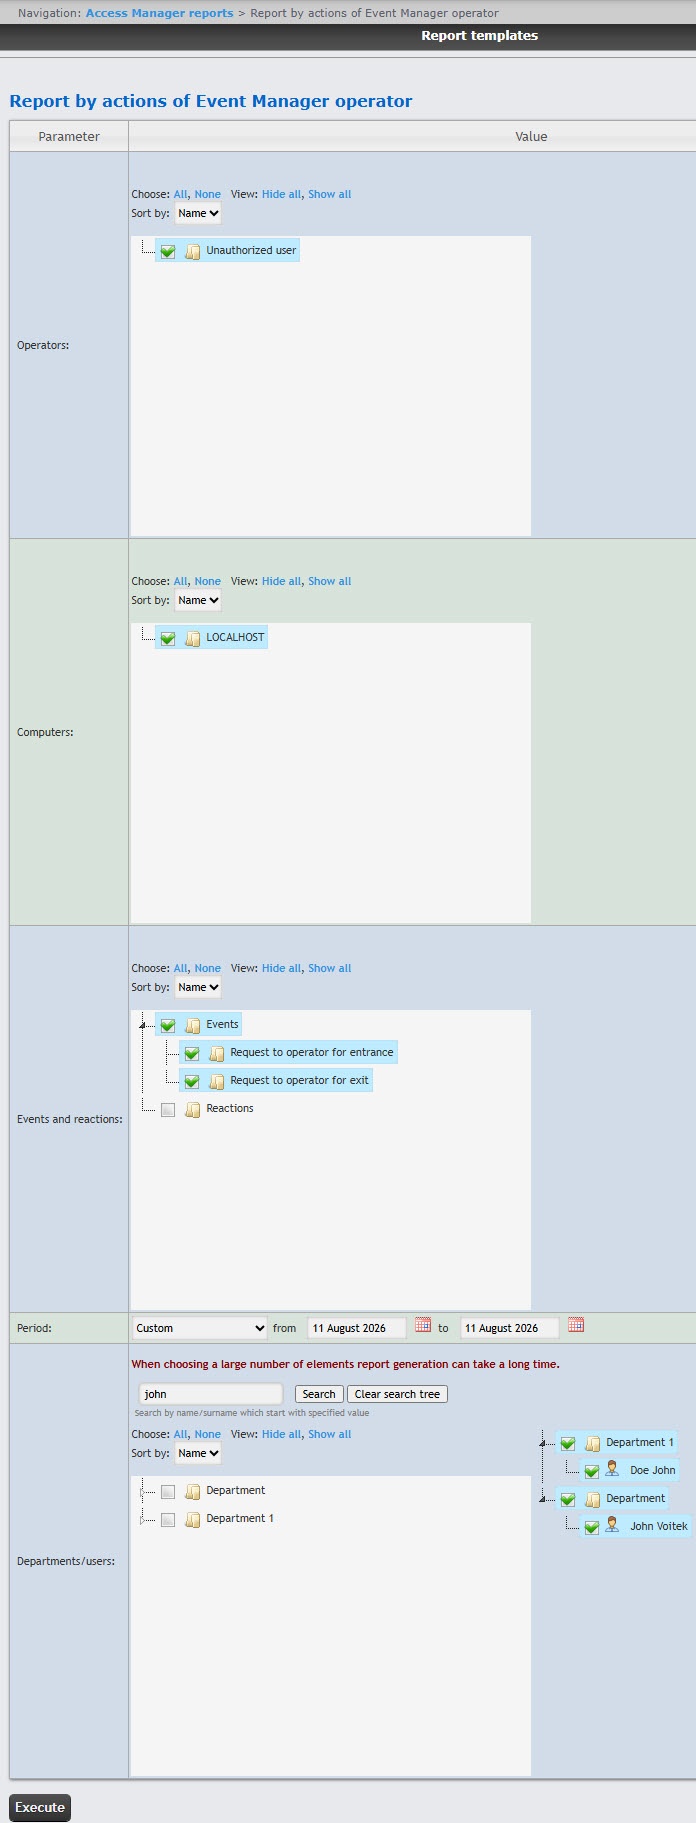
 Image Removed
 - In
the Operators field (1) - the Operators field, set the checkboxes for the operators whose actions
should - must be displayed in the report. Click All to select all available operators, click None to deselect. Click Show all to expand the
operators - operator structure, click Hide all to hide the structure.
In the Computers field (2) set the checkboxes for the computers the information on which should be displayed - By default, the list of operators is sorted by name. To sort by number, select this option from the Sort by drop-down list.
- In the Computers field, set the checkboxes next to the computers that you want to include in the report. Click All to select all available computers, click None to deselect. Click Show all to expand the
computers - computer structure, click Hide all to hide the structure.
In the - By default, the list of computers is sorted by name. To sort by number, select this option from the Sort by drop-down list.
- In the Events and reactions
field (3) - field, set the checkboxes
for - next to the events and reactions
the information on which should be displayed - whose information you want to display in the report. Click All to select all available events and reactions, click None to deselect. Click Show all to expand the
events - event and
reactions - reaction structure, click Hide all to hide the structure.
- By default, the list of events and reactions is sorted by name.
- To sort by number, select this option from the Sort by drop-down list.
- From
From - the Period drop-down list
(4) - select the time period for which the report
is to - must be created.
- If
the - you select the Custom or Custom 2 time period
- , enter the
- dates of the start and end periods for which the report
- must be created in the from and to fields using the Calendar tool.
 Image Removed button near the corresponding field to use the Calendar tool.
 -
- For the Custom 2 time period,
- you can also
- enter the
- start and end period
 Image Removed
- .
- In the Departments/users field
(5)- , set the checkboxes next to those departments or employees
, the information on which should be displayed - whose information you want to display in the report. Click All to select all found departments and employees, click None to deselect. Click Show all to expand the department structure, click Hide all to hide the structure.
- You can find an employee by
their first - name or surname using the search.
For this- To do it, enter
in the search field (6) - at least
4 - four first characters of the employee's first name or surname in the search field and click the
- Search
- button
(7)- . The department to which the
founded - found employee belongs
will be - is displayed in the
search - additional object tree
in - to the
area 8- right. To clear the search field and the search tree, click
the - the Clear search tree
button (9). - button.
- By default, the list of departments and employees is sorted by name. To sort by number, select this option from the Sort by drop-down list.
- To create
a - the report
click Execute (10)- , click the Execute button.
As Example of a result the report with specified parameters is displayedreport by actions of Event Manager operator.
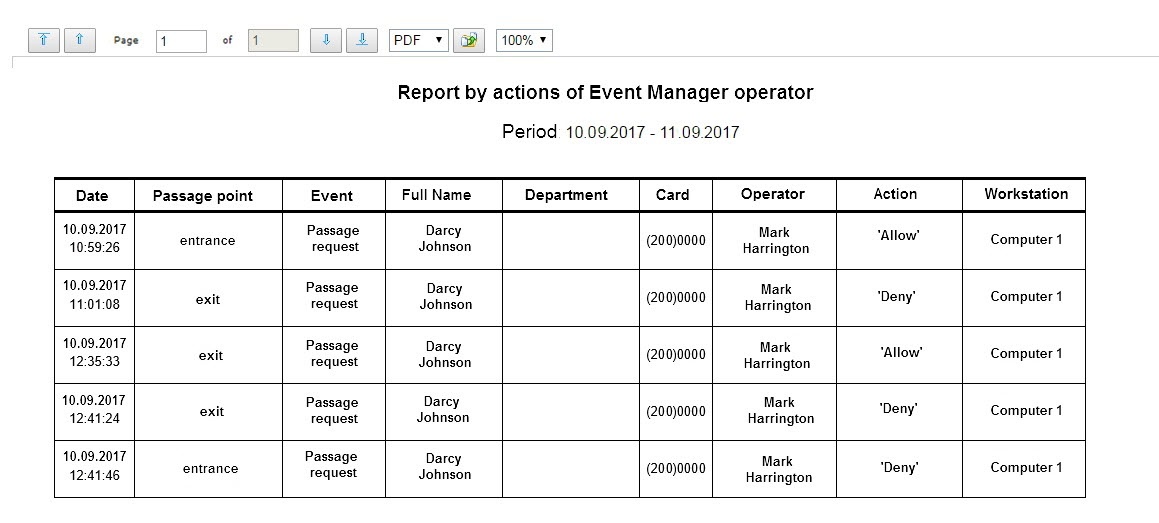
The report fields are described in the table.
| Field name | Description |
|---|
| Date | Date of the request received by the operator |
| Passage point | The passage access point controlled by theEvent Manager module |
| Event | Request received by the operator |
| Full Name | Full name of the requesting person |
| Department | Department of the requesting person |
| Card | Card number of the requesting person |
| Operator | Full name of the operator |
| Action | Operator reaction to a request |
| Workstation | The name of the computer on which the operator action was performed |
You can save the report in the following formats:
The Report by actions of Event Manager operator is created.


