
Go to documentation repository

Documentation for Axxon PSIM 2.0. Documentation for other versions of Axxon PSIM is available too.
Previous page Next page

On the page:
You can add the Video capture device object for receiving video from all server displays/monitors via the FFMPEG driver by creating and configuring the Video capture device object or using the Camera discovery tool. The latter way is preferable.
Besides, the driver supports capturing system sounds and sounds from the computer microphone. The audio input and output format is PCM. For this, except for the Video capture device object, you must create and configure the Audio card and Microphone objects. You can also do it by using the camera discovery tool. To capture system sounds, you must preconfigure the system (see below).
Preconfiguring the system for capturing system sounds
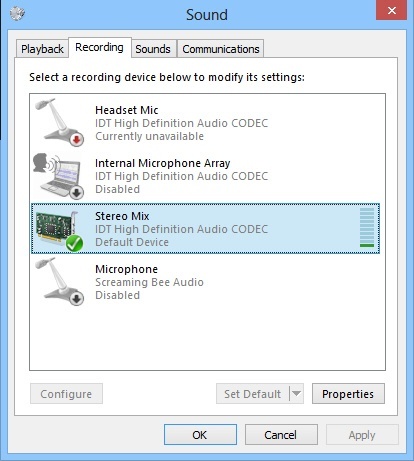
To capture system sounds, you must enable the Stereo Mix device in the system in the following way:
Open the Sound window and go to the Recording tab.
Note
In Windows 7, you can open this window by selecting the Recording Devices item in the menu that opens when you right-click the speaker icon.
If there is no Stereo Mix device on the Recording tab, right-click any empty space in the list and select Show Disabled Devices.
If the Stereo Mix device is disabled, right-click it and select Enable.
Click the Apply button in the Sound window.
Creating the Video capture device and Audio card objects
To add the Video capture device object for receiving video from all server displays/monitors and the Audio card and Microphone objects for capturing sound via the FFMPEG driver, do the following:
- Open the Camera discovery tool.
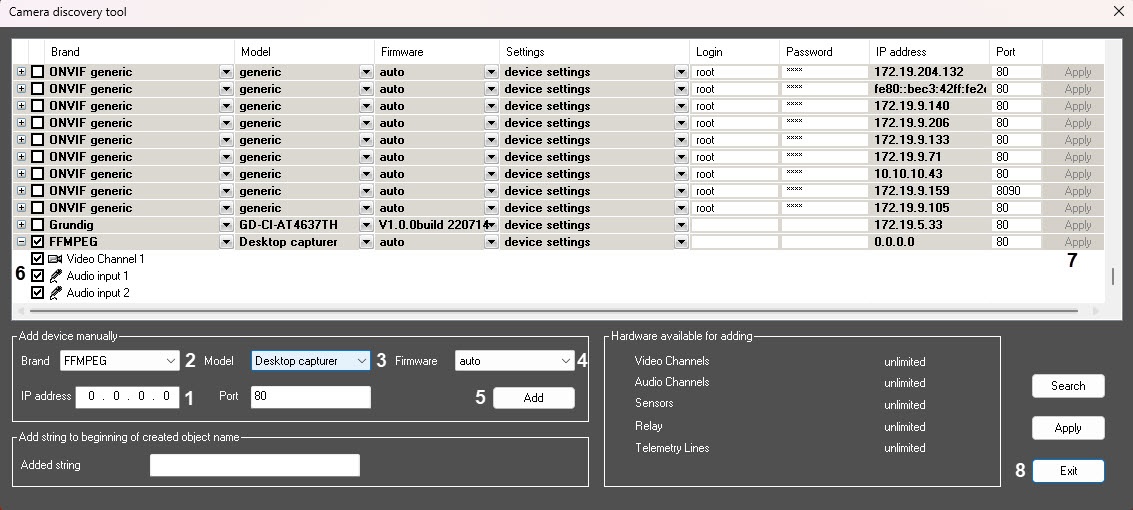
In the IP address field (1), enter any IP address. The driver automatically sets the required address for this model.
Note
When you add a device of this type by creating the Video capture device object, you must specify the gdigrab://desktop address in the IP address field.
- From the Brand drop-down list (2), select the FFMPEG value.
- From the Model drop-down list (3), select the Desktop capturer model.
- From the Firmware drop-down list (4), select the auto firmware.
- Click the Add button (5). The device is added to the list.
- Set the checkbox next to the added device and the required child objects (6):
- Select the Video channel 1 object if you want to capture video.
- Select the Audio input 1 object if you want to capture audio from the speaker selected as the default output device in the system.
Select the Audio input 2 object if you want to capture audio from the microphone selected as the default device (not communication) in the system.
Attention!
You can detect the default microphone/speaker when you add the Video capture device object. If you switch the default microphone/speaker (for example, by connecting the USB camera or the microphone/speaker connector or simply changing the system settings) after that without unloading Axxon PSIM, then switching to the new device ISN'T performed automatically. To update the linked input/output device, you must restart Axxon PSIM or delete the Video capture device and Audio card objects and re-add them.
- Click the Apply button (7).
- Click the Exit button (8).
Additional features of the FFMPEG device
You can manually set the address line by including the ffmpeg utility options to it in the IP address field on the settings panel of the Video capture device object. In this case, the address looks in the following way:
gdigrab://desktop: [-additionalOptions]
For example, you can set a specific area and several other options.
The list of options supported by the ffmpeg library for the gdigrab mode:
- -draw_mouse <int> draw the mouse cursor (from 0 to 1) (1 by default);
- -show_region <int> draw borders across the capture line (from 0 to 1) (0 by default);
- -framerate <video_rate> set the frame rate ("ntsc" by default);
- -video_size <image_size> set the frame size;
- -offset_x <int> indent along the x axis of the capture area (from INT_MIN to INT_MAX) (0 by default);
- -offset_y <int> indent along the y axis of the capture area (from INT_MIN to INT_MAX) (0 by default);
Example of the value for the "additionalOptions" property:
-draw_mouse 1 -show_region 1 -framerate 25 -video_size 640x480 -offset_x 10 -offset_y 10
Overview
Content Tools