Configuration of the Neurocounter module includes: configuring the detector and selecting the area of interest. You can configure the Neurocounter module on the settings panel of the Neurocounter object created on the basis of the Camera object on the Hardware tab of the System settings dialog window.

Configuring the detector
- Set the Show objects on image checkbox to frame the detected object on the video image in the debug window (see Start the debug window).
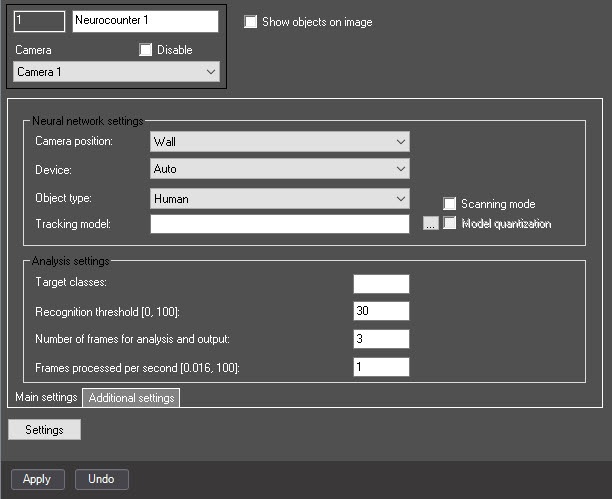
The Main settings tab
You can configure the neurocounter main settings on the tab of the same name.
- From the Camera position drop-down list, select:
- Wall—objects are detected only if their lower part gets into the area of interest specified in the detector settings.
- Ceiling—objects are detected even if their lower part doesn't get into the area of interest specified in the detector settings.
- From the Device drop-down list, select the device on which the neural network operates: CPU, one of NVIDIA GPUs, or one of Intel GPUs. Auto (default value)—the device is selected automatically: NVIDIA GPU gets the highest priority, followed by Intel GPU, then CPU.
- From the Object type drop-down list, select the object type:
- Human—the camera is directed at a person at an angle of 100-160°;
- Human (top-down view)—the camera is directed at a person from above at a slight angle;
- Vehicle—the camera is directed at a vehicle at an angle of 100-160°;
- Person and vehicle (Nano)—person and vehicle recognition, small neural network size;
- Person and vehicle (Medium)—person and vehicle recognition, medium neural network size;
- Person and vehicle (Large)—person and vehicle recognition, large neural network size;
- Human top-down view (Nano)—the camera is directed at a person from above at a slight angle, small neural network size;
- Human top-down view (Medium)—the camera is directed at a person from above at a slight angle, medium neural network size;
- Human top-down view (Large)—the camera is directed at a person from above at a slight angle, large neural network size;
- By default, the standard (default) neural network is initialized according to the object type selected in step 14 and the device type in step 13. The standard neural networks for different processor types are selected automatically; you must not do it manually. If you use a custom neural network, then click the
 button to the right of the Tracking model field, and in the standard Windows Explorer window that opens, specify its file
- Set the Scanning mode checkbox to detect small objects. If you enable this mode, the load on the system increases. So in step 10 we recommend specifying a small number of frames processed per second. By default, the checkbox is cleared. For more information on the scanning mode, see Configuring the Scanning mode.
- Set the Model quantization checkbox to enable the model quantization. By default, the checkbox is cleared. This parameter allows reducing the consumption of the GPU's computational power.
- If necessary, specify the class of the detected object in the Target classes field. If you want to count and display tracks of several classes, specify them separated by a comma with a space. For example, 1, 10.
The numerical values of classes for the embedded neural networks: 1—Human/Human (top view), 10—Vehicle.
- In the Recognition threshold [0, 100] field, enter the neurocounter sensitivity—an integer value in the range from 0 to 100. The default value is 30.
- In the Number of frames for analysis and output field, specify the number of frames that must be processed to determine the number of objects in them.
- In the Frames processed per second [0.016, 100] field, specify the number of frames processed per second by the neural network in the range from 0.016 to 100. For all other frames, interpolation is performed—finding intermediate values by the available discrete set of its known values. The greater the value of the parameter, the more accurate the detector operation, but the higher the load on the processor.
The Additional settings tab
You can configure the nerocounter additional settings on the tab of the same name.
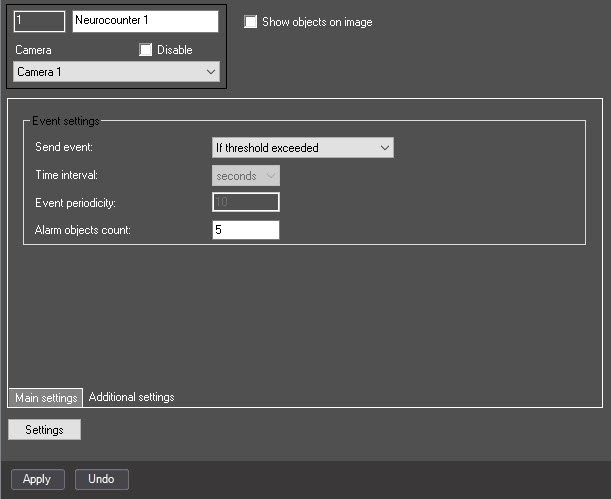
- From the Send event drop-down list, select the condition by which an event with the number of detected objects is generated:
- If threshold exceeded is generated if the number of detected objects in the image is greater than the value specified in the Alarm objects count field;
- If threshold not reached is generated if the number of detected objects in the image is less than the value specified in the Alarm objects count field;
- On count change is generated every time the number of detected objects changes;
- By period is generated by the time period:
- From the Time interval drop-down list, select the time unit of the counter period: seconds, minutes, hours, days
- In the Event periodicity field, specify the time after which the event with the number of detected objects is generated. The range of values: from 1 to 100—for seconds, minutes, hours; from 1 to 20—for days.
- In the Alarm objects count field, specify the threshold number of detected objects in the area of interest. It is used in the If threshold exceeded and If threshold not reached conditions. The default value is 5.
Selecting the area of interest
- Click the Settings button. As a result, the Detection settings window opens.

- Click the Stop video button (1) to pause the playback and capture the frame of the video image.
- Click the Area of interest button (2) to specify the area of interest. The button is highlighted in blue.

- On the captured frame, sequentially set the anchor points of the area in which the objects are detected by using the mouse (3). The rest of the frame is faded. If you don't specify the area of interest, the entire frame is analyzed.
- Click the OK button (4) to save the detector settings and return to the settings panel of the Neurocounter object.
- Click the Apply button.
Configuring the Neurocounter module is complete.

 button to the right of the Area of interest button.