
Go to documentation repository

Documentation for Axxon PSIM 2.0. Documentation for other versions of Axxon PSIM is available too.
Previous page Next page

You can select and configure cameras for displaying in the Monitor window in two ways:
- Separately. The settings panel of the Monitor object is used.
- In bulk. The Add/Edit Camera Objects window is used (the Range button), see Bulk selection and configuration of cameras.
To select cameras individually on the settings panel of the Monitor object, do the following:
- Go to the List of cameras tab.
- To select all cameras registered in the system, click the All button.
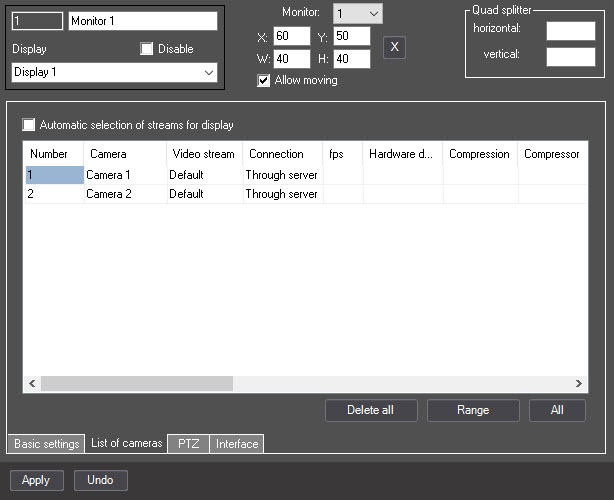
- To add a separate camera, configure the following settings in the table:
- From the drop-down list in the Number column, select the number of the camera. As a result, the name of the selected camera is automatically displayed in the Camera column.
If multistream mode is enabled for the camera, in the Video stream drop-down list, select the number of the video stream that you want to display on the monitor. If no stream is selected, the default stream is used.
Note
Configuration of the server video streams is described in Configuring the multistream video. The selected video stream is requested when receiving a video signal both from the server and via the videogate.
- By default, the monitor receives a video stream through the server. If it is necessary to get the video stream directly from the camera, not through the server, from the Connection drop-down list, select Direct.
If a video signal needs to be decimated for its transmission to the client monitor, select the required frame rate of the video signal from the drop-down list in the fps column.
Attention!
We strongly discourage you from setting additional decimation and/or compression for video signals displayed on the server monitor, as this results in unnecessary consumption of the server resources while the video image quality deteriorates.
Features of fps selection:
- The selected FPS value must be less than the frame rate of the video digitizing by a video capture card. Otherwise, the frame rate of the video signal will be the same as the FPS of digitizing.
- For the correct decimation of a video stream compressed using the H.264 or MPEG4 codecs, the FPS value must be equal to the frame rate of the key frames specified in the device settings (IP camera) or Axxon PSIM settings (see Configuring video compression).
- Four streams for a chip are processed on SC300Q16 (FX4) video capture card. If the chip processes a stream without a signal (blue screen), then the total FPS is 10 (4x2.5 FPS) for one chip.
- From the Hardware decoding drop-down list, select default CPU decoder (blank value), Nvidia decoder, or Intel Quick Sync. Selecting a hardware decoder increases the load on the corresponding CPU.
If the compression level of the video signal needs to be changed for transmission to the client monitor, select the required level of video signal compression from the drop-down list in the Compression column. The compression level of the video signal increases from 0 (no compression) to 5 (maximum compression).
Note
If you change the compression level for the client, the video signal on the server will be pre-decompressed, which will result in a great load increase on the CPU of the server.
To change the algorithm of the video signal compression for transmission to the client monitor, select the required algorithm of compression from the Compressor drop-down list. If the compressor is selected, the value in the Compression list must be selected as well.
Note
Recompression of the video signal is performed on the videogate side.
- If the monitor must receive live and archived video from the selected camera via the Videogate object, select the name of this object from the drop-down list in the Gate column.
If a video archive from the selected camera must be transmitted to the monitor from the Backup archive object, select the name of this object from the drop-down list in the Backup archive column.
Note
In case the access to the backup archive is performed through the videogate, the specified value must coincide with the selected value for this video camera when configuring the Videogate object—see Selecting and configuring the cameras for the Videogate module.- If the selected camera is used for viewing the video archive from the edge storage, select the required Edge storage object from the Edge storage drop-down list.
- If the transmission from the Backup archive object is performed via the Videogate object, select the name of this object from the drop-down list in the Videogate for Backup archive column.
- To enable search in the archive of the corresponding camera, select the VMDA metadata storage object corresponding to the VMDA tracks database intended to be used for archive search from the VMDA metadata storage drop-down list.
If there is a fisheye or a panomorph lens on the camera (see Configuration of fisheye cameras), in the Display type drop-down list, select the type of video display from the camera in the surveillance window: virtual telemetry or panorama.
Note
Conversion is enabled in the video surveillance monitor when zooming in (see Control of PTZ devices using a mouse) or in the function menu of the surveillance window (see Enable fisheye).
This feature won't work if:
- Only alarm cameras are displayed on the monitor (see Configuration of the display mode of camera windows).
- PTZ control on the video surveillance monitor is forbidden (see Set the PTZ control priority using the Monitor object).
- If it is necessary to start macros from the camera function menu in the surveillance window, select the corresponding Macro objects from the Macro 1 and Macro 2 lists. See also Creating and using macros.
- The Guid column automatically displays the unique identifier of the selected camera. This value cannot be changed, it depends on the camera number.
- Repeat steps a–n for all required cameras. To add new cameras to the table use the down arrow button ↓ on the keyboard. To delete a row, use the Ctrl+Del key combination.
- To save all changes, click the Apply button.
Cameras on the settings panel of the Monitor object are now selected.
Overview
Content Tools