
Go to documentation repository
On this page:
The Live sound switch operation is based on templates, each of which specifies the necessary interconnections between microphones and speakers. You can set an unlimited number of templates.
The display window of the Live sound switch object contains a list of templates (1), template control buttons (2) and template settings (3):

Template configuration
- Click the Add button to create a template (4).

In the Speaker list (5), set the checkboxes for the speakers which should play sound. You can use the search box (6) to find the required speaker by writing its name or part of it.
In the Microphone list (7), set the checkboxes for the microphones or audio files, the sound from which should be sent to the speaker (the procedure of adding them to the list is described below). Similarly, you can find the required microphone or audio file by name in the search box (8).
Note
The sound on the speaker is mixed if multiple sound sources are selected. You cannot select both a microphone and an audio file as the audio source at the same time, but you can select multiple microphones.
- Click the Save button (9) to save the template settings.
- Repeat steps 1-4 to configure the required number of templates.
Managing templates
- To search for a required template, enter the template name or part of it in the Search field (10).
- To change the playback order of templates, select a template in the list and click the Up or Down button (11, 12). The first template in the list will be played first.
- To rename a template, select it in the list and left-click on it once. You can also right-click on the template and select Edit from the context menu.
- To delete a template, select the required template and click the Delete button (13). You can also right-click on the template and select Delete from the context menu.
Playing audio by template
To play sound on speakers, select a template in the list and click the Play button (14). As a result, the sound from the selected microphones will be sent to the selected speakers, and the names of active devices will be highlighted with red:

When playing sound from audio files, the sound transmission progress will be shown as a percentage next to the file name or in the form of a separate window illustrating the playback progress (depends on the settings, see Creating and configuring the Live sound switch object):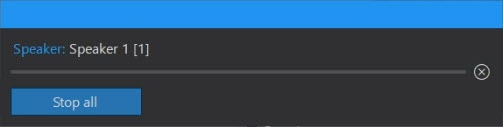
To stop sound transmission, click the Stop button (15).
Adding audio files as sound sources
To send custom sounds to the speakers, set the checkbox for Audio files when selecting sound sources. The window for adding files will open:

Add audio files as follows:
- Click the Add button (1).
- In the window that opens, specify the path to the audio file with its name. Files in wav format are supported. Path example: C:\Users\Julia\Desktop\wav\sample-3s.wav.

- Click OK. As a result, the selected file (2) will appear in the list of files for playback.
- If it is necessary to loop the file during playback, select it in the list and set the Loop check box (3).
- Repeat steps 1-4 for the required number of audio files.
- If necessary, adjust the playback order of files by selecting the required file in the list and moving it using the Up and Down buttons (4, 5). The first file in the list will be played first.
- To edit the added file, right-click on it and select Edit from the context menu. To delete the file, select it in the list and click the Delete button (7) or right-click on it and select Delete from the context menu.
- Click the OK button (6).
Adding audio files is now complete. To edit the list of audio files, right-click on Audio files object and select Edit from the context menu:
Overview
Content Tools