
Go to documentation repository
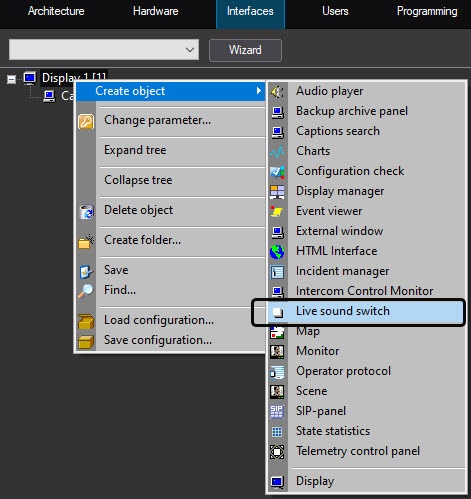
The Live sound switch object is created on the basis of Display object in Interfaces tab of System setting dialog box.
To set up the Live sound switch object, do the following:
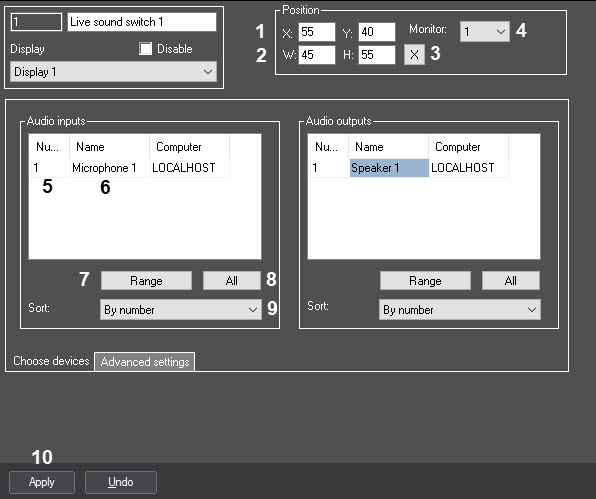
- Go to the Choose devices tab on the setting panel of the Live sound switch object.
- Adjust the position of the Live sound switch object dialog box in one of the following ways:
- Manually:
- Enter the coordinates of the upper left corner: the X (horizontal indent from the left screen border) and Y (vertical indent from the top screen border) fields (1). The coordinates are expressed as a percentage relative to the screen size horizontally and vertically, respectively.
- Enter the dialog box dimensions: the W (window width) and H (window height) fields (2). The dimensions are expressed as a percentage relative to the screen size horizontally and vertically, respectively.
- With a test window:
- Click the X button (3).
Position the Specify dimensions test window where the Live sound switch window should be displayed.
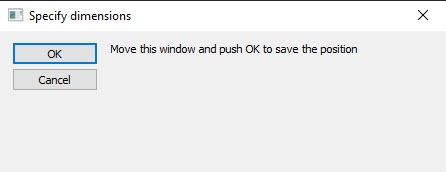
Click OK. As a result, the coordinates in the fields X, Y, W, H will be set in accordance with the size and position of the test window.
- Manually:
- From the Monitor drop-down list (4), select the number of the monitor in the system for which the coordinates are set and on which the Live sound switch should be displayed.
- In the Audio inputs field, add the audio sources in one of the following ways:
- One by one:
- From the drop-down list in the Number column (5), select the number of the Microphone object, or in the Name column (6), select the name of the Microphone object. The rest of the columns will be filled in automatically.
Repeat step i for all required Microphone objects.
Note
To add a new row to the table, press the "down" button on the keyboard. To delete a row, select it and press Ctrl+Del.
- Several microphones at once:
- Click the Range button (7). This will open the Add devices window.
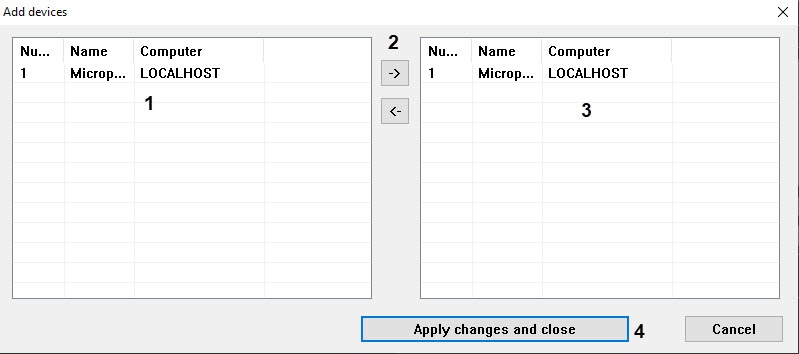
- In the list on the left (1), select the necessary microphones to add. To select multiple lines, left-click on them while holding down the Ctrl key on the keyboard.
Move the microphones to the list on the right (3) using the -> button (2).
Note.
To remove the audio sources from the list on the right, select them and click <-.- Click the Apply changes and close button (4).
- As a result, the selected microphones will be added to the list on the settings panel of the Live sound switch object.
- Click the Range button (7). This will open the Add devices window.
- All microphones created in the hardware tree: click the All button (8).
- One by one:
- From the Sort drop-down list (9), select the sorting method for the Audio inputs list: by number or by name.
- In the Audio outputs field, add audio receivers and set up sorting similarly to audio sources in steps 4 and 5.
- Go to the Advanced settings tab and set the External window when playing files check box, if it is necessary that a window with playback progress opens in the Live sound switch interface when playing files:
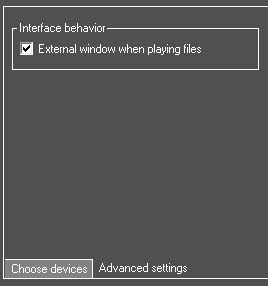
If the checkbox is not set, then the progress will be displayed as a percentage in the speaker name during the playback. - Click the Apply button to save the changes (10).
Setting up the Live sound switch object is now completed.
Overview
Content Tools