
Go to documentation repository
Documentation for Intellect 4.11.0-4.11.3. Documentation for other versions of Intellect is available too.
Previous page
![]()
![]() Next page
Next page
The Report system window contains the following sections: the main control panel, the report creation panel, and the report view panel.
Figure below shows an example of the Report window.
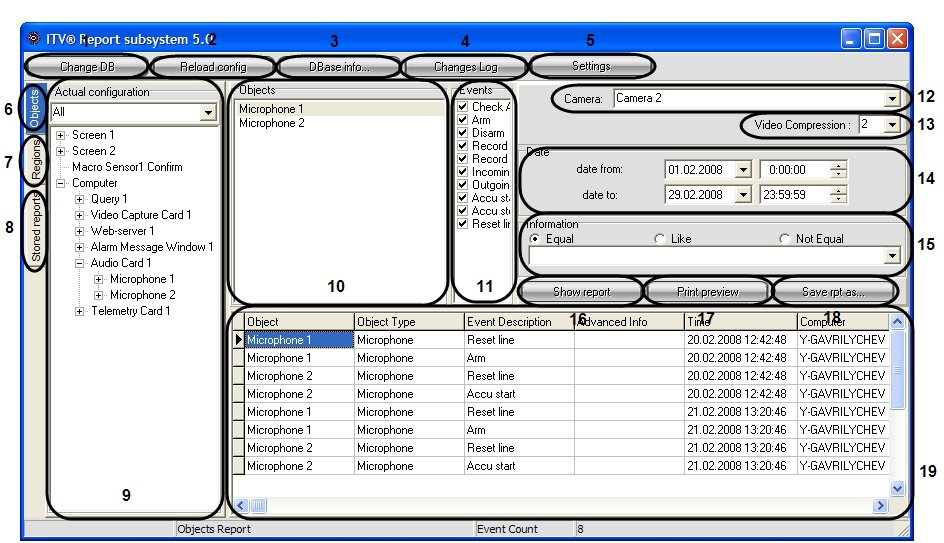
The Report window includes the following interface elements (numbered according to the screenshot on the figure):
- The Change DB button allows changing the current configuration database of the Intellect system.
- The Reload Config button reloads the system configuration and registered events from the current database.
- The DBase Info button opens the Base Info window containing the following information about the events archive: the dates of the first and last registered event, the archive depth and the total number of events in the database.
- The Changes Log button allows viewing the information on the changes made to the Intellect configuration.
- The Settings button opens the OptionsForm window allowing to introduce new Events Log parameter settings.
- The Object button opens the Actual Configuration tab allowing to select the objects to become the sources of the events to be included in the report.
- The Regions button opens the Regions tab allowing to select the objects in the chosen region. The reports are then created on these objects.
- The Shared Reports button opens the tab for selecting the existing report templates. A report template is a list of objects and events to be included in the report.
- The Actual Configuration tab allows selecting the objects to become the sources of the events to be included in the reports.
This tab opens when the Objects button is clicked.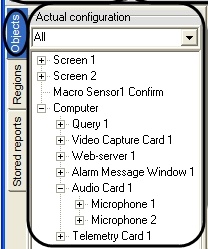
The Regions button opens the Regions tab allowing to select the objects in the chosen region. The reports are then created based on these objects.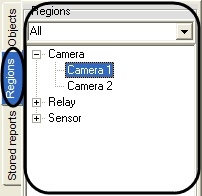
The Shared Reports button opens the tab showing the list of all existing report templates. A report template is a list of objects and events to be included in the report.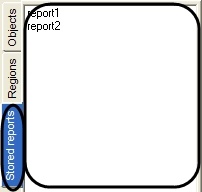
- The list of selected objects to create the reports for.
- The list of available events for the object selected in step 10. Select the events to be included in the report. By default, all events of the chosen object are selected.
- The Camera list is designed for selecting the camera, archive of which is playing from the screen report form if it’s required to change default camera.
- The Video Compression list allows setting the compression level of the video played in the Report system.
- The Date group allows specifying the time interval for the report.
The Information group allows setting the string criteria to be searched for in the Advanced Info column of the report.
Note.
In case of first start of Web-report subsystem this panel unavailable for edit. Restart the Web-report subsystem
The Information field group contains the following fields:- Text field. Enter the character string to be searched for.
- Equal radio-button. When selected, the system looks for exact case-sensitive matches only.
- Like radio-button. When selected, the system looks for the rows where the Advanced Info column contains the search string, case-sensitive.
- Not Equal radio-button. When selected, the system looks for the rows where the Advanced Info column does not match the search string, case-sensitive.
- The Show Report button. Creates the screen form of the report (see the Creating a screen report section).
The Print Preview button. Creates the printed report (see the Creating a printed report section).
Note.
If the screen report has not been created before the printed report is activated, the screen report is automatically created.- The Save Rpt As button. Saves the report template, i.e. the list of objects (see p. 10) and corresponding events (see p.11).
- The screen report panel. Shows the screen report. The panel includes the following columns:
- Object – the name of the object where the event occurred.
- Object type – the type of the object where the event occurred.
- Event Description – the name of the event registered by the system.
- Advanced Info – additional information on the event.
- Time – date and time when the event started.
- Computer - the name of the computer that registered the event.
Overview
Content Tools