
Go to documentation repository
The SIP-panel is configured as follows:
- Go to the Basic settings tab of the SIP-panel object.
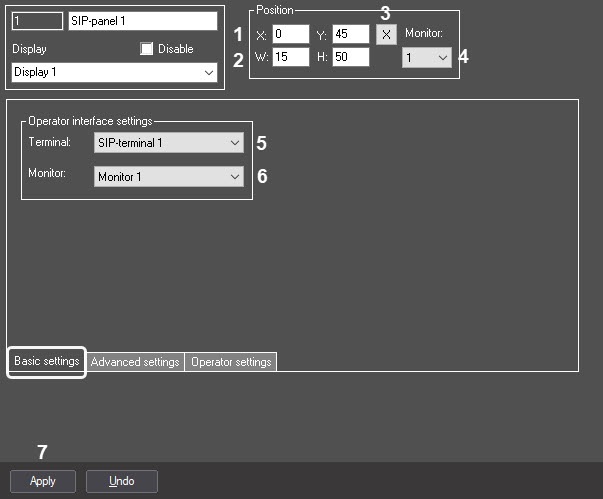
- Set the coordinates of the SIP-panel interface window in one of the following ways:
- Manually:
- Set the coordinates of the upper left corner of the interface window: the X (horizontal indent from the left edge of the screen) and Y (vertical indent from the upper edge of the screen) fields. The coordinates are expressed as a percentage of the horizontal and vertical screen dimensions, respectively (1).
- Set the dimensions of the interface window: the W (window width) and H (window height) fields. The dimensions are expressed as a percentage of the horizontal and vertical screen dimensions, respectively (2).
- Using the test window:
- Click the X button (3).
- Position the Specify dimensions test window where the SIP-panel should be displayed.
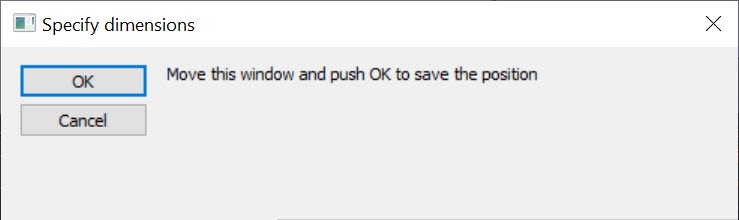
- Click the OK button. As a result, the coordinates in the X, Y, W, H fields will be set according to the dimensions and position of the test window.
- Manually:
- From the Monitor drop-down list (4), select the computer monitor on which the interface window will be displayed.
From the Terminal drop-down list (5), select the SIP-terminal object which SIP-devices use the SIP-panel.
Note
Each Server/Remote Client should have its own display with its own SIP-panel (see Assigning the displays to the operator workstations). If the display with this SIP-panel is already selected for any computer, the Terminal drop-down list will be inactive. It is necessary to fix the incorrect configuration of the Server/Remote Client.
- From the Monitor drop-down list (6), select the Monitor object corresponding to the Video Surveillance Monitor to which the video cameras associated with the corresponding SIP-devices are added. For details, see Selecting and configuring video cameras.
- Click the Apply button (7).
The basic settings of the SIP-panel interface object are now configured.
Overview
Content Tools