Go to documentation repository
Axxon PSIM™ software performs audio signal archiving to the local server disks, net disks and USB disks.
In synchro recording mode, audio recording files are stored together with video recordings in the "Video" folder(s). So, selecting the disks for audio recording storage in synchro recording mode is equivalent to selecting the disks for video recording storage. For description of the procedure, see the relevant section of this Guide. In sound activated recording mode, audio recording files are stored in the "AUDIO" folder separately from the video archive.
By default, no HDD is listed for the sound activated audio recording storage, hence, sound activated recording is unavailable. To enable the sound activated recording, select one or more disks.
Important!
If audio recording is activated by sound – not performed in synchro record mode – then disks different from those for recording video are to be selected.
Note.
Disk(s) selection is done in one of the following ways:
- Estimate the disk capacity, necessary for audio archive storage in the sound activated mode. The estimation technique is similar to the one used for the video archive (see Free disk space (video archive size) required).
- Go to the Computer object settings panel.
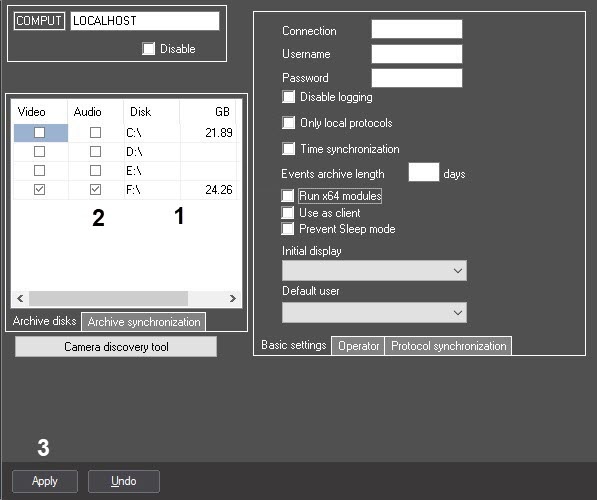
- Select the Computer object on the Hardware tab in the objects tree. The settings panel of the selected object appears in the right part of the Hardware tab.
- The local disk names, available for audio archiving, are presented in the Disk column of the Archive storage disks table (1). The GB column contains the relevant disks capacities in gigabytes (GB). Select the disks for audio archiving and make sure that the total selected disk capacity is sufficient.
- Set the checkmarks in the Audio column for the selected disks names (2). Local, net and USB disks are available for storing.
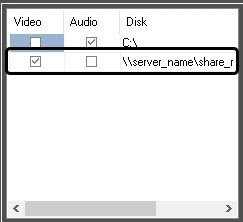
- To add a net disk via UNC paths, do the following:
- Go to the last line in the disk list and click the down key.
- Enter the path to a net disk in the appeared line. UNC path is set in the format «\\server_name\share_name», where «server_name» is the name of file server and «share_name» is the net name of general folder.
- Set a checkbox in the Audio column for created disk.
- Go to the last line in the disk list and click the down key.
- Click the Apply button (3).
Selecting the disks for audio archive storage is completed.

