Go to documentation repository
Page History
...
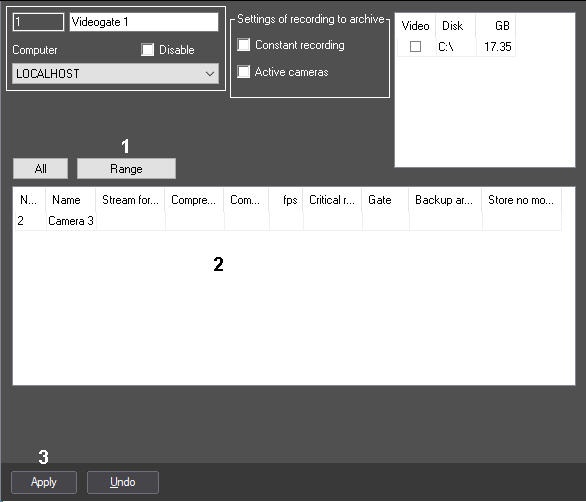
- Go to the settings panel of Videogate system object and then click Range button (1).
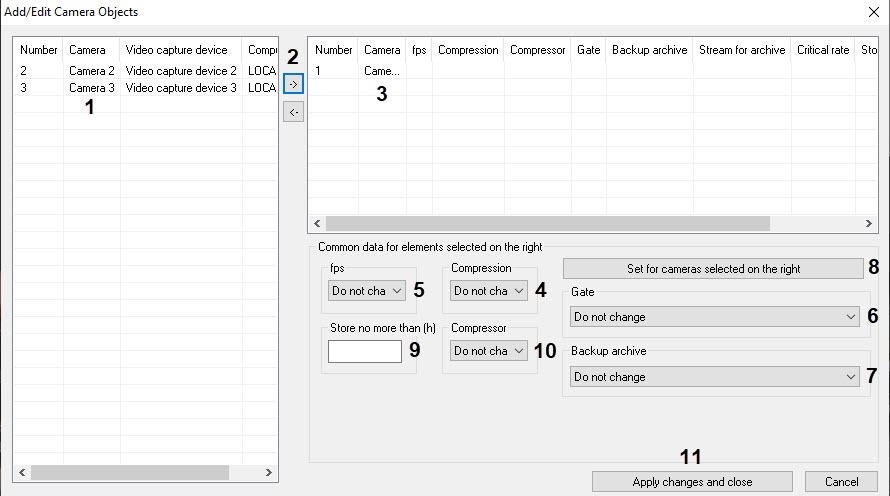
- In result a dialog window Add/Edit Сamera Camera Objects will open.
- Select the required objects in the left list of Add/Edit Сamera Camera Objects window (1).
Remove the selected cameras to the right list, clicking the button (2).
Info title Note. Right list contains a list of cameras, selected for transmitting the video signals through the Videogate.
Button is used for back action, for removing the selected cameras from the right list to the left (2).- In result, the selected video cameras will be displayed in the right list of Add/Edit Сamera Camera Objects window (3).
When necessary select in the right list the names of the required cameras for complex editing of parameters (3).
Note title Attention! For all the selected cameras the same value of parameters will be set.
Info title Note. There is no possibility to edit Critical rate parameter using the Add/Edit Сamera Camera Objects window. If it is necessary to change the video signal compression level for transmission through the Videogate, select the required video signal compression level from the Compression drop-down list (4). The video signal compression level increases from 0 (no compression) to 5 (maximum compression). Selecting an empty value means that the initial compression level will be applied, Do not change value means that the compression level of the device will be applied.
Info title Note. In case of setting the compression level video signal must be preliminary decompressed on the Server that leads to great loading on the CP of the Server.
Settings Compression, fps, Gate, Backup archive belong to the group Set for cameras selected on the right.If it is necessary to thin out the video signal for transmission through the Videogate, select the required video frame rate from the fps drop-down list (5). Selecting an empty value means that the initial frame rate will be applied, Do not change value means that the frame rate with which the device transmits the video signal will be applied.
Info title Note. The given fps value must be less the frame rate of video signal’s digitizing by video capture card. Otherwise frame rate of video signal will be equal to the frame rate of digitizing. - In case, if video signal form the selected cameras is to be received from the other Videogate object, then select the name of this object from the Gate dropdown list (6).
- In case when video signal has to be transmitted from the selected cameras from the Backup archive object, select from the Backup archive dropdown list the name of this object (7).
- If it is necessary to limit the storage time of the Videogate archive, enter the maximum number of hours of storage in the Store no more than (h) field (9).
- If it is necessary to change the video signal compression algorithm for transmission through the Videogate, select the required compression algorithm from the Compressor drop-down list (10). If a compressor is specified, it is necessary that a value be selected in the Compression list (4). If a compression level is specified but Compressor is not selected, then the Motion Wavelet compressor is used. Selecting an empty value means that the initial algorithm will be used, Do not change value means that the algorithm that is used for recording on the device will be used.
- To save the set parameters click Set for cameras selected on the right button (8).
- In result the set parameters will be displayed in the right list of Add/edit cameras window (3).
- Repeat steps 6-13 for complex editing of all the required cameras.
- To save all the changes and close Add/Edit Сamera Camera Objects window click Apply changes and close button (11).
- The given settings will be displayed on the settings panel of the Videogate object (2).
- To save the given changes click Apply button (3).
...


