Go to documentation repository
Documentation for DetectorPack PSIM 1.0.1.
Previous page Next page
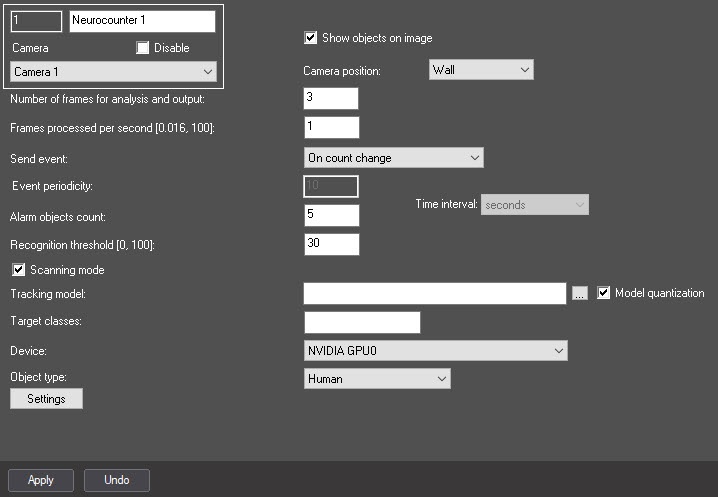
The Neurocounter module can be configured on the settings panel of the Neurocounter object created on the basis of the Camera object on the Hardware tab of the System settings dialog window.
The Neurocounter module is configured as follows:
- Go to the Neurocounter object settings panel.
- Set the Show objects on image checkbox (1), if it is necessary to frame the detected objects on the image in the debug window (see Start the debug window).
- In the Number of frames for analysis and output field (2), specify the number of frames to be processed to determine the number of objects on them.
- In the Frames processed per second [0,016, 100] field (3), set the number of frames processed per second by the detection tool.
- From the Send event drop-down list (4), select the condition by which an event with the number of detected objects will be generated:
- If threshold exceeded is triggered if the number of detected objects in the image is greater than or equal to the value specified in the Alarm objects count field.
- If threshold not reached is triggered if the number of detected objects in the image is less than or equal to the value specified in the Alarm objects count field.
- On count change is triggered every time the number of detected objects changes.
- By period is triggered by a time period:
- In the Event periodicity field (5), set the time after which the event with the number of detected objects will be generated.
- From the Time interval drop-down list (6), select the time unit of the counter period: seconds, minutes, hours, days.
- In the Alarm objects count field (7), set the threshold number of detected objects in the area of interest. It is used in the If threshold exceeded and If threshold not reached conditions.
In the Recognition threshold [0, 100] field (8), enter the neural counter sensitivity—integer value from 0 to 100.
Note
The neural counter sensitivity is determined experimentally. The lower the sensitivity, the more false triggerings there might be. The higher the sensitivity, the fewer false triggerings there might be, however, some useful tracks might be skipped.
- If a unique neural network is prepared for use, in the Tracking model field, click the button (9), and select the file in the standard Windows Explorer window that opens. If the field is left blank, the default neural networks will be used for detection. They are selected automatically depending on the selected object type (11) and device (10).
- If the path to the neural network was not specified at step 7, from the Device drop-down list (10), select the device on which the neural network will operate. Auto—the device is selected automatically: NVIDIA GPU gets the highest priority, followed by Intel GPU, then CPU.
- From the Object type drop-down list (11), select the object type if the path to the neural network was not specified at step 7:
- Human—the camera is directed at a person at the angle of 100-160°.
- Human (top-down view)—the camera is directed at a person from above at a sight angle.
- Vehicle—the camera is directed at a vehicle at the angle of 100-160°.
- Specify the detection surveillance area on the video image:
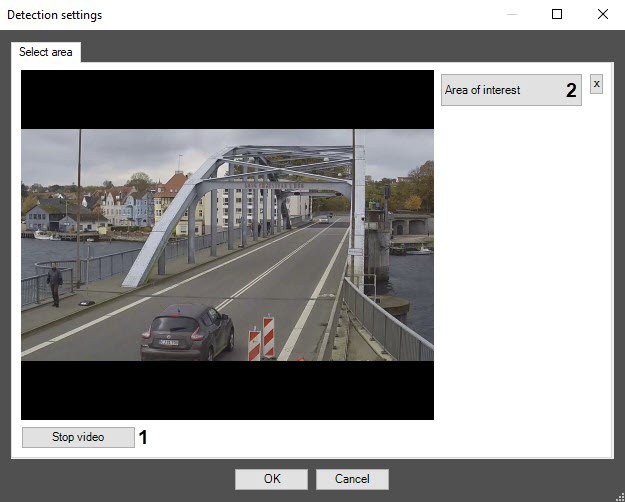
- Click the Settings button (12). The Detection settings window will open.
- Click the Stop video button (1) to capture the video image.
- Click the Area of interest button (2).
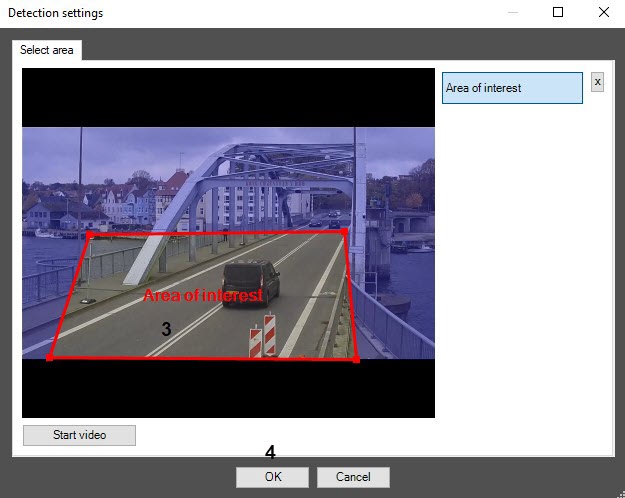
- On the captured video image, set the anchor points of the area, the situation in which you want to analyze, by sequentially clicking the left mouse button (3). Only one area can be added. If you try to add a second area, the first area will be deleted. After adding an area, the rest of the video image will be darkened.
- Click the OK button (4).
- Click the Settings button (12). The Detection settings window will open.
- Click the Apply button (13).
Configuring the Neurocounter module is complete.
Overview
Content Tools


