
Go to documentation repository
Documentation for Axxon One 3.0/3.1 version. Documentation for Axxon One 2.0 version is also available.

On the page:
General information
In Axxon One, you can create and configure detectors and their sub-detectors (child detectors). Sub-detectors process the data received from parent detectors (see General information about detectors and their sub-detectors). The ability to create, edit, copy, and delete detectors is determined by the access level settings in the Detection settings parameter (see Role).
Attention!
- You can create detectors and sub-detectors for enabled and disabled cameras if camera video streams are enabled (see Configuring video stream settings).
- You cannot create sub-detectors if the parent detectors don't have the settings applied (you must click the Apply
 button).
Several identical detectors can operate on the same camera stream:
| Detectors | Number of identical detectors for one camera |
|---|---|
| Motion detector, Neural tracker, Object tracker, Neural counter | 10 |
| Water level detector, Queue detector, Visitors сounter, Mask detector VL, Mask detector VA, Mask detector TV | Unlimited |
Attention!
For other detectors and their sub-detectors, you cannot create identical detectors and their sub-detectors for one camera.
To create, edit, copy, and delete detectors and their sub-detectors in camera groups, go to the Groups tab in the lower left corner. The Groups tab displays only cameras within the groups; the full list of cameras is not displayed. You can edit camera groups only on the Devices tab (see Configuration of camera groups).
Create a detector
To create a detector, do the following:
- Go to the Detectors tab.
- Below the required camera, click Create…. The list of available categories of detectors will be displayed (see General information about detectors and their sub-detectors).
Select a detector.
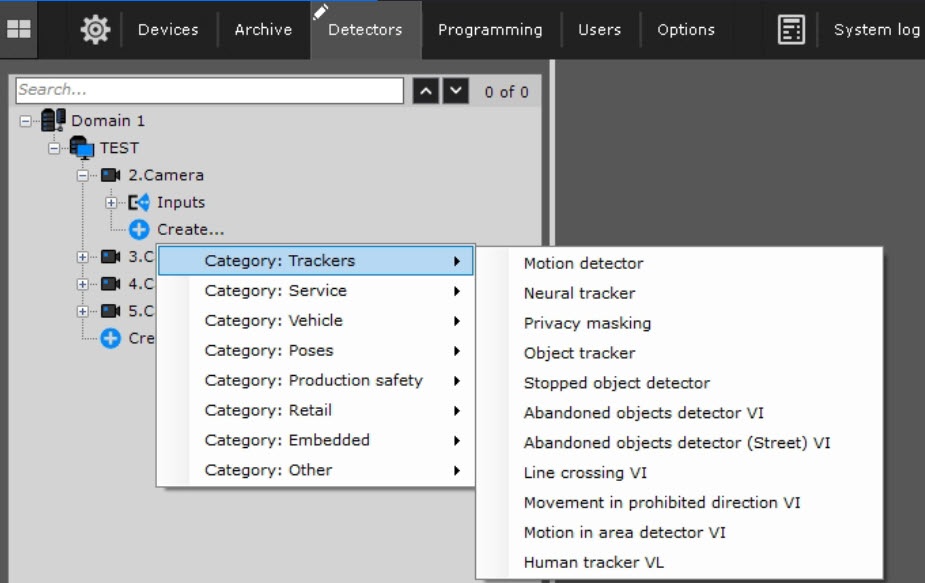
A window in which you can configure a detector opens: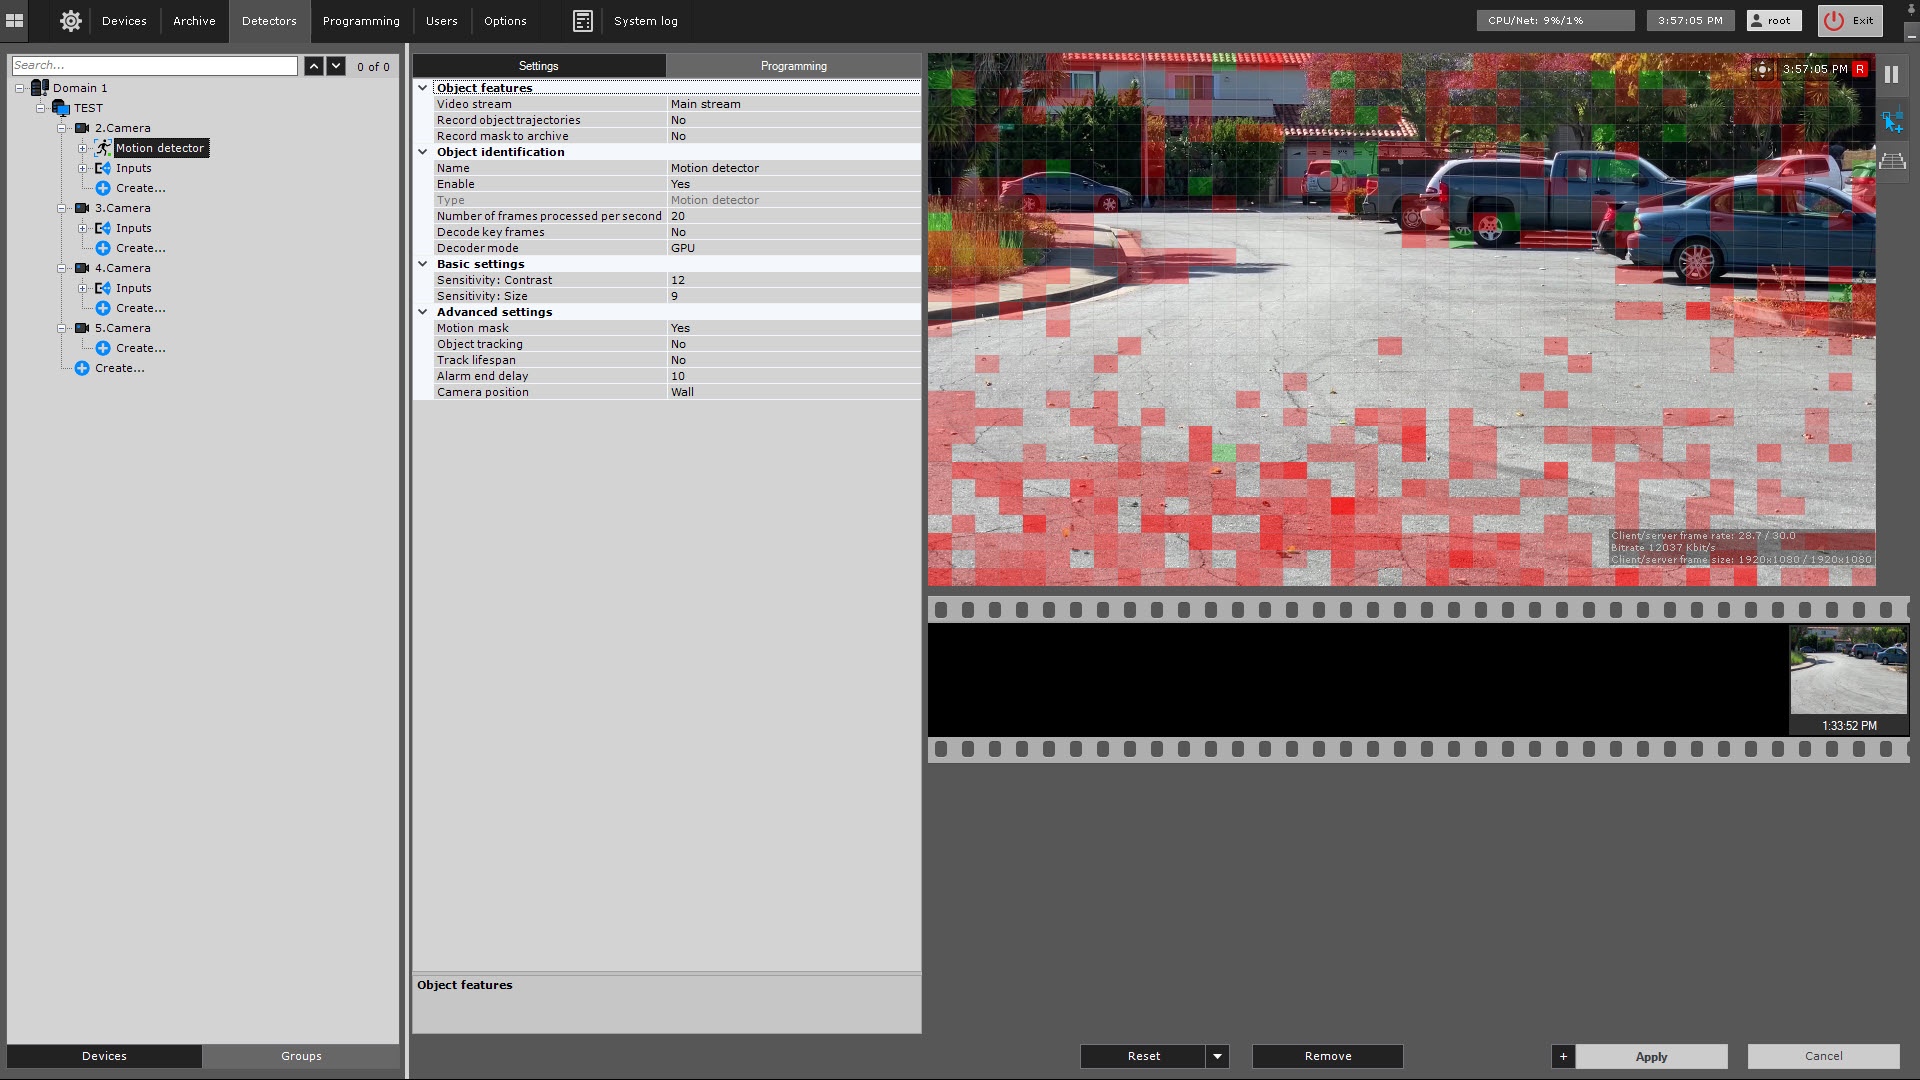
- Click the Apply button.
Creation of a detector is complete. The detector is displayed below the selected camera in the object tree.
Create a sub-detector
To create a sub-detector, do the following:
- Create the required detector and specify its parameters (see General information about detectors and their sub-detectors).
Below the created detector, click Create…. The list of available sub-detectors is displayed.
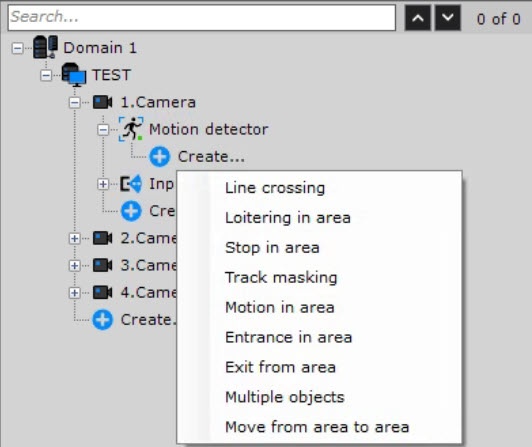
- Select a sub-detector. A window in which you can configure a sub-detector opens.
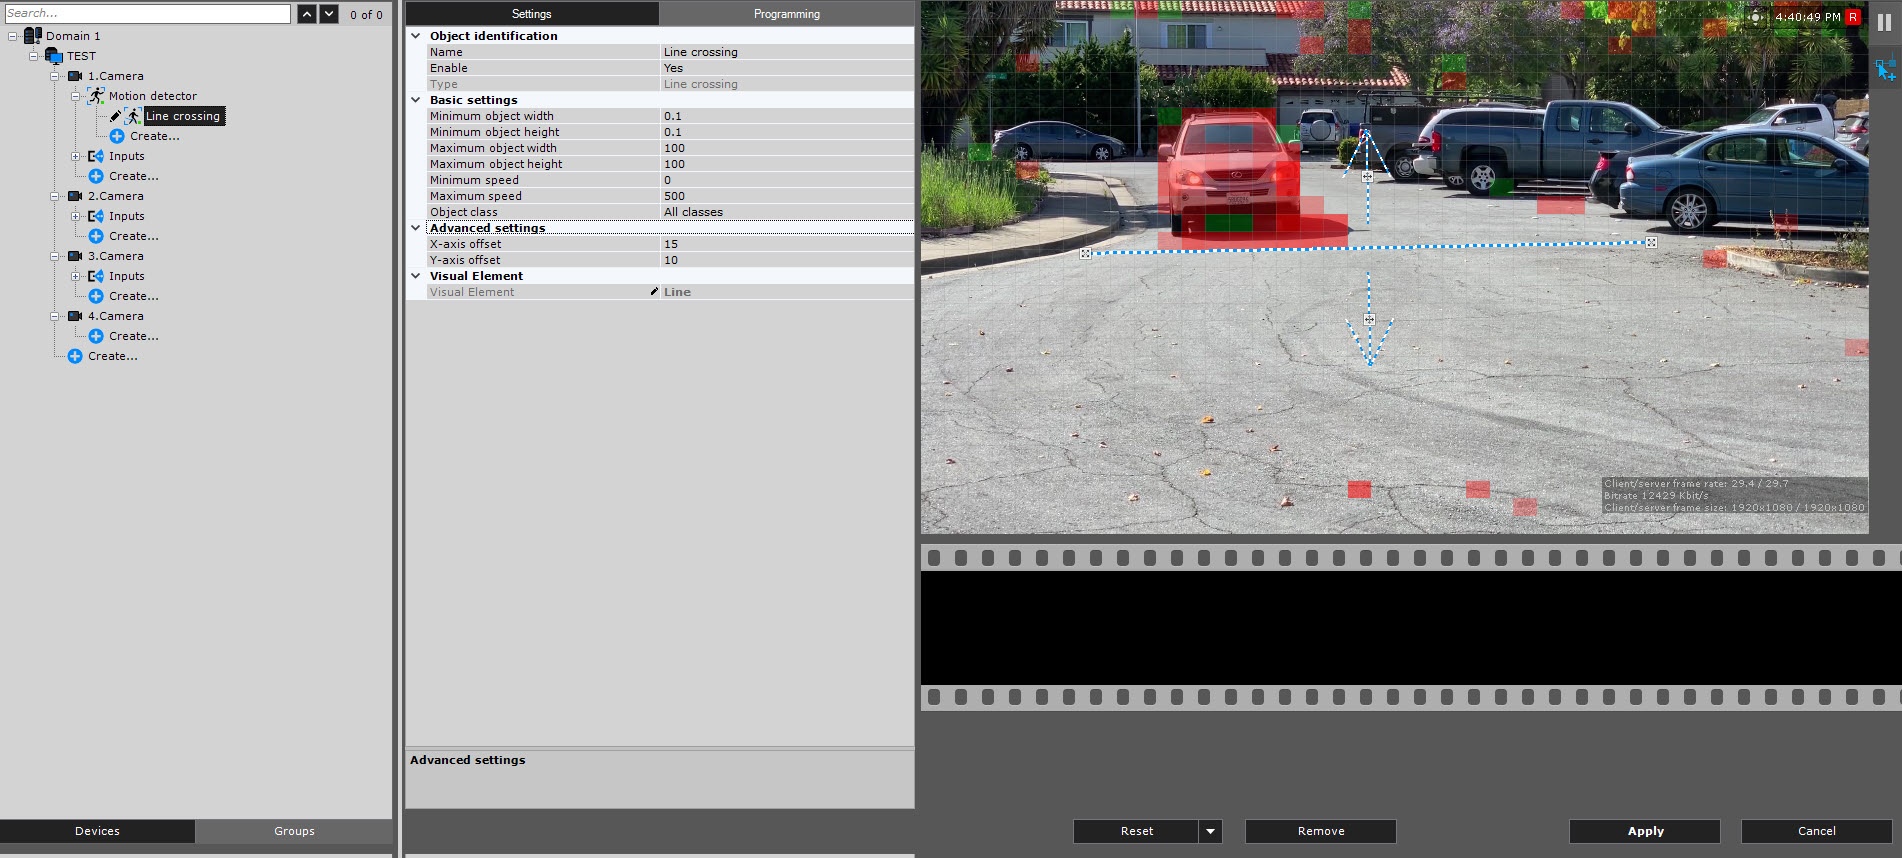
- Click the Apply button.
Creation of a sub-detector is complete. The sub-detector is displayed below the selected camera and below the detector in the object tree.
Bulk creation of detectors/sub-detectors of the same type for different cameras
To bulk create detectors/sub-detectors of the same type for different cameras, do the following:
- Create and configure the required detectors/sub-detectors for one camera, or select the existing detector/sub-detectors in the object tree.
Click the
 button in the lower right corner.
Note
When you select a sub-detector, in the camera list, only those cameras that have the same parent detector are available.
Set the checkbox next to the required cameras. To quickly select a large number of cameras, press the Shift key, select the first and the last cameras for which you want to create a detector/sub-detector. The checkbox will be set for all selected cameras when you select any of them.
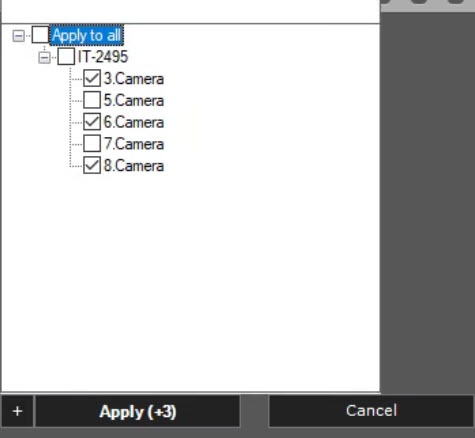
- Click the Apply button. The number of cameras for which the detector/sub-detector is created is indicated in brackets.
Bulk creation of detectors/sub-detectors of the same type for different cameras is complete. The detectors/sub-detectors of the selected cameras will be displayed in the object tree.
Bulk application of settings for detectors/sub-detectors of the same type
For bulk application of settings for detectors/sub-detectors of the same type, do the following:
Change the values of the parameters in the settings of one detector/sub-detector.
- Click the button in the lower right corner.
Set the checkbox next to the required cameras with the same type of detector/sub-detector. To quickly select a large number of cameras with the same type of detector/sub-detector, press the Shift key and select the first and last cameras for which you want to change settings of a detector/sub-detector. The checkbox will be set for all selected cameras with the same type of detector/sub-detector when you select any of them.
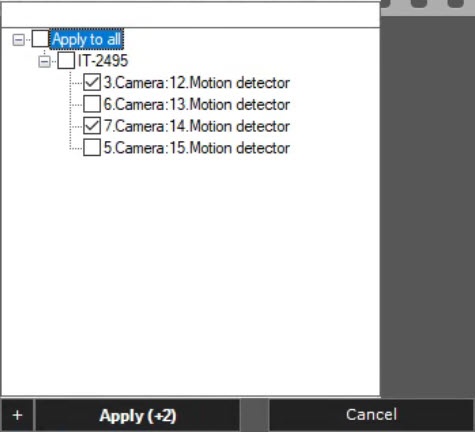
Attention!
You cannot bulk change detection areas (see Configuration of a detection area) and ignore areas (see Configuring the ignore area).
- Click the Apply button. The number of cameras with the same type of detector/sub-detector for which the settings are applied is indicated in brackets.
Bulk application of settings for detectors/sub-detectors of the same type is complete. In the settings of the detectors/sub-detectors, the selected cameras will have the same values of the parameters.
Reset settings of a detector/sub-detector
To reset the settings of a detector/sub-detector to default values, do the following:
- Go to the Detectors tab.
- Below the required camera, select the detector/sub-detector.
- Click the Reset
 button.
 - To save the changes, click the Apply button. To cancel the actions, click the Cancel
 button.
The settings of a detector/sub-detector are reset.
If you need to reset individual settings of a detector/sub-detector:
- Go to the Detectors tab.
- Below the required camera, select the detector/sub-detector.
- Click the
 button next to the Reset button.
 - Select:
- Reset visual elements to default (to reset visual elements).
- Reset configuration to default (to reset configuration).
- To save the changes, click the Apply button. To cancel the actions, click the Cancel button.
Individual settings of a detector/sub-detector are reset.
Bulk reset of settings of a detector/sub-detector
To bulk reset the settings of a detector/sub-detector to default values, do the following:
- Go to the Detectors tab.
- Below the required camera, select the detector/sub-detector.
- Click the button in the lower right corner.
- Set the checkbox next to the required cameras with the same type of detector/sub-detector. To quickly select a large number of cameras with the same type of detector/sub-detector, press the Shift key and select the first and last cameras for which you want to change settings of a detector/sub-detector. The checkbox will be set for all selected cameras with the same type of detector/sub-detector when you select any of them.
- Click the Reset button.
- Click the Apply button. The number of cameras with the same type of detector/sub-detector for which the settings are applied is indicated in brackets. To cancel the actions, click the Cancel button.
The bulk reset of settings of a detector/sub-detector to default values is complete.
If you need to reset individual settings of a detector/sub-detector:
- Go to the Detectors tab.
- Below the required camera, select the detector/sub-detector.
- Click the button in the lower right corner.
- Set the checkbox next to the required cameras with the same type of detector/sub-detector. To quickly select a large number of cameras with the same type of detector/sub-detector, press the Shift key and select the first and last cameras for which you want to change settings of a detector/sub-detector. The checkbox will be set for all selected cameras with the same type of detector/sub-detector when you select any of them.
- Click the button next to the Reset button.
- Select:
- Reset visual elements to default (to reset visual elements).
- Reset configuration to default (to reset configuration).
- To save the changes, click the Apply button. The number of cameras with the same type of detector/sub-detector for which the settings are applied is indicated in brackets. To cancel the actions, click the Cancel button.
The bulk reset of individual settings of a detector/sub-detector is complete.
Remove a detector/sub-detector
To remove a detector/sub-detector, do the following:
Go to the Detectors tab.
- Below the required camera, select the detector/sub-detector.
Click the Remove
 button.
Attention!
If you created sub-detectors for the detector, they also will be removed from the existing configuration.
- To save the changes, click the Apply button. To cancel the changes, click the Cancel button.
Removing a detector/sub-detector is complete. The removed detector/sub-detector won’t be displayed below the camera in the object tree.
Bulk removal of detectors/sub-detectors
To bulk remove detectors/sub-detectors, do the following:
- Go to the Detectors tab.
Use the Ctrl key to select the detectors/sub-detectors that you want to delete in the object tree.
Attention!
You can select detectors of one level only. For example, if you select Motion detector, you cannot select Line crossing and vice versa.
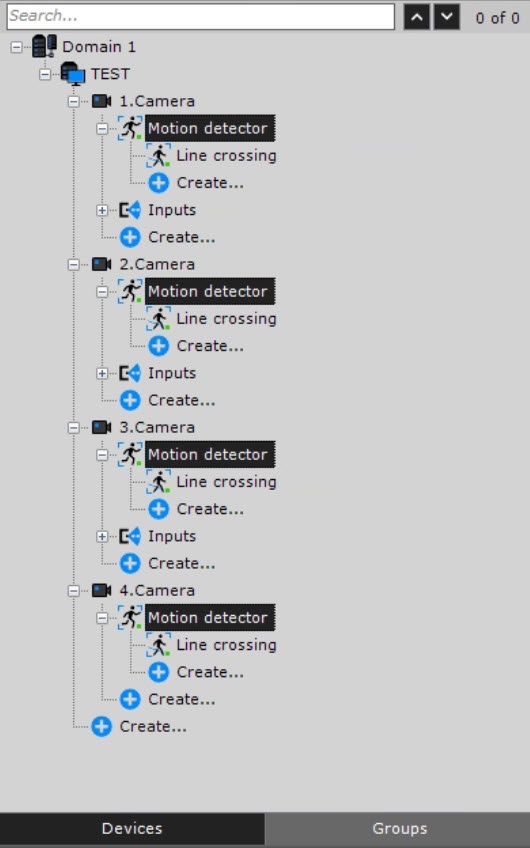
- Click the Remove button.
Click the Apply
button to save the changes. Click the Cancel button to cancel the changes.
Bulk removal of detectors/sub-detectors is complete. The removed detectors/sub-detectors won’t be displayed in the object tree.
Overview
Content Tools