
Go to documentation repository
Documentation for Axxon One 3.0/3.1 version. Documentation for Axxon One 2.0 version is also available.

On the page:
General information
A role is intended for assigning a group of users individual rights and permissions for administration, management and/or monitoring of individual components of Axxon One.
Creating a role
To create a new role, do the following:
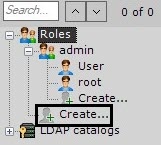
- At the end of the list of system roles, click the Create link. The new role is added to the system, with its properties displayed on the right side.
Configure the access permissions:
Parameters Access level Description Basic Name operator Specify a name of the role Map control Map control No access Select the access level to the maps for users with this role Other
Archive depth viewing restriction (hours) 0 If you need to limit the access of users of this role to all system archives, you can specify the archive depth limit in hours. If no limit is set, users can view all videos Access to Functions Configure access permissions to the Axxon One fucntions Access to confidential bookmarks Yes Add and view confidential bookmarks No Access to Search in archive mode
Yes Archive search (see Search in archive)
No Adding camera to layout in monitoring mode Yes Add a camera to a layout in the Live mode (see Configuration of layouts)
No Adding/editing presets Yes Add and edit presets for PTZ cameras (see Selecting a preset)
No Alarms processing − Alarms management (see Video surveillance in the Alarm management mode)
No access Users have no access to alarm events View only Users can view alarm events, but they can't assess them Full access Users can view alarm events and assess them Allow deleting records Yes Remove videos from the archive (see Deleting archive fragment)
No Allow unprotected export Yes Export frames and videos without password protection. If No, it is necessary to set a password when exporting (see Export)
No Bookmarks processing No access Users can view and export bookmarks
Create Users can create a bookmark without protection and export it. When editing, you can view and add cameras to the bookmark
Create/Protect Users can create a bookmark with or without protection and export it. When editing, you can view and add cameras to the bookmark. You cannot add or remove protection while editing a bookmark
Create/Protect/Edit and delete Users have all options, including bookmark deletion
Display user login watermark Username The option of protection a video by overlaying watermarks with a unique identifier on top of it (username)
Full access Export Yes Export frames and videos (see Export)
No Layouts editing Yes Edit layouts (see Configuration of layouts)
No Minimize to taskbar Yes Minimize the client of Axxon One (see Interface of Axxon One)
No Operating domain Yes Managing a domain (see Operations with domains)
No Permission to access via WebUI Yes Access to the Web-Server (see Working with Axxon One through the Web client)
No Show titles Yes Showing titles (see Viewing titles from POS terminals)
No System log Yes Viewing the system log (see System log)
No Unlock camera menu button Yes Context menu of a camera (see Context menu of the surveillance window)
No View masked video Yes Showing masked video (see Configuring privacy masking in archive, People masking)
No Access to Settings Allow password change by user (starting with Axxon One 3.1) Yes Allow or prohibit the user with this role to change the password themselves. The default value is Yes. To prevent the user from changing the password themselves, select the No valueNo Archive settings Yes - Configure the access permissions to the Settings tabs
Attention!
- If you select the Device access rights only value in the User Permission settings parameter, all users of the given role will have the permissions to change only the access permissions to the connected devices.
- If the Programming setup isn't available for the user role, the user cannot use the created macros on the Programming tab until the appropriate permissions are granted.
- Configure the access permissions to the system error messages
Attention!
- System error messages are displayed in real-time in the Layouts interface.

- Critical error messages in the system are displayed regardless of the Show error messages parameter.
- Critical errors include:
- geomap connection error;
- export error;
- domain disconnection error;
- insufficient network bandwidth error that is disabled by default. If necessary, you can enable it by adding the SHOW_INSUFFICIENT_BANDWIDTH_WARNING system variable with the TRUE value (see Creating system variable).
- System error messages are displayed in real-time in the Layouts interface.
No Client special options settings Yes No Detection settings Yes No Device settings Yes No Domain options settings Yes No Programming setup Yes No Show error messages Yes No User Permission settings Yes Device access rights No Access to TabsConfigure access permissions to interfacesGroup panelsYes Configure access permissions to camera groups in the Hardware tab and to camera groups in the Layouts interfaceNo Layouts tabYes Configure access permissions to the Axxon One Layouts interface. This parameter refers to the Axxon One client and to the Web-Client (see Web-Client configuration)No Objects panel and Camera search panelYes Configure access permissions to the object panel (see Object panel) and camera search panel (see Camera search panel).No Additional Comment Specify additional information about the user, if necessary
Personal data settings
Attention!
If you set the No value in the View masked video parameter, then the privacy mask is applied to all video recordings (personal data is hidden).
Face recognition
Full access
The value is set by default. The user has full access to the face recognition functionality
No access
If the No access value is set, the user has no access to the:
- face search in the archive (see Search in archive);
- alert panel (see Alert panel) that won't display videos of alarm events that are associated with faces;
- events search (see Events search) that won't display event notifications when faces are detected;
- macros that won't display face settings (see Programming)
License plate recognition
Full access
The value is set by default. The user has full access to the license plate recognition functionality
No access
If the No access value is set, the user has no access to the:
- license plates search in the archive (see Search in archive);
- alert panel (see Alert panel) that won't display videos of alarm events that are associated with license plates;
- events search (see Events search) that won't display event notifications when license plates are detected;
- macros that won't display license plates settings (see Programming)
Similitude search
Full access
The value is set by default. The user has full access to the similitude search functionality
No access
If the No access value is set, the user has no access to the:
- similitude search in the archive (see Search in archive);
- alert panel (see Alert panel) that won't display videos of alarm events that are associated with similitude search;
- events search (see Events search) that won't display event notifications when a similitude search is detected;
- macros that won't display similitude search settings (see Programming)
Vehicle recognition
Full access
The value is set by default. The user has full access to the vehicle recognition functionality No access
If the No access value is set, the user has no access to the:
- vehicle search in the archive (see Search in archive);
- alert panel (see Alert panel) that won't display videos of alarm events that are associated with vehicles;
- events search (see Events search) that won't display event notifications when vehicles are detected;
- macros that won't display vehicle settings (see Programming)
Supervisor confirmation Supervisor for acccess to export - If the administrator has to confirm the launch of export for users of this role (see Export), select the corresponding role in the list
- If the administrator has to confirm the login of users of this role (see Start the client), select the corresponding role in the list
Attention!
- If a user belongs to several roles and each of these roles has its own supervisor, the user can receive confirmation to access export or authorization from a single administrator.
Note
For example, a user can belong to several roles at the same time: Operator 1, Operator 2, Operator 3.
Each of these roles has its own supervisor:- For Operator 1, the supervisor is Admin 1.
- For Operator 2, the supervisor is Admin 2.
- For Operator 3, the supervisor is Admin 3.
The user needs to receive confirmation from only one of the three administrators.
- If a user belongs to a regular role (such as Operator) and an administrator role at the same time, supervisor confirmation isn't required, provided that the administrator role can be used as supervisor.
Note
For example, a user belongs to the Operator 1 and Admin 1 roles at the same time. If Admin 1 is selected as supervisor in the Supervisor confirmation settings, the user doesn't need to receive confirmation to access export or authorization.
Supervisor for authorization in Client Time schedule management Time schedule If you need to grant the users in this role permissions only for a certain period of time, select a time schedule from the list. These users willn't be able to use their permissions outside of the selected time schedule
Video walls management TEST Inherited(No) Configure the permissions to manage the connected clients' monitors by setting permissions for each server on domain. A user who has management permissions for the monitors of a particular server can manage monitors of any client connected to that server
- Configure the access permissions to the Settings tabs
On the Groups tab, configure the Default permissions (see Types of permissions to access hardware, archives and macros).
Note
When you create a new role, you cannot go to another tab until the role is saved. If you change any access permissions on any tab, you cannot go to another tab until the settings are saved.
Device
Access level
Description
Default permissions Configure the default permissions to devices Camera access
No access
No access to the device
Archive only User can view only the archive
Live in Armed mode
User can view video from the camera only when the camera is armed
Live
User can view live video from the camera. Other functions and device configuration aren't available
Live/Archive
User can view live and recorded video from the camera. User cannot arm/disarm/configure the camera
Live/Archive/Control
All functions available. User cannot configure the device
Live/Archive/Control/Configure All functions and device configuration available
Microphone access
No access
User cannot listen to live audio:
- from the camera;
- in the archive.
Audio recording to an exported file isn't available
Live Audio
User can listen to live audio from the camera (the microphone must be turned on). User cannot listen to audio in the archive
Live Audio and Archive
All functions are available
PTZ priority
No access
User cannot control the PTZ device
Maximum level
User can control the PTZ device with the corresponding priority (see Controlling a PTZ сamera)
High level Medium level Low level Minimum level If necessary, configure the access permissions to a specific device on the Devices tab.
To do this, select the access level for a specific device (see Types of permissions to access hardware, archives and macros).Access level Device Access level to device Inherited Camera Access levels are inherited from the Default permissions tab → Groups or from the group permissions Microphone Access levels are inherited from the Default permissions tab → Groups PTZ No access Camera No access to device Microphone PTZ Archive only Camera Archive only Microphone Live audio and archive PTZ Medium level Live in Armed mode Camera View in armed mode Microphone Live audio PTZ Medium level Live Camera View live video Microphone Live audio PTZ Medium level Live/Archive Camera View live video and archive Microphone Live audio and archive PTZ Medium level Live/Archive/Control Camera All functions, configuration isn't available Microphone Live audio and archive PTZ Medium level Live/Archive/Control/Configure Camera All functions, configuration is available Microphone Live audio and archive PTZ Maximum level You can specify the access level to a specific camera and extend it to other cameras. To do this, do the following:
- Select the access level to a camera from a drop-down list on the Devices tab.
Click the
 button and select the cameras, to which you want to specify the same access level.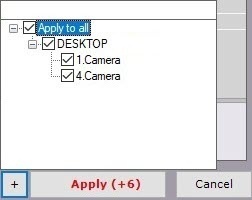
Click the Apply button.
As a result, the specified access level is extended to the selected cameras.
To quickly select multiple cameras, press down the Shift key, select the first and last camera, to which you want to specify the same access level. The checkbox is set for all selected cameras when you select any of them.Note
Similarly, you can extend the access levels to microphones, PTZ devices and archives.
Configure the Default permissions to domain archives or Archive permissions to a specific archive in the Archives section.
Device Access level Description Default permissions Configure the default access permissions to the archive (see Types of permissions to access hardware, archives and macros) Archive access No access No access to this archive Full access Full access to the archive Archive permissions Configure the permissions to a specific archive (see Types of permissions to access hardware, archives and macros) Archive Inherited (full access) Access level is inherited from the Default permissions tab No access No access to this archive Full access Full access to the archive - Configure the Default permissions to macros or Macro permissions to a specific macro in the Macros section.
Attention!
Users outside the admin role can create macros, if they have the permissions to create them. They cannot use them until they have the permissions to use them.
Macro type Access level Description Default permissions Configure the default permissions to macros (see Types of permissions to access hardware, archives and macros) Macro access No access No access to macros Full access Full access to macros Macro permissions Configure the access permissions to a specific macro (see Types of permissions to access hardware, archives and macros) Automatic rules
Inherited Access level is inherited from the Default permissions tab No access No access to macros Full access Full access to macros Event rules Inherited Access level is inherited from the Default permissions tab No access No access to macros Full access Full access to macros Click the Apply
 button to save the changes.
A new role is created.
Copying a role
You can copy a role. To do this, do the following:
- Click the name of the role that you want to copy.
- Click the Create button.
A new role is created with the same parameters as the selected role.
Note
To create an empty role with no parameters specified, select the Roles common group, and click the Create button.
Removing a role
To remove a role, do the following:
Select the role that you want to remove.
Click the Remove
 button.
Note
You cannot delete a role if the user who is logged in belongs to that role.
- Click the Apply button.
The role is removed. All users who belong to this role are also removed.
Overview
Content Tools