Go to documentation repository
There is an opportunity of integrated selection and editing of cameras’ parameters for copying the video archive to the Backup archive.
Integrated selection can be performed in the following way:
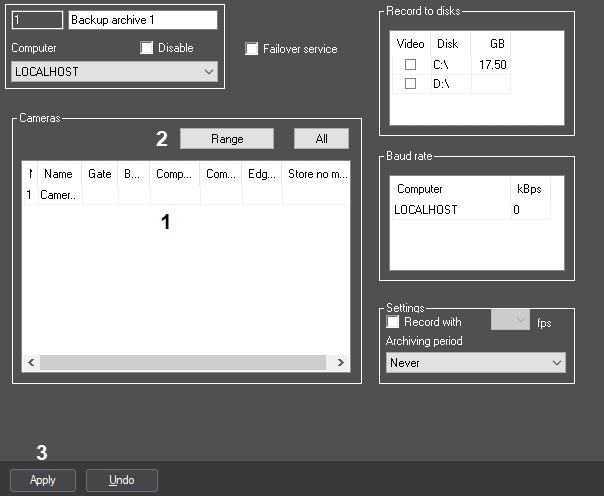
- Go to the settings panel for the Backup archive system object, click the Range button in the Cameras group (1).
- As a result, the Add/Edit Camera Objects dialog box opens.
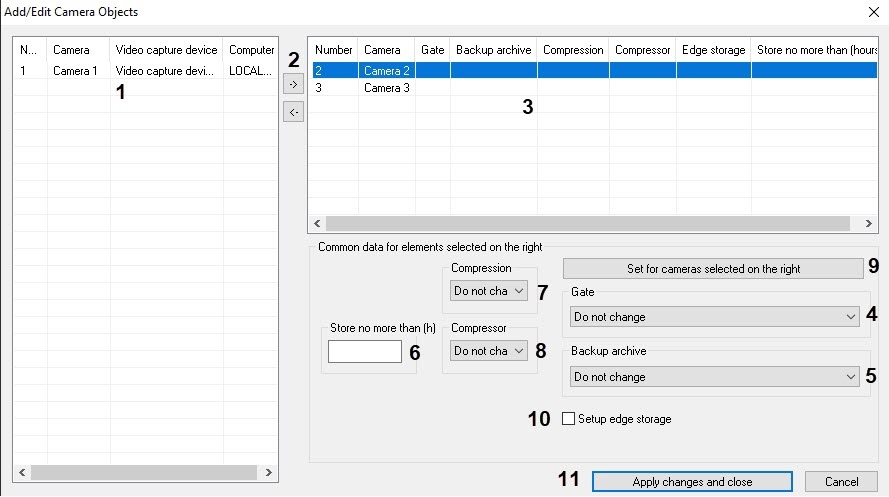
- Select the required cameras in the left list of the Add/Edit Camera Objects box (1).
Move the selected cameras to the right list by clicking the button (2).
Note.
The list on the right is the list of cameras selected for copying the video archive to the Backup archive.
The button is used for reverse action that is for moving the selected video cameras from the right list to the left one (2).- As a result, the selected cameras are displayed in the right list of the Add/Edit Camera Object box (3).
If it is necessary in the right list select the names of required cameras for complex editing their parameters (3).
Attention!
For all the selected cameras the same parameters will be set.If a video archive from the selected camera is to be received via the Videogate object, then select the name of this object from the Gate drop-down list (4).
Note.
The Gate, Backup archive, Setup Edge storage, Store no more than (h), Compression, and Compressor settings belong to the Common data for elements selected on the right group.- If a video archive from the selected camera is to be transmitted from another Backup archive object, select the name of this object in the Backup archive drop-down list (5).
- In the Store no more than (h) field, enter the time period in hours after which it is necessary to delete the records from the corresponding camera from the Backup archive (6). The parameter should be set according to the same rules as for the main archive — see Configuring video camera archive depth.
- If it is necessary to change the video signal compression level when recording to the Backup archive, select the required video signal compression level from the Compression drop-down list (7). The video signal compression level increases from 0 (no compression) to 5 (maximum compression).
If it is necessary to change the video signal compression algorithm when recording to the Backup archive, select the required compression algorithm from the Compressor drop-down list (8). If a compressor is specified, it is necessary that a value be selected in the Compression list (7).
Note
Video signal recompression is performed on the Backup archive side.
- Check the Setup Edge storage checkbox if it is necessary to apply external storages to the selected cameras, if any (10, for more details on external storages, see Importing from edge storages). In this case, the video recordings will be imported into the Backup archive from the external storage corresponding to each camera.
- To save the parameters, click the Set for cameras selected on the right button (9).
- As a result, the set parameters are shown in the list on the right of the Add/Edit Camera Objects box (3).
- Repeat steps 6-13 for complex editing of all the required cameras.
- To save the changes and close the Add/Edit Camera Objects box, click the Apply changes and close button (11).
- Camera settings are shown in the Cameras table on the settings panel of the Backup archive object (2).
- To save all the changes, click the Apply button (3).
Integrated selection of video cameras is now over.


