Go to documentation repository
Page History
A SIP trunk is used to create a virtual communication channel between two SIP servers. It can be two IntellectAxxon PSIM SIP servers, or the IntellectAxxon PSIM SIP server and a third-party SIP server.
Before you start configuring the SIP trunk, it is necessary to add to IntellectAxxon PSIM the SIP-devices of a third-party server based on the same SIP-terminal on which the SIP trunk will be added (see Configuring SIP-devices of the IntellectAxxon PSIM's SIP server).
In the following description of the SIP trunk configuration procedure, the connection between the IntellectAxxon PSIM SIP server and a third-party SIP server is used as an example.
...
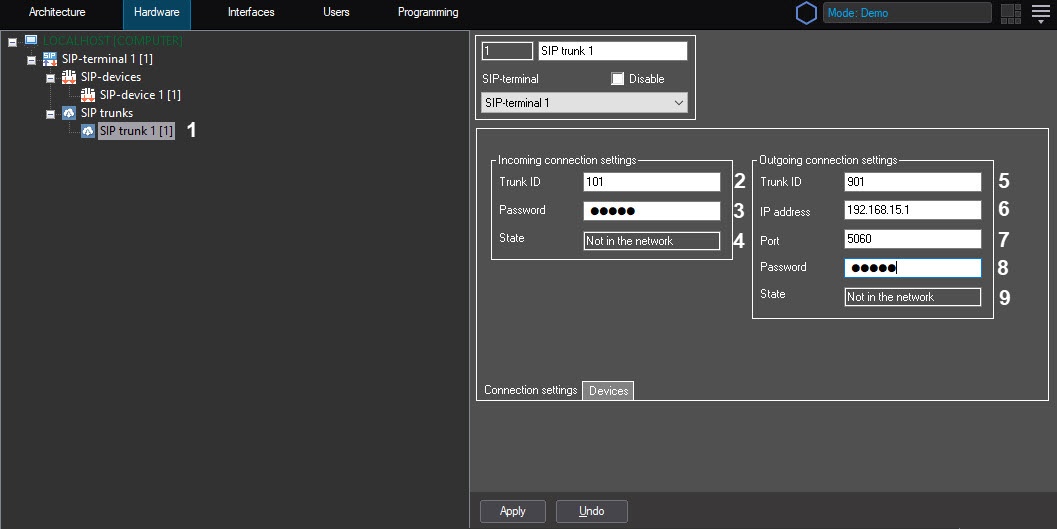
- Create a SIP trunk object on the basis of the SIP-terminal object which is to be connected with the SIP trunk (1).
- On the Connection settings tab, in the Incoming connection settings group:
- In the Trunk ID field (2), specify the ID of the third-party SIP server that is registered in IntellectAxxon PSIM;
- In the Password field (3), enter the password for connecting to a third-party SIP server;
- The State field (4) displays the current status of the registered SIP server.
- On the Connection settings tab, in the Outgoing connection settings group:
- In the Trunk ID field (5), specify the ID of the IntellectAxxon PSIM SIP server, which is registered on a third-party SIP server;
- In the IP address field (6), enter the IP address of the third-party SIP server;
- In the Port field (7), specify the port of the IntellectAxxon PSIM SIP server;
- In the Password field (8) specify the password for connecting to the IntellectAxxon PSIM SIP server;
- The State field (9) displays the current status of the IntellectAxxon PSIM SIP server.
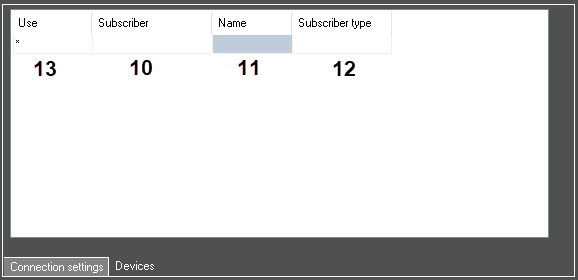
- On the Devices tab, select the devices of the third-party SIP server that will be used on the IntellectAxxon PSIM SIP server:
- From the Subscriber drop-down list (10), select the device number;
- The Name (11) and Subscriber type (12) fields will display the device name and type, respectively;
- In the Use column (13), put * (asterix) in front of the devices that will be used.
- From the Subscriber drop-down list (10), select the device number;
- Click the Apply button.
...
Overview
Content Tools

