
Go to documentation repository
You can select and configure cameras for transmitting the video signals through Videogate in two ways:
- Separately. Use the settings panel of the Videogate object.
In bulk. Use the Add/Edit Camera Objects dialog box.
Note
Order of bulk selection of video cameras for transmitting video signals through the Videogate is described in Selecting video cameras in bulk for the Videogate module.
To select cameras on the settings panel of the Videogate object, do the following:
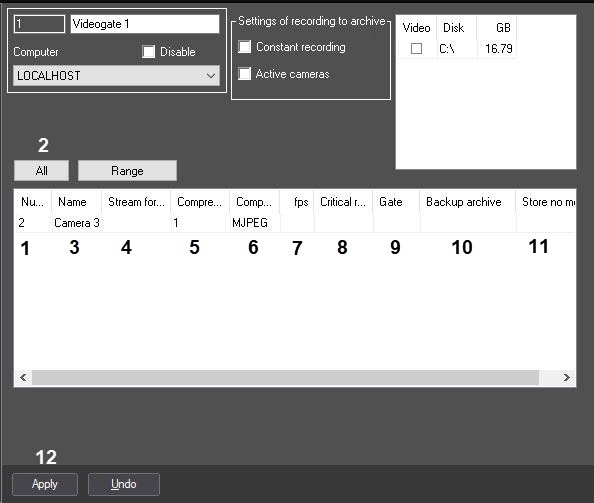
- Go to the settings panel of the Videogate system object.
From the drop-down list in the Number column, select the number of the required video camera (1).
Note
To select all cameras, registered in the system, click the All button (2).- As a result, the Name column will display the name of the selected camera (3).
- From the Stream for archive drop-down list, select the video stream from the Server that you want to use to record the videogate archive (4). By default, the Archive stream that the Server uses for constant recording is recorded (see also Configuration of multistream video).
In case, you want to change the compression level of the video signal for transmitting through the Videogate, from the drop-down list in the Compression column, select the required compression level of video signal (5). Compression level of the video signal increases from 0 (no compression) to 5 (maximum compression).
Note
If you set the compression level, the video signal on the Server has to be preliminary decompressed, which significantly increases the load on the Server CPU.
To change the algorithm of video signal compression for transmitting through the Videogate, from the Compressor drop-down list, select the required compression algorithm (6). If you specify the compressor, the value in the Compression list must be selected (5). If you specify the compression level, but don't select the Compressor, the Motion Wavelet compressor is used.
Note
Recompression is performed on the Server side.In case, you want to thin out the video signal for transmitting through the Videogate, in the field in the fps column, enter the required frame rate of the video signal (7).
Note
The specified fps value must be less than the frame rate of the video signal digitizing by the video input device. Otherwise the frame rate of video signal will be equal to the frame rate of digitizing.
The specified fps value must not be less than 0.01 which corresponds to transmission of one frame in 100 seconds.Note
For the correct thinning of a video stream compressed using the H.264 or MPEG4 codecs, the fps value must be equal to key frame rate specified in the device (IP camera) or Axxon PSIM settings (see Configuring video compression).In case, you want to control the transmission of video signals through the local network from the Server to the Videogate, in the field in the Critical rate column, enter minimum available value of frame rate of video signals, transmitted to the Videogate (8).
Note
The value specified in the Critical rate column should not be greater than the frame rate of video signal, transmitted to the Videogate.
The setting of critical rate on the Videogate must be combined with the settings of the Alarm Messages Window system object (see Setting up the Alarm Message window). In this case, with the reduction of rate of input signals below the given value, the Alarm messages window will be displayed with the message Reduced input rate.- In case, when video signal from the selected video camera should be received from another Videogate object, from the drop-down list in the Gate column, select the name of this object (9).
In case, when the video archive for the selected camera has to be received from the Backup archive object, from the drop-down list in the Backup archive column, select the name of this object (10).
Attention!
The selected value must coincide with the value that is specified when configuring video cameras that should be displayed on the Video surveillance monitor for this Camera—see Selecting and configuring video cameras.- In the Store no more than (hours) field, enter the time period in hours after which you want to delete the recordings of the corresponding camera from the Videogate (11). The parameter must be set according to the same rules as for the main archive—see Configuring video camera archive depth.
- Repeat steps 2-11 for all required cameras.
- To save all the changes, click the Apply button (12).
Selecting cameras on the settings panel of the Videogate object is completed.
Overview
Content Tools